MTV Lessons- Hickman

Think-Puzzle-Explore: College  (pg. 71-77)

For this lesson I plan to ask students, what do you think you know about college? What puzzles you about college? And how can we explore answers to our questions. This lesson allows students to connect to prior knowledge including allowing us to become aware of the microconceptions students have about this topic. I appreciate the Importance of language in this lesson. Our prospective student audience varies drastically as far as how much students think they might know, so it’s important not to make anyone feel like they don’t know enough.

  1. Set up: Each student will begin class with post-it notes and a pen on their desk. There will be a graph on the board in the front of the room split into two sections labeled “think” and “puzzle”.
  2. Ask: I will ask students, what do you think you know about college? Students will jot down their thoughts on at least two post-it notes but will be encouraged to write as many as they would like within two minutes. During the two minutes students will walk up to the board and post their notes under the “think” column.
  3. Ask: Next I will ask students, what puzzles you about college? What questions do you have. Again, students will jot down their ideas on at least two post-it notes in two minutes. Notes can then be attached at the front of the room under “puzzle”.
  4. Share the thinking: After students complete the “what do you think you know” and “what puzzles you” questions and have posted their thoughts on the board, I will ask for two volunteers. One student volunteer with go through the “think” side and place post-it notes with the same theme in groups. Another student volunteer with place the post-it notes in the “puzzle” side in groups with similar themes as well. While the two students are grouping the post-it notes, I will share with students this Youtube video about common misconceptions.

This video will allow students to think about misconceptions in a fun and entertaining way which will hopefully allow them to not feel self conscious about what they know or don’t know. Once the volunteers have grouped the two categories, I will go through and read aloud what students think they know about college and what confuses them about college.

5. Ask: Finally, I will ask “How can we explore these puzzles?” What are the steps we can take to find answers to our questions? Who should we ask? I will encourage students to follow trusted sites about college on their social media accounts such as,

https://www.facebook.com/theacttest/

https://www.facebook.com/thecollegeboard


I will lead this conversation into the beginning of our topic which would cover college readiness and Miami University information. We can also revisit this question at the end of the presentation for those who still have puzzles they’re thinking of and what their next steps should be.

I could also use these supporting articles to address additional myths about college.

https://www.fastweb.com/college-search/articles/the-10-completely-false-college-myths

https://www.fastweb.com/college-search/articles/debunking-common-college-misconceptions


Tug-of-War: Traditional vs. Non-Traditional College Options  (pg. 199-206)

I would use this lesson to encourage students to talk about the traditional college route compared to a non-traditional route. Many students may feel strongly about one side or the other, taking a stance too quickly and rushing to defend it without pausing to understand alternative perspectives. The tug-of-war lesson will allow students to think deeply on how important or unimportant pulls will be.

  1. Set up: Students will be split up into groups of 4. Each group will be given a small dry erase board and a dry erase marker as well as a pack of post-it notes. I will ask that one student in the group draw a line on the board from one end to the other. On one end the student will write “traditional college route” and on the other, “non-traditional college route”. I will give students 2 minutes to discuss among themselves what they each think these two routes mean. When the 2 minutes is up, I will ask each group to share what they think traditional and nontraditional routes mean. Each group can have varying answers, however this should help each group to have a more specific foundation to continue the activity.
  2. Consider the “tugs”: Since there is really no right or wrong answer, I will ask the students to next jot down on post-it notes, reasons why students may choose one option or the other. They will do this as individuals for 2 minutes coming up with at least three reasons.
  3. Place the “tugs”: Once students have come up with their reasons, they will spend the next 5 minutes as a group discussing what they have each written down and where they should be placed on the line.
  4. Ask what if? What about? Questions: After students have placed their ideas and talked about their reasoning I will ask questions regarding different scenarios. How would a student’s opinions differ if they recently had a baby? If they just returned from deployment? If their parents were paying for college for them? I would encourage students to look through different lenses.
  5. Share the thinking: To wrap up the activity I will encourage groups to share what they wrote on their post-it notes and where they placed them. Each group can contribute if they had different reasoning.


After participating in the tug-of-war activity, I will show this Youtube video which gives some insight into the multitude of options after graduation.


Assessment- I will be using these MTV lessons during short visits in high school classrooms. While it is not typical that I would be in the same classroom for multiple days in a row, it will be important to gather feedback from teachers and students. The day following my visit to the classroom, I will follow up with the teacher to ask for feedback regarding the lesson. I will ask if there was anything that could have been changed or done differently to improve the lesson. This feedback will allow me to make adjustments for future lessons.


Posted in Misc | 9 Comments

Prince – MTV Stategies

Strategy#1 : See-Think-Wonder

Age group of children: 3-4 years (preschool age)

Ohio Department of Education Early Learning Standards:
Strand: Geography
Topic:Spatial Thinking and Skills
STANDARD STATEMENT Demonstrate a beginning understanding of maps as actual representations of places.

Strand:Listening & Speaking
Topic: Expressive Language
STANDARD STATEMENT Use language to communicate in a variety of ways with others to share observations, ideas and experiences; problem-solve, reason, predict and seek new information.

Strand:Creativity
Topic:Innovation and Invention
Standard Statement: Use imagination and creativity to interact with objects and materials.

Strand:Creativity
Topic:Expression of Ideas and Feelings Through the Arts
STANDARD STATEMENT
Express interest in and show appreciation for the creative work of others

General Unit Theme: The curriculum at La Casita Learning Center is focused on different Spanish Speaking Countries and Cultures throughout the summer. Different age children at the center have varying abilities to understand the concept of place or location.

Guiding Questions for Unit:
What does place or location mean? This concept is developed with young children by first beginning with their personal places and locations. Home, school etc.

How can people represent objects within their place or location? ART – PAINTING WITH WATERCOLORS

Materials: Watercolor Pictures, Art Easels, Watercolors, Paint brushes

Step 1: Ask the children what art is and record their responses. Ask the children how people “do” art and record their responses. Give examples as needed to get the children thinking. Then talk with the children about what people try to show with their art. Give examples.

Step 2: Show children pictures of watercolor art from Guatemala. Show children where Guatemala is on the globe and where we are in relation to Guatemala.

Tell the children these are watercolor paintings by people who live in Guatemala.

Ask the children to spend 3 minutes looking at the pictures Ask them to describe what they see the artists from Guatemala are trying to show with their watercolor art; “Yo veo……….” Generate a list of what the children say.

Step 2 Sit in a semicircle with paintings displayed and ask children to tell them what seeing the pictures makes them think of. Use open discussion.

Step 3 Describe and model what the word “wonder” means and then ask the kids what seeing the pictures and thinking about the pictures makes them wonder. Use open discussion.

Step 4 Model “I wonder what I could represent by painting in watercolors?” by showing the last couple strokes of a painting completed by teacher.

Step 5 Ask the children to think of something they would like to represent by painting in watercolors. Then have them close their eyes to try to see what it would look like.

Step 6 Each child has set of watercolors and paper to begin painting.

Take a look at our Artistas with this lesson.

https://www.facebook.com/lacasitalanguagecenter/?hc_ref=PAGES_TIMELINE

Step 7 Instructor asks the children to describe what they are painting and then when finished they share with the others.

Evaluation: Formative – Did the child paint with watercolors? Was he/she able to express what his/her drawing represented to peers and teacher?

Strategy #2 – CSI: COLOR, SYMBOL, IMAGE

Age group of children: 8-10 years (3rd-5th grade)

General Unit Theme: Spanish Speaking Countries/Cultures

Ohio Learning Standards Grade 3 – Social Studies

Theme: Communities: Past and Present, Near and Far
Strand: Geography

Topic: Places and Regions
A place is a location having distinctive characteristics, which give it meaning and character and distinguish it from other locations. A region is an area with one or more common characteristics, which give it a measure of homogeneity and make it different from surrounding areas. Regions and places are human constructs.

Topic:Spatial Thinking and Skills
Spatial thinking examines the relationships among people, places and environments by mapping and graphing geographic data. Geographic data are compiled, organized, stored and made visible using traditional and geospatial technologies. Students need to be able to access, read, interpret and create maps and other geographic representations as tools of analysis.

Materials: Maps, Books on Guatemala, Chart Paper, Various drawing tools (crayons, colored pencils, markers)

Guiding Questions & Steps for Lesson:

Step One:What does place or location mean? Ask the children to find Guatemala on their maps and go to the globe to show where Guatemala is located in relation to Ohio.

Step Two: How do people interact with their families within their place or location? How is this similar or different to the way you interact with your family? Show the picture of a Guatemalan family. Ask students to think about what they see in this family. Write what they say on whiteboard. (This is 1 representation of 1 Guatemalan family. Families are very diverse in Guatemala and this is very important for the children to know up front.)

Step Two: Choose a symbol that reflects a similarity you feel your family has with this family. Ask the children to draw the symbol.

Step Three: Choose a symbol that reflects a difference you feel your family has with this family. Ask the children to draw the symbol.

Step Four: Partner the children and ask them to take a look at the symbols they chose for similarities and differences. Ask them to guess what each of their partner’s symbols represent and then share the artist’s meanings after partners have had time to guess.

Evaluation: Formative = Is the child able to locate Guatemala on the map and show where it is in relation to Ohio? Did the child choose one symbol to represent a similarity and one symbol to represent a difference? Did the child have discussion with his/her partner and did he/she guess what the other’s symbol represented?

Posted in Making Thinking Visible | Tagged , , , | 17 Comments

Coldiron_MTV Strategies

Lesson 1 1st Grade Art: Intro to Ancient Architecture (See – Think – Wonder)

Lesson Objective: This lesson will introduce students to ancient architecture of Greece and the Mediterranean. The see, think, wonder exercise will help students to generate ideas for their own work through observation. Students will use their answers from the exercise to create a drawing and purpose of an ancient building.

Timing: This lesson will take approximately 50 minutes. However, there will be a follow up discussion as students start a final art work during the next class, based off the rough sketch they complete during this lesson.

Standards:

3PE Examine one or more cultural and historical artworks and respond to the visual, expressive features in the work.

4PR Create an artwork based on observation of familiar objects and scenes.

2PR Invent imagery and symbols to express thoughts and feelings.

5RE Discuss the meanings of visual symbols, images and icons observed in artworks.

Materials:

  • Teacher: White board, Projector, Dry erase marker, Large format images of Greek architecture and local architecture
  • Student: Mixed Media Paper 9X12in, Pencil, Color Pencils, Black Washable Marker

Setup: During this exercise, the teacher will record answers on the board in three columns See, Think, and Wonder, the teacher will draw the shapes students see over top of each images. After the See, Think and Wonder, process is complete the table of the week will pass out color pencils, paper and markers to students.

See:

The Parthenon

Temple of Isis

City of Petra

See Images 1st A photo of the Parthenon 2nd An image of the Temple of Isis 3rd The city of Petra

  • What shapes do you see? Are there any shapes that are used in all the pictures? What color are the objects you see? What else do you see?

Think:

Brown County Court House

Ripley Mansion

The White House

Think Images 1st A photo of the Brown County Court House 2nd The Ripley Mansion 3rd The White House

These images share characteristics of Mediterranean architecture and may be recognizable to students. The think images will be shared after students have been asked about where or when they have seen buildings that look similar to the ones pictured in the see section.

  • What do you think about when you see them? What about the image makes you think that? Can you think of building like these that you’ve seen in real life? What might the building be made of?

Wonder:

  • Do you wonder anything about these buildings? What questions do you still have?

Discussion: What ideas do you have for creating your own ancient building? What would you use your building for?

The Three kinds of Greek columns Doric, Ionic, Corinthian

http://kids.britannica.com/kids/assembly/view/95051

Assessment:

Informal: Students will use the examples given in the See, Think, Wonder exercise to create their own image of an ancient building; taking inspiration from the shapes, colors, and ideas of their classmates. Students will be asked to give their building a purpose answering what their building is used for by writing the answer on the back of their paper. Students should use symbols colors and shapes in their drawing that will help the viewer determine its function.

Formal: In the following lesson students will use their rough sketch to create a final ancient building painting made from outlining, cutting, and gluing their building to a secondary color study done earlier in the unit. Student will be asked to complete a small rubric rating their work from 1 to 4 on craftsmanship, creativity, and clean up. Followed by a one question short answer giving one example of how their painting compares to the ancient buildings studied.

Social Media:

Greek Architecture Flickr (Safe Search)

https://www.flickr.com/search/?text=greek%20architecture

#MetKids—How Can I Recognize Ancient Greek Architecture?


Lesson 2 3rd Grade Art: Identifying Art Elements/Communicating through Art (Zoom In)

Lesson Objective: In this lesson students will hone their listening and use a full art vocabulary to communicate with a partner. They will use their imagination to fill in the blanks and create an independent piece of art. Student will learn to analyses  small areas of an art work paying close attention to the details within each area. As well as identify what art elements are used in a work.

Timing: This lesson was designed to take 50 minutes, one class period, giving 10 minutes for students to really study the image they plan to communicate, and 30 minutes to investigate and record findings of their art card. The remaining 10 minutes will be spent on answering follow up questions.

 Standards:

2PE Identify the relationships between and among selected elements and principles of art and design.

2PR Use appropriate visual art vocabulary during artmaking processes.

3PR Find and solve problems of personal relevance and interest when developing artmaking ideas.

6PR Collaborate with others to create a work of art that addresses an interdisciplinary theme.

Materials:

  • Teacher: White board, dry erase maker, example large format art work card
  • Students: White construction paper 9X12in, Pencil, color markers, dry erase markers, notebook paper, post-it notes, and art work cards

Set up:

  • Teacher: Before the lesson the teacher will find famous works of art that challenge thinking and promote connections to the art elements covered within the unit. They will be printed in color and laminated.
  • Student: At the beginning of this exercise students will choose a partner and each will be given a card with a significant art work on it. Each student will write a list of steps to re-draw the work. One at a time students will guide the other in drawing the image stopping half way through their list of steps to allow their partner to record what they think they know about the drawing.

Example Art Card 1

Keith Haring, DJ

Example Art Card 2

Hokusai, The Great Wave off Kanagawa

Reveal: After each student has completed their drawing half way and recorded their thoughts their partner will reveal a quarter of the image to them.

Repeat: Students will record what they see and how it is the same or different from their original idea. They will make any needed changes to their work. Students will repeat this step three times until the full image is revealed.

Share: Students will be sharing their ideas with their partner throughout the process of creating and evaluating the art work. In addition students will discuss what they would change and what was successful when describing the art work for their partner.

Follow Up Activity: Students will use a dry erase marker to outline and point out the art elements they see in their revealed piece of art. Pointing out where they see value, texture, shapes, colors, line, space, and form.

A visual aid will be displayed to help students identify the elements of art on their art card, and to help promote the use of art vocabulary throughout class discussion.

Elements of Art

Assessment: Each partner will evaluate how well they themselves explained the first steps in the drawing giving themselves a rating of 1 through 4. Students will then write a short explanation about the difference between the verbal and visual information they were given. As well as what they thought they were drawing at each stage of their interpretations. At the bottom of their response they will give examples of three art elements they see on their art card, and explain where it is present in the original work. Students will finish the assignment by submitting their drawing and their written work.

Social Media:

Elements of Art Series, KQED Art School

Elements of Art (Line) Board, Pinterest

https://www.pinterest.com/ateleristacise/line-element-of-art-elementary-art-class/


Posted in Making Thinking Visible | Tagged , , , , , , , | 54 Comments

Frydryk – MTV Strategies

Headlines (Modification):  Derivatives & Their Applications

Overview/Objective:  Students will use their knowledge of derivatives to write a headline that conveys their understanding of the concept of derivatives, then write a new headline (separate from the previous headlines) as each new application of derivatives is learned.
A culminating headline will be written at the end of the unit on derivatives that encapsulates all of the headlines that have already been written.
I chose this content because I found that students often lost sight of the purpose/role/origin of derivatives, especially as there were more and more applications of them that connected to other mathematical concepts.  Using this thinking routine will hopefully provide students with an avenue to become adjusted to looking for the big idea throughout a unit.
The process of writing headlines will be repeated multiple times.  It is estimated that with individual writing time and group sharing time, each headlines session will take approximately 10-15 minutes.  The final sharing time (Invite Further Sharing) is estimated to take 15-20 minutes.

Prior Knowledge Needed/When to Teach:  This activity will occur in Calculus throughout the unit on derivatives, beginning after the introduction to derivatives.

Standards:  Note: there are no state standards for calculus.  The specific content objectives are listed.
– determine the local or global extreme values of a function
– apply the Mean Value Theorem
– find the intervals on which a function in increasing or decreasing
– use the first and second derivative test to determine the local extreme values of a function
– determine the concavity of a function and locate the points of inflection by analyzing the second derivative
– graph f(x) using information about f'(x)
– solve application problems involving finding minimum or maximum values of functions
– solve related rate problems

Materials:
– Students will need a piece of paper or computer at various times throughout the process.
– Butcher paper (or other paper than can be written on and hung in the room) will be needed

Lesson Outline:
Set Up:
– After being introduced to the concept of derivatives, students will be asked to think about the big ideas related to derivatives.

Write a Headline:
– Students are asked to individually “write a headline for ‘derivatives’ that explains an important idea that you think is valuable to remember” in 15 words or fewer.
– As suggested by Karrie Tufts (case study from Ritchhart p. 115-118), students will also be asked to give “a little more of the story” (Ritchhart p. 116).
– These will be kept by the student, either in a notebook, binder, or digitally so that they can be accessed later (the medium is up to the student, they need to be able to be accessed later).

Share the Thinking:
– After students write their headline individually, students will share their headline with a partner.
– As a team, they will discuss their headlines and their reason behind choosing their words as they did.
– They will then combine their individual headlines into one and it on butcher paper to be posted in the classroom for reference throughout the unit. This will be done in order to have reminders of what derivatives truly mean as the content gets “crowded” with more and more applications.

Rinse and Repeat:
– These three steps of Set Up, Write a Headline, Share the Thinking will be repeated after each new application of derivatives is introduced (extreme values, Mean Value Theorem, increasing/decreasing intervals of a function, concavity of a function, optimization, related rates), using the prompt: “Write a headline for _________ (each application of derivatives listed above) that explains an important idea that you think is valuable to remember.”
– The individual headlines will all be kept in one location (chosen by the student, either digital or hard copy).
– The partner headlines will all be posted in the classroom.

Invite Further Sharing:
– At the end of the unit on derivatives, each student will have a collection of 7 headlines, as well as the headlines posted in class.
– Students will then work individually to write one headline that encapsulates all of their previous headlines about derivatives.
– These headlines will be shared to the class, and a discussion about common themes will occur.
– Optional: A gallery walk can be done where students walk around and view their classmates’ headlines.  This can be turned into a journaling assignment where they comment on their classmates’ headlines, as well as the common themes and different ideas that are focused on throughout the class.

Assessment:
This activity works great as informal formative assessment to see whether students are understanding the concepts as they are covered in class. Checking in with individual students to see their headlines can aid with this.  By having students write their headlines individually (and give “a little more of the story”), I will be able to see if there are conceptual misunderstandings or gaps in instruction, as well as getting an idea of how deeply each student is understanding the material.
– Optional: This final piece of the activity can be used as a formal assessment at the end of this chapter.

Notes to Teacher:
– Remind students of some strategies of writing headlines! Fewer, more powerful words are often more effective in capturing attention than more words.

Sources:
Ritchhart, R., Church, M., Morrison, K., & Perkins, D. (2011). Making thinking visible: how to promote engagement, understanding, and independence for all learners. San Francisco, CA: Jossey-Bass.


3-2-1 Bridge:  Solving Systems of Equations

Overview/Objective:
This activity is meant to help students gather their preexisting knowledge regarding solving systems of equations prior to beginning the unit.  From my experience, most students have some knowledge about solving systems of equations from Algebra 1.  By completing the second step of 3-2-1 Bridge at the end of the chapter, students will have the opportunity to see how their knowledge and understanding has shifted/grown as a result of the learning.
This is a 2-part activity.  The first 3-2-1 and discussion is estimated to take 15-20 minutes, depending on the depth of discussion.  The second 3-2-1, Bridge, discussion, and journaling is estimated to take 20-30 minutes, with the possibility of journaling at home.

Prior Knowledge Needed/When to Teach:  Students will do this 3-2-1 Bridge activity at the beginning and end of the unit on systems of equations in Algebra 2.

Standards Addressed in this Unit:
A-CED.A.2 Create equations in two or more variables to represent relationships between quantities, graph equations on coordinate axes with labels and scales.
A-CED.A.3 Represent constraints by equations or inequalities, and by systems of equations and/or inequalities, and interpret solutions as viable or nonviable options in a modeling context.
A-REI.C.5 Prove that, given a system of two equations in two variables, replacing one equation by the sum of that equation and a multiple of the other produces a system with the same solutions.
A-REI.C.6 Solve systems of linear equations, exactly and approximately (e.g., with graphs), focusing on pairs of linear equations in two variables.
A-REI.C.8 Represent a system of linear equations as a single matrix equation in a vector variable.
A-REI.D.11 Explain why the x-coordinates of the points where the graphs of the equations  and  intersect are the solutions of the equation ; find the solutions approximately, e.g., using technology to graph the functions, make tables of values, or find successive approximations.

Materials:
– student computers
– projector for class

Outline:
Set Up:
– Students will record their thoughts digitally in two places:
1) they will submit a Microsoft Form (similar to a GoogleForm, but Microsoft, as my school is now using a Microsoft platform) with their answers so that I can see individual responses
2) they will submit part of their responses using a digital resource called Answer Garden (detailed later)
– Note: this can also be done using a piece of paper, but the discussion period will look different since answers cannot be displayed.

First 3-2-1:
Students will go to bit.ly/frydrykMTVsystemsform (sample shown).  They will have 2-3 minutes to fill out the form that asks for:
Three Words that come to mind when they hear the phrase “solving systems of equations algebraically”
Two Questions that come to mind when they hear the phrase “solving systems of equations algebraically”
One Metaphor/Simile for “solving systems of equations algebraically”
– While on that webpage, students are linked to an Answer Garden where they will submit their 3 words. The system will populate the projector screen with their classmates’ answers in the class for all to see (sample answers have been populated in this screen, shown below).– This same process will be repeated with the phrase “solving systems of equations graphically”.

Debriefing/Discussion:  Two different pieces will be used to discuss and debrief this initial 3-2-1:
– The Answer Garden image (sample shown above)
– The 2 Questions and 1 Metaphor students provided (no names will be displayed) from an Excel spreadsheet

Provide an Instructional Period:
Over the next 10 – 12 instructional days, students will learn about how to solve systems of equations in both two- and three-variables in multiple ways (ex. guess-and-check, graphically, tables, substitution, elimination, matrices).

Perform the Second 3-2-1:
Students will do the 3-2-1’s again, this time they will write their answers on paper.

Share the Thinking:  Bridging:
– I will pass out a print-out to each student with their answers from the first 3-2-1’s (easily done by printing out the Excel spreadsheet and cutting the rows per student into strips).
– In pairs, students will trade their papers and read their partner’s 3-2-1 responses from both before and after the unit. Each partner will comment on how they noticed their partner’s knowledge/understanding change as a result of the instruction.
– This discussion will continue individually as a journaling assignment as students explain how their own thinking evolved, as well as what insight having their partner provide feedback gave them.

Assessment:
The first 3-2-1’s will be used as both an individual and class pre-assessment to see if there are any topics that can be skipped, if additional depth can be added to a topic, or if differentiation is needed for specific students (high and/or low).  I will have access to the results, with student names attached so that differentiation can be done as needed, via an Excel spreadsheet.
The last piece of Bridging where students individually journal (possible outline included in Notes to Teacher) about their Bridge can be used a part of a formal cumulative assessment to see students’ awareness of the content.  It can also be used to launch students into an individual or group exploration of topics that they wish to further learn about based on their questions from the second bridge.  A third option is to use the Bridge piece as a review before a cumulative assessment is given.

Notes to Teacher:
If the journal is to be an assessment, pieces to look for could include:
– Acknowledgement of how their choice of words shifted over time
– Provide an explanation of why they think their choice of words shifted over time
– If their first questions were answered, when? If their first questions were not answered, what resources could help them find the answer?
– Find the answer to one of their two final 3-2-1 questions. Include resources used (online or other).
– Explanation of their similes/metaphors in detail (so that someone who did not understand what a metaphor or simile was could understand the connections that are being made)
– Explanation of what insights their partner was able to provide

Posted in Making Thinking Visible | Tagged , , , , , , | 26 Comments

Bradford – MTV Strategies

Rules of Exponents: “Used to Think” Method

Lesson Objectives For this lesson, students are learning to combine rules of exponents to simplify expressions.  This activity was created to reveal student misconceptions about exponential expressions, and to cause students to critically think about exponents.  This activity encourages students to think about their individual rules for exponents, as well as the “why” behind each rule.

Although students will be problem solving with a partner, at the end of the activity they will reflect upon what they used to think about exponents, and what they now know following the activity.

Lesson Standards CCSS.MATH.CONTENT.8.EE.A.1 Know and apply the properties of integer exponents to generate equivalent numerical expressions. For example, 32 × 3-5 = 3-3 = 1/33 = 1/27.

CCSS.MATH.PRACTICE.MP2 Reason abstractly and quantitatively.

CCSS.MATH.PRACTICE.MP3 Construct viable arguments and critique the reasoning of others.

CCSS.MATH.PRACTICE.MP5 Use appropriate tools strategically.

CCSS.MATH.PRACTICE.MP7 Look for and make use of structure.

CCSS.MATH.PRACTICE.MP8 Look for and express regularity in repeated reasoning.

Prior Knowledge This lesson is intended for a 7th or 8th grade classroom in which students are first introduced to exponent rules.

Prior to this lesson, students have learned order of operations, and the following exponent rules: multiplying powers with the same base, power of a product, and power of a power.

Why Use the “Used to Think” Method? When teaching rules of exponents, many misconceptions can arise.  The goal of this activity is to cause students to identify some of their misconceptions, learn from their mistakes, and understand the content at a deeper level.  The “Used to Think” method allows students first to learn from their mistakes, but also become more aware of how their level of understanding changes as they critically think about a topic.
Materials and Set-Up Materials:

  • Envelopes with Exponent Cards (See Below)
  • Pencil and Paper (Students)
  • White board/Poster board (Teacher)

Set-Up:

In this lesson, students will be working with partners to match unsimplified exponential expressions to their corresponding simplified expressions.

The teacher should copy and cut the exponential expression cards seen below, and will put the set of cards in an envelope.  Each group of students will receive one envelope containing the set of 10 cards.  Many of the expressions below have similar simplified expressions, which will encourage students to think critically about how exponential expressions are simplified.

Outline (1)    The teacher will pass out a set of cards to each group, and will explain that the students’ goal is to match an unsimplified expression to a simplified expression.

Note: If students struggle to understand what is meant by simplifying expressions, the teacher can provide some insight by comparing simplifying expressions to simplifying sentences in English class.  The following is an example of simplifying sentences:

“You and I should both get in the car and go to the grocery store at the end of the street to pick up icecream.”

“Let’s go get icecream at Kroger.”

Clearly, the second sentence is much simpler.  This example would help students to understand the difference between unsimplified and simplified expressions, as well as the value in simplifying expressions.

Another example the teacher can use to help students understand the importance of simplifying expressions can be found here.

(2)    Students will discuss with their partners and try to match the expressions.

Note: Many different conversations and misconceptions will arise as students look at the matching cards.  For example, some students may struggle to identify the difference between an unsimplified and simplified expression, which could lead to conversations about what makes an expression simplified.  Some students may match incorrectly because they mix up when they should add exponents and when they should multiply.  This may lead to conversations of how it is important to understand “why” the rules work the way they do (exponents are repeated multiplication), and not just what the rules are.

(3)    After completing the task, students will check in with the teacher, and if they make any mistakes will be asked to correct their matches.

(4)    Once students complete the assignment, the teacher will lead students into the “Used to Think” portion of the lesson.  A sample script is given below.

“Before this activity, you all had some ideas of how to simplify expressions with exponents.  I want you to write down a few sentences about what you used to think about expressions with exponents. “

[The teacher should give students plenty of time to process and write.]

“Now I want you to think about how your ideas about exponents have changed after this activity. Again, write down a few sentences and what you now think about expressions with exponents.”

[Again, the teacher should give students plenty of time to process and write.]

(5)    Once students have written what they used to think and now think, the teacher can ask students to share their change in thinking with the class.  The teacher should look for ways to ask questions and push students to think about the content at a more critical level.

Notes:

  • Before classroom discussion, the teacher could have students share their responses with a partner.  This could provide students with more time to process what they have learned.  It may also create a foundation for students to communicate their own perspectives during group discussion.  (The teacher could also choose to have students share their responses with a partner following group discussion if he or she chooses to.)
  • The teacher can record student responses on a large poster board, that could then be used to demonstrate to the students how and what they learned through the activity. This could be a beneficial visualization for students to look back over as they progress in their understanding of exponents.
Lesson Extension As an extension for the lesson, students can create their own sets of 5 matching cards.  Students should be sure to include examples that address all of the rules they have learned so far (multiplying powers with the same base, power of a product, and power of a power) in their cards.  This extension allows for students to synthesize what they have learned, and therefore leads to more reflection and a deeper level of understanding.  It also creates a space for students to reflect upon what they have learned throughout the lesson.

The teacher can also use this video as a reteach and preview of future rules if desired: Exponent Song

Assessment Formative assessments:

  • The “teacher check” step in the matching activity provides an opportunity for the teacher to informally assess student understanding, and allows students to correct work based on teacher feedback.
  • The written responses and whole group discussion from the “Used to Think” portion of the lesson could allow the teacher to informally assess student understanding, and identify areas where students may still have misconceptions with the content.

Summative assessment:

  • The teacher can use the lesson extension as a summative assessment to check student understanding.


Circumference of Circles: “See, Think, Wonder” Method

Lesson Objectives The goal of this lesson is for students to recognize the relationship between the circumference of a circle and either its radius or diameter.  Following this lesson, students should be able to identify that the ratio of the circumference to the diameter is pi, and the ratio of circumference to radius is pi.  Following the lesson, students should also recognize that if they know the radius or diameter of a circle, they can then find the circumference.

Circumference Comic

Standards CCSS.MATH.CONTENT.7.G.B.4 Know the formulas for the area and circumference of a circle and use them to solve problems; give an informal derivation of the relationship between the circumference and area of a circle.

CCSS.MATH.PRACTICE.MP2 Reason abstractly and quantitatively.

CCSS.MATH.PRACTICE.MP3 Construct viable arguments and critique the reasoning of others.

CCSS.MATH.PRACTICE.MP4 Model with mathematics.

CCSS.MATH.PRACTICE.MP5 Use appropriate tools strategically.

CCSS.MATH.PRACTICE.MP7 Look for and make use of structure.

CCSS.MATH.PRACTICE.MP8 Look for and express regularity in repeated reasoning.

Prior Knowledge The target audience of this lesson is 7th grade students.

Before this lesson, students have learned basic circle vocabulary (circumference, radius, diameter), but have not performed any area or circumference explorations.  Most students have also heard of  and know that it is approximately 3.14, but do not know that pi is the ratio of circumference to diameter.

Why Use the “See, Think, Wonder” Method? This lesson is an introduction into relating radius and diameter to the circumference of a circle. The goal for students is to view the radius, diameter, and circumference of each circle, think about how these measurements relate, and then wonder if this relationship occurs in all cases, and how it can be used in future cases.
Materials and Set-Up Materials:

  • Pencil and Paper (Students)
  • White board/Projector (Teacher)
  • Poster board (Teacher)

Set-Up:

Before students come in the room, the teacher should draw or project images of four circles of differing size on the board.  Below the first three circles, the teacher should record measurements of circumference, radius, and diameter.  Below the fourth circle, the teacher should write the diameter, but leave circumference blank. An example of this is given below.

Outline (1)    When students come in, the teacher should explain that he or she measured the radius and the diameter of the circles using a ruler, and then used measuring tape to find the circumferenceThe teacher can then say, “Notice that on the third circle, the circumference is not given.  Our goal today is to figure out what it would be without measuring.

(2)    See: Ask students to independently write down what they see looking at the first three circles (Note: This step can be done as a “Think-Pair-Share” with a partner.).  After students write something down, have them share with the class what they see.

(3)    Think: Ask students to independently write what they think is happening with the circles (Note: This step can also be done as a “Think-Pair-Share” with a partner.).  After students write something down, have them share with the class what they think about it.

(4)    Wonder: Ask students independently write what they wonder is true about the relationship between circumference and radius, and how they might find the circumference of a circle (Note: This step can also be done as a “Think-Pair-Share” with a partner.).  After students write something down, have them share with the class what they think about it.

(5)    Extension: Following class discussion, students could take time to record what they have learned from today’s lesson, and summarize in their own words how radius and diameter relate to the circumference of a circle.  They could also record any questions they have about circumference that the day’s lesson brought up.

Notes:

  • Students should be given plenty of time to work through each stage, and to discuss each stage as a class.  Students will discover the relationship between radius/diameter and circumference if given time to explore and process with other students.
  • The teacher can use a poster board to record student responses from “See, Think, Wonder.”  This could be a useful learning tool, as well as a way for students to visualize what they are learning.
  • Because students are actively participating in the learning process and thinking about their learning, they are more likely to reach understanding and take ownership of their own learning.
Assessment Formative Assessment:

  • The teacher can use the informal partner and whole group conversations to assess student understanding of circumference.
  • The teacher can collect what students have written down during the “See, Think, Wonder” process to assess student understanding of circumference.
  • The teacher can also collect the extension portion of the lesson to check for student understanding, and to identify what students are still confused about.
  • The teacher could also provide basic practice problems as an extension to assess student understanding.

Summative Assessment:

  • A summative assessment would not take place following this lesson, as it is solely an introduction to circumference.


Posted in Making Thinking Visible | Tagged , , , , , , , , , | 15 Comments

Knurek – MTV Strategies

Lesson #1: Real Numbers – Chalk Talk

Overview:

‘Real Numbers’ is the first topic that we cover in Pre-Algebra. Students explore the real number system and discover the difference between rational and irrational numbers. From there, students further categorize rational numbers into integers, whole numbers, and natural numbers.

In order for students to build a deep understanding of the characteristics of rational numbers and irrational numbers, students must first understand what a ‘real number’ actually is. The purpose of this lesson is to explore students’ prior knowledge and interpretation of numbers.

Objectives:

  • Students will be able to give the definition of a “Real Number”.
  • Students will be able to categorize real numbers as Rational or Irrational.

Standards:

  • NS.1: Know that numbers that are not rational are called irrational. Understand informally that every number has a decimal expansion; for rational numbers show that the decimal expansion repeats eventually, and convert a decimal expansion which repeats eventually into a rational number.

 Materials:

  • Teacher:
    • Whiteboard/Markers
  • Students:
    • Pencil/Paper
    • Laptop (for homework)

Lesson Outline:

  1. Introduction: To start the lesson off, the teacher will write “What is a number?” on the whiteboard at the front of the room. This will be the first of two questions students will explore during the lesson.
  1. Explain Activity: The teacher will then explain the process of a ‘chalk talk’. The teacher will tell students that they may freely come up to the board and write their thoughts/ideas, but they may not talk. They will be reminded that the point of a ‘chalk talk’ is to make learning visible. Students can write down questions and ideas, draw pictures, write numbers, etc. Nothing is off limits!
  1. Facilitate Chalk Talk #1: Allow students a good amount of time to put their thoughts/ideas on the board. Walk around and make sure that students are participating without talking. As the teacher, feel free to write something on the board that may prompt a different thought or idea! Encourage students who are not participating by placing a marker on their desk. Ask students to elaborate on what they have already put on the board.
  1. Discussion #1: Ask students to go back to their seats. Allow students to have some time to just look at the board as a whole. They can now talk to one another. Have them discuss any observations that they make. Have them jot down one or two ideas/thoughts that stood out to them. Come back as a class and discuss the question, “What is a number?” Allow all students to participate in the conversation.
  1. Facilitate Chalk Talk #2: Erase the first ‘chalk talk’ and write a new question on the board: “How can we categorize numbers?” Facilitate this second ‘chalk talk’ the same way as the first.
  1. Discussion #2: Facilitate a class discussion in the same manner as before around the question, “How can we categorize numbers?” Allow all students to participate in the conversation. This conversation should transition into the next step, ‘making the connection’.
  1. Making the Connection: To end the lesson, introduce students to the terms ‘Rational’ and ‘Irrational’. Ask students to make connections between the way they were categorizing numbers and how these two terms now categorize numbers. This will also be a teacher-facilitated discussion. Make sure students leave with the correct definitions of these two types of real numbers.


Assessment:

  • Homework: Using a Prezi (prezi.com), students are to create some kind of graphic representation of ‘real numbers’. Students may categorize numbers in different ways, but must show examples of both irrational and rational numbers. Students will share their Prezi with the class. The teacher will use these assignments to facilitate a discussion in the near future.
    • Students will be given the following graphic organizer the next day:

Social Media:

______________________________________________________________

Lesson #2: Scatter Plots – Micro Lab Protocol (Revised)

Overview:

‘Statistics’ is the last topic that we cover in Pre-Algebra. Students observe scatter plots and discuss relationships and patterns in data. Students are introduced to ‘lines of best fit’. In high school, students continue analyzing scatter plots and start the discussion of ‘correlation’.

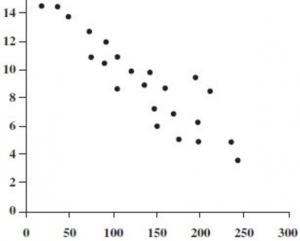
This lesson just focuses on the patterns that students see in scatter plots. Students struggle with making meaning of these patterns in the context of problems. The Micro Lab Protocol is used in this lesson to get students used to interpreting data in front of their peers. The collaboration aspect of this lesson will allow students to engage in deep discussion on patterns in data.

Objectives:

  • Students will be able to interpret a scatter plot.
  • Students will be able to use context to make meaning of data represented in a scatter plot.

 Standards:

  • SP.1: Construct and interpret scatter plots for bivariate measurement data to investigate patterns of association between two quantities. Describe patterns such as clustering, outliers, positive or negative association, linear association, and nonlinear association.

 Materials:

  • Teacher:
    • Scatter plots printed for groups
  • Students:
    • Pencil/Paper
    • Notebook (for notes)

Lesson Outline:

  1. Introduction: Put students in groups of 3 or 4. Pass out 3-4 different scatter plots that all look different in their correlation/pattern. Each student gets one scatter plot.
  • Examples:

  1. Explain Activity: Tell students that they will be given time to interpret the scatter plot, and tell their peers what they think the scatter plot is representing. Walk students through the entire process of the “Micro Lab”.
  1. Sharing: Tell the first student in each group to start their interpretation of their scatter plot to the group. Remind the other students to be silent when their peer is presenting.
  1. Call for silence: After the first student speaks, tell students to allow 20 seconds of ‘quiet time’. Tell students that this time should be used to take in and analyze what their peer just said. After they have spent some quiet time, students should write down notes on what their group member just said. This will be turned in to the teacher at the end of class.
  1. Do rounds 2 and 3: Repeat with the other students in the groups.
  1. Commence Discussion: Tell students that they may have 5 minutes to discuss (as a full group) what everyone said collectively. Encourage students to connect their ideas with one another. What were some similarities? What were some differences?
  1. Share the thinking: As a whole class, we will discuss the ‘thinking’ process that students were observing. Make sure that the conversation is centered around the interpretation and analysis processes that were taking place.
  1. Reveal: After the class discussion, reveal the context behind each scatter plot. Show the labels for the x- and y-axis for each graph. Give students the rest of class to discuss the similarities/differences between their own interpretations and the actual context.

Assessment:

  • Notes: Students should keep written notes of what each student said. These notes will be turned in to the teacher for a grade. The teacher should encourage students to listen first, and to take notes after the student in done talking (and after the ‘quiet time’). This will allow the teacher to visibly see the reflection process.

Social Media:

Posted in Making Thinking Visible | Tagged , , , , | 17 Comments

MTV Strategy Based Lesson Plans_Heller

This blog post contains two lesson plans intended for Algebra I classrooms. The lessons can be adapted for similar topics in pre-algebra or Algebra II with moderate alterations. The two thinking strategies that I chose to highlight are the See-Think-Wonder routine and the Circle of Viewpoints routine.

Lesson One: Introduction to Quadratic Functions: See – Think – Wonder

Lesson Objective: Students will use prior knowledge of quadratic functions from pre-algebra as well as linear equations to identify mathematical properties of the images presented. Students will begin to explore properties of quadratic functions as well as any other mathematical ideas and concepts as they appear in the image.  Students will make connections to the mathematics they already know, what they want to know and the phenomena they observe through a mathematical lens. This activity is designed to be an open-ended activity. There is not one specific property of a quadratic function that should be discovered through the activity, but rather a starting point for students forming meaningful connections to quadratic functions, their properties and graphs.

Lesson Outline: This lesson is intended to get Algebra I students thinking about what a parabola looks like outside of the mathematics classroom. Ideally, this lesson would be used to introduce quadratic functions and their properties so students can associate properties of quadratic functions and graphs of quadratic functions with concrete examples that exist outside of the classroom.

Timing: This lesson is designed for a 45 minute class period and will only take one day. However, if good conversations are occurring, the conversation and extensions may run over into a second day.

Prior knowledge: Students do not necessarily need prior knowledge of quadratic functions to be successful in this activity. There are other mathematical aspects of the images that students may pick up on and wish to discuss.

Standards: 

  • A.CED.1  – I CAN create quadratic equations equations in one variable. 
  • A.REI.4.1 – I CAN solve quadratic equations using completing the square.
  • A.REI.4.2 – I CAN solve quadratic equations by taking square roots, factoring and the quadratic formula.
  • F.IF.1 – I CAN understand domain and range as they relate to a quadratic function. 
  • F.IF.7a.1: – I CAN graph quadratic functions and show key features. 

Set up: Class begins with three images on the board

See: “Are these images mathematical?”


  • Students record what they notice so that they don’t forget by the time the discussion begins.
  • Students discuss their observations with one peer and record shared and different ideas.

Think: Think about how these images are connected to the mathematics you already know. Think about the mathematics you want to know about these images.

  • Students record what they think so that they don’t forget by the time the discussion begins.
  • Students discuss their observations a different peer and record shared and different ideas.

Wonder: Why are these images mathematical? What other structures or images are mathematical? Where else do you see mathematical images such as these outside of the classroom?

  • Students record what they think so that they don’t forget by the time the discussion begins.
  • Students discuss their observations a third peer and record shared and different ideas.

Discussion: A class discussion follows the activity to explore what mathematics students saw, what they thought about that mathematics and where else they see similar mathematics. * If the discussion strays from these topics, that is okay. Discuss any appropriate mathematics students want to explore in the activity.

Video: After the discussion, this video can be used to show students other parabola examples outside of the classroom:  Quadratic Functions and Parabolas in the Real World

Assessment:

  • See: informal assessment of student’s ability to recognize any mathematical properties in the images. As students participate in similar activities, assessment can look for improvement in student’s ability to notice mathematical details and relate those details to prior knowledge
  • Think: Focus on support that students are able to provide for their observations as well as connections to prior mathematical knowledge
  • Wonder: listen to students musings for broad questions and connections that are making relations to mathematics. These questions should not have concrete answers. Also when students suggest other mathematical images, those images should relate to quadratic functions in an out of the box matter.

Materials:

  •  Images to project on board (above)
  • Paper and pencil for students to record observations and thoughts
  • Recording space for student observation and thoughts during discussion

Teacher Notes:  Be sure to allow enough time for students to examine each image through a mathematical lens. This may be tough at first, but don’t guide them to specific properties of quadratics or parts of the image, such as the vertex. Students will draw on their prior knowledge of parabolas, which will take longer for some students to recall than others. The discussion will be the most insightful part of this activity; allow and encourage students to build on each other’s discoveries and thoughts. Avoid pointing out mathematical features of the images and asking students leading questions that point to various aspects of quadratics functions.

Lesson Two: Transformations – Circle of Viewpoints

Lesson Objective: Students will be exploring the various representations of quadratic transformations as they relate to one another as well as the parent function. Students will be provided a graph, equation and table for a quadratic function and will be asked to describe the function using mathematical language. Students will then engage in justifying that each of the mathematical representations are representing the same quadratic transformation. They will communicate using mathematical language and problem solving in order to justify their conclusions. This activity is designed to be a connection creating activity. Students have knowledge of quadratic transformations, tables, graphs, equations and are well versed in communicating mathematically. Thinking is made visible in this activity through proving posing and problem solving.

Lesson Outline: This lesson focuses on examining quadratic transformations of functions from different representational perspectives. Quadratic transformations can be expressed verbally, graphically, by an equation and by a table (this is not an extensive list, but the ones I would focus on for this activity).

Timing: This lesson is designed for a 45 minute class period and will take two days. Day one is designed to identify the viewpoints, and for students to explore the different representations with their group. Day two will be finishing up those discussions and exploring the different groups’ perspectives as a whole class.

Prior Knowledge: Students are beginning this lesson after having been exposed to linear transformation, properties of quadratic functions and base knowledge of parent functions.

Standards: 

  • A.CED.1 – I CAN create equations in one variable and use them to solve problems
  • 8.F.2 – I CAN compare properties of functions using graphs, tables, algebraically and by verbal descriptions.
  • A.SSE.1a – I CAN interpret terms, coefficients and exponents of expressions
  • A.SSE.1b – I CAN complex expressions by viewing them as individual pieces.

Set Up: Multiple representations of a quadratic function that has been transformed is given to students who will be working in small groups)

Identify viewpoints: The representations will be apparent to students as they will physically see a table, a graph and an equation and will be given directions to describe the transformation from the parent function verbally (orally within the group and written on paper)

Select a Viewpoint to Explore: Students will be given topics to explore for the various representations such as:

  • Are each of these representations depicting the same quadratic transformation?
  • Why do you believe this to be true?
  • How can you support your claim?
  • Would this be true of all verbal descriptions, graphs, tables and equations (assuming they are mathematically accurate)?

Respond to the “I think….” Prompt: Students will explore how each individual representation is representing the quadratic transformation and how the representation relates to the parent function. Students will be asked to provide concrete evidence  that each of the representations in fact do represent the same quadratic transformation and justify their evidence.

Respond to the “A question I have from this viewpoint….” Prompt: This step will happen naturally throughout the activity as students discuss the multiple representations of the quadratic transformation and justify whether or not they all represent the same quadratic transformation. Questions will arise regarding the connections between different representations as well as the representations themselves and groups will address these questions as they arise.

Share the Thinking: Student groups will share their findings and discuss these findings with their classmates in an open-idea environment. This allows for all students to ask questions, clarify confusion, expand upon discoveries, reflect upon the process and revise their findings if necessary/desired. In this discussion, common misconceptions regarding transformations (that were most likely noticed during the activity) should be addressed.

Assessment: Groups will be assessed based upon their justifications provided for whether or not each mathematical representation describes the same quadratic function. Students will be provided a rubric for their justifications. Participation in the discussion will also be included as part of the assessment.

Materials

  • Prepared tables, graphs and equations of quadratic functions for each group
  • Appropriate technology for exploration (graphing calc, access to interactive dynamic technology, etc)
  • Recording devices (pencil paper, google doc, etc) for student groups
  • Recording space for student observations and thoughts during discussion

Teacher Notes: The purpose of this activity is to let students create connections and justify their thinking while connecting knowledge. Allow students to participate in this activity by not telling them if they are on the right or wrong track with their justifications. Students seek approval and will want to know if they are on the right track. Instead of saying yes or no, try to pose an open question that keeps students thinking in terms of their task and where they are at in justifying their conclusions.

Extension: After students have been successful thought the graphing transformations unit, Marble slides, a Dan Meyers Desmos activity,  can be used to formally or informally student’s knowledge and application of domain, range and transformations.

Check out @HollyClarkEdu for some great ideas on making thinking visible in classrooms with technology! Here’s a link to her blog too!

Posted in Making Thinking Visible | Tagged , , , , , , , , | 20 Comments

Thinking Routines Lessons_Altieri

This blog post contains two lesson plans that can be implemented in Algebra 1 or Geometry classrooms.  I created the lessons to specifically reflect two thinking routines (Zoom In and Generate-Sort-Connect-Elaborate).  The lessons are detailed and include an overview, timing guide, standards, required materials, and a full description of how to implement the lesson into a classroom.  I have also imbedded corresponding links, images, and necessary references.  Enjoy!

LESSON 1: Zoom In: Scatter Plots (Algebra) Lesson Plan Continue reading

Posted in Making Thinking Visible | Tagged , , , , , | 17 Comments

Example Post: Trouble with Science Education

This week’s blog is going to:

1. Talk about my concerns/struggles with science teaching
2. What I can do to overcome these struggles
3. Side of Botany

My Concerns/Struggles with Science Teaching


1. This idea of teaching to the test
  • worksheets to just cover material
  • making students read chapters just to say it was done
  • not going into the margins because we have to stay on track
  • “there is not enough time to do that”
  • multiple-choice exams 
  • ​quizzes and exams every week or every other week
  • not going outside for activities because you have to finishing covering material for the state test

2. Managing a Science Classroom

  • during labs making sure you are available to help all of the groups 
  • there’s one of you and 20+ of them (purpose of answering questions and helping all of the students)
  • if working with strong chemicals or fire, making sure that no one is injured 
  • time constraints

​3. Dealing with controversial topics

  • climate change
  • stem cell research
  • GMOs
  • cloning 
  • evolution

​4. Knowledge vs understanding

  • having students not just memorize information
  • creating a classroom where students understand the material

​​5. Missing assignments

  • what if students are missing lots of assignments…is it on you or on them?
  • do you give them class time to work on it?
  • should you cut back on assignments?
  • how do you handle if a student never turns in work?

​These are concerns/struggles that I think about and wonder how will I address or face these struggles in my future classroom. I think most of these issues stem from a traditional classroom, which is not what I am about. My biggest struggle will be how do I not give into a traditional classroom and make sure that I always try new activities.

Ideas on How to Overcome these Challenges


The following suggestions are ones that fit how I think I will address these concerns/struggles:

  1. Worry more about how will I prepare my students to think critically, make data based decisions, make connections, etc. and not focus my classroom around the state exam
  2.  With time and practice I will learn the best way I can manage a science classroom, but that my first couple of years teaching may be tough
  3. Have students talk about controversial activities. If you never talk about them, how will we change anything?
  4. Create an inquiry-based classroom where students explore and make their own connections and we will go into the margins!
  5. Only give assignments that are relevant and not give students any busy work

I think that struggles can only make us better and more effective science educators!

You can also teach students about the various struggles that scientists constantly deal with!

Side of Botany!

This weeks side of botany is food for thought! 

Posted in Misc | 20 Comments