8.F.4: Construct a function to model a linear relationship between two quantities. Determine the rate of change and initial value of the function from a description of a relationship or from two (x, y) values, including reading these from a table or from a graph. Interpret the rate of change and initial value of a linear function in terms of the situation it models, and in terms of its graph or a table of values.
Objectives:
Students will be able to work cooperatively with group members to achieve a common goal.
Students will be able to share ideas with their group members.
Students will be able to write algebraic expressions to model real-world situations.
Materials:
Bag of gumdrops (they can get more from the teacher if they need it)
Bag of toothpicks (they can get more from the teacher if they need it)
Two solo cups (placed upside down, exactly 12 inches apart
Task #1: Students are to create a bridge from one top of the cup to the other out of the toothpicks and gumdrops. (See image above) They can use any method of construction that they’d like. However, the bridge must only consist of toothpicks and gumdrops.
Class Discussion #1: As groups are starting to complete the bridges, the teacher will bring the class into a discussion on strategies that are being used around the room. Groups will share their ‘methods’ for constructing their bridges. This conversation can take place before any groups have finished. This will allow teams to re-think their construction methods if necessary.
Task #2: Once groups are finished, they will count the number of toothpicks and the number of gumdrops that they used. Now students will be tasked with building a new bridge that uses less material. Teams will compete to build a bridge using the fewest materials.
Task #3: Once teams have finished the previous task, they will be challenged with writing algebraic expressions to represent the following pictures (there will be more than just the pictures shown below). The teacher will circulate the room and guide teams that are struggling to make the connection.
Class Discussion #2: The teacher will lead a full-class discussion over the algebraic expressions that teams came up with to represent the pictures above.
Cooperative Learning Lesson: Guided Reciprocal Peer Questioning (modified with a Chalk Talk)
Pythagorean Theorem “5 W’s”
This lesson would take place after 2 or 3 days of working with the Pythagorean Theorem in class. By the time this lesson roles around, students know how to use the Pythagorean Theorem. Now, they will explore the value of the Pythagorean Theorem using both guided reciprocal peer questioning techniques and a chalk talk.
This lesson will be centered around these ‘Generic Question Stems’, that follow a ‘Who, What, When, Where, Why progression:
“Who uses the Pythagorean Theorem?”
“What can we do with the Pythagorean Theorem?”
“When is the Pythagorean Theorem useful?”
“Where can we see the Pythagorean Theorem in the world around us?”
“Why are we learning about the Pythagorean Theorem?”
Standards:
8.G.6: Explain a proof of the Pythagorean Theorem and its converse.
8.G.7: Apply the Pythagorean Theorem to determine unknown side lengths in right triangles in real-world and mathematical problems in two and three dimensions.
8.G.8: Apply the Pythagorean Theorem to find the distance between two points in a coordinate system.
Objectives:
Students can identify parts of a right triangle.
Students can use the Pythagorean Theorem to find missing sides of a right triangle.
Students can use the inverse of the Pythagorean Theorem to prove whether or not a triangle is a right triangle.
Chalk Talk (Stations): The teacher will write these 5 Generic Question Stems around the room on the boards. The teacher will them announce to the class that they will doing a chalk talk in groups (collaboratively, so people are allowed to talk!
At each ‘question’, students will write ideas and thoughts stemming off of the generic question stem. Then, they will come up with some further questions that can be discussed and analyzed at a later time. Each group will have a certain amount of time at the question before rotating. Students are encouraged to create stems off of other students stems.
Class Discussion: The teacher will lead a full-class discussion over 5 questions. Students will spend the majority of time looking at the 5 completed chalk talks and discussing what is shown.
Lesson 1- Team Building Activity: Connecting Stories
When thinking about a team building activity for a classroom of high school students I focused on the importance of getting to know one another on a more personal level. I think building classroom community with teenagers is really important in order to continue on with lessons and earn their trust and attention as a teacher as well as to earn trust and attention from each other. I’ve always thought the team building activity in the movie Freedom Writers was really powerful.
While the Connecting Stories activity may not dig as deep as some other sharing activities, it may still allow students to get to know each other personally and find out ways in which they may have similarities.
Lesson Objective:
Students will work together in teams of 4
Students will learn more about one another
Students will be able to make connections to each other
Students will work to remember what each student says
Teams will introduce teammates to the class
Lesson Overview:
The Connecting Stories activity will begin with one student beginning by sharing a short story that is true about him or herself. The students will then go around the group and, one after the other, state another story that relates to the previous student’s story in some way. The stories should flow within three seconds of each other. Students will also be assigned to remembering information about one person in the group in order to report out at the end of the activity and tell the class about that student.
Room Set-Up:
Students in the room should angle their desks to be facing the other members in their group. Students should all be able to see each others face.
Materials Needed:
Scrap piece of paper
Writing utensil
Creativity
Outline:
Intro- I will ask students to turn to the people next to them and create teams of 4. Students should not move around the room to find partners but should stay close to where they are. If students end up needing to move around to make a group I will prompt them to do so. Once teams are formed I will ask each person to get out a scrap sheet of paper and a writing utensil
Activity- Next I will explain the activity. Each team should pick one person to begin. The first student will start by stating a true story story about themselves. This story should only be one sentence long. Ex. Last summer I went to the beach and got stung by a jellyfish. After the first story is shared the next student, clockwise, will state their story which must relate to the first person’s story in some way. Ex. I’ve never seen a jellyfish in real life, only at the aquarium. The students will go around the circle connecting stories to the one before them. Each student should state their story within three seconds of the last one to keep the activity moving along. In addition to stating their story, each student will be encouraged to remember the story of the person that goes after them. They can use the scrap paper to jot down quick pictures or words. This encourages students to actually remember the stories of their classmates in order to articulate them latter. The student should not write down word for word what the other said as the activity should go fast.
Presentation- After students have gone around the circle at least 5 times, or as time allows, I will end the activity. For the second part of the activity, students will introduce the student who went after them and quickly tell the class a few interesting things about that student based on the stories they told. This sharing presentation should only last 5 seconds for each student.
When teaching a college freshman, UNV 101 University Studies course, I used a similar type of team building activity. Every student in the class was a male but around half of the students were international students and the other half domestic. Each week I experienced different situations which involved students being unwilling or not interested in learning or working with each other. I eventually spent one of the classes doing a team building experience in hopes that the students in the room would realize that no matter who they were they probably had something in common with each other.
I began the class by asking everyone to move their desks into a circle with everyone facing each other. Next I asked that each one of them write down an interesting fact about themselves without using any identifiers. I didn’t want students to be able to know right away who the person was that wrote the fact, for example something like, I have a tattoo on my arm etc. After students wrote down their fact I collected them all in a bowl and began reading each fact out loud. We all had to guess which student wrote that particular fact. Some students wrote things like, “I love shoes and have a collection of over 100 sneakers”, “I’m getting married this summer in Florida”, “I play tennis for the school and we won our championship yesterday”, “I play the guitar and my band plays in town every weekend” etc.
During the activity I noticed students smiling and laughing and making comments such as, “wow I didn’t know that about you” or “I like that too”. By the end of the activity I think students at least learned something new about their classmates. If I could have gone back to teach the class over I would have done this activity on the first day.
Lesson 2- Co-op Co-op
Student-centered Discussion:
In order for students to have more say in what they learn, I will conduct the Co-op Co-op model of cooperative learning. I will begin by introducing the topic “College”. I will briefly talk about the different avenues to achieve higher education such as types of degrees and places to earn an education however I will mostly leave the topic open for students to interpret. I will spend a few minutes asking students in the room what they think college is. We will keep track of our thoughts with marker on a large poster in the front of the room.
After discussing the topic and writing down ideas, we will work towards narrowing down common themes. Ideas can be grouped together or elaborated on in order to narrow down the list. After discussing the topic, students will form teams.
Team Selection:
Students will be able to select their own teams however, students should consider forming teams with other students who possibly have ideas about college that differ from their own. Teams should be about 5 students big.
Separation and Delegation:
Each group will work among themselves to pick one of the themes written on the board. Each group should have a different topic. Each member of the group will them split the topic into mini topics or parts in which each individual student will research part of the topic themselves, using the internet, books, interviewing the teacher etc, and report back to the group. For example if students write on the board that college includes dorms, a team may choose the topics of dorms and then split this topic into sections for investigation such as cost, size of the room, requirements for different colleges, pros/cons etc.
Team Presentations:
After each student finds out more information about the topic they will work together to create a presentation to discuss the topic with the whole class. Students may also want to create a creative Google Document, Pinterest page or Padlet in order to hold all of their ideas. These links can all be shared with others in the classroom so that every student can explore each topic on their own. With so many resources out there for each topic, having one place with minitiopics can be helpful to narrow down important information.
The evaluation for each group will simply involve me asking the audience what questions they have about the topic and/or if they agreed with what was presented. Since students will have many different ideas and opinions about what college means, there will not necessarily be a right or a wrong answer. I will also evaluate students on how well they worked with each other to accomplish the task.
Team Building Lesson — If You Build It… Overview: Students will progress through multiple rounds of building a structure under different constraints. Prior Knowledge/When to Teach: Use at any time throughout the year – can be used as an introductory activity at the beginning of the year. Standards/Objectives/Outcomes: The objective of this lesson is for students to work together toward an end goal. This team-building exercise is designed to contain multiple rounds so students can learn from their previous trials, as well as experience a round where students have different roles in the group. The final objective with this lesson is for students to reflect on their experience and ultimately learn from their time working in a group. Materials:
Mini marshmallows (enough bags for one per 4-person group)
Spaghetti (enough boxes for one per 8 students)
Timing: This lesson will take 60-90 minutes. Outline:
Divide students into groups of four randomly (especially if done at the beginning of the year, since student demeanors are probably unknown).
Each group will have one package of mini marshmallows and half a package of spaghetti.
For each of the following rounds, students have either a different end goal, or a different means to the end. They will be allowed to use up to 30 sticks of spaghetti and 30 marshmallows. They have 8 minutes to complete each round.
Possibilities for different rounds (with suggested progression):
No talking! Students must build the tallest structure possible without talking.
Talking this time, same goal of building tallest structure.
Build a structure that can hold my empty water bottle (a large Nalgene) for 10 seconds at least 12 inches above the ground/table.
Two students in the group are blindfolded. They are the only ones allowed to touch the building materials (and thus the only ones allowed to build). The other two students are not blindfolded, but cannot touch the building materials. This is a competition to build the structure to be at least 30 inches the fastest (it must stand for at least 15 seconds before falling below that height).
In a group or class discussion, answer the following questions:
What difference did not talking versus talking make in your progress?
How did blindfolding two students change the group dynamic?
Which round was easiest for you/your group?
Which round was hardest for you/your group?
Assessment:
Individually, students journal about their experience and answer the following questions.
In what ways did your small group support you?
What roles did you serve in your small group?
How did your knowledge of your group members change throughout the activity?
How did your knowledge of the activity/goal change throughout the activity?
Teacher Notes:
Keep the time between rounds short – keep the experience running continuously, then discuss at the end.
Jigsaw – Conic Sections Overview: Students will work in groups to become experts on the geometric and algebraic components of three different conic shapes: parabolas, ellipses, and hyperbolas. They will split up and share this knowledge with (and learn from) two experts from the other conics. Standards/Objectives/Outcomes:
HSG-GPE.A.2 Derive the equation of a parabola given a focus and directrix.
HSG-GPE.A.3 Derive the equations of ellipses and hyperbolas give the foci, using the fact that the sum or difference of distances from the foci is constant. Prior Knowledge/When to Teach: Students should be familiar with graphing equations and multi-variable equations. Timing: 3 days. 2 days to work in expert groups, 1 day to share in learning groups Materials:
Computers
Expert Sheets (one per student)
Instructions for paper folding (enough of each for 1/3 of class)
Compasses (enough for 1/3 of class)
Rulers (enough for 1/3 of class)
Patty paper (enough for each student to have 3 pieces)
Outline:
Day 1
Randomly split students up into three groups.
Each of these groups will study the same conic sections.
Each person will have an Expert Sheet with questions, resources, and prompts that they will need to be able to answer and explain to their classmates who are not learning about this conic.
Give students 30 minutes to look through the resources individually and begin formulating their thoughts on how to answer the questions.
In groups of 2-3, give students 15 minutes to discuss their findings and begin compiling their information.
Day 2
In the groups from the end of class yesterday, students have the entire class period to construct 2-3 activities that will help them teach their group members the information that they learned.
Teachers may want to suggest certain activities that students may use to help them teach:
Hands-on construction activity
Direct instruction
Discovery questions
Create their own mini-video that portrays their findings from their Expert Sheet.
Day 3/4
Students are placed into leanring groups of 3 (assigned) where they will present their findings.
Day 5
Individual journaling
Polygraph game from Desmos to help students practice vocabulary. https://teacher.desmos.com/polygraph/custom/560ad28c9e65da5615091ec7
Work in learning groups on a few practice problems, then discuss as a class by randomly calling on students from each group (make this known to students that this will be done be beforehand to increase individual accountability).
Assessment:
Assessment can come from a few different places:
Answers from group practice
Individual reflection on experience
Were you enough of an expert on your topic (i.e. were you able to answer questions that your learning group had)? If so, what led you to that conclusion? If not, what could you have done in order to make yourself enough of an expert?
In what ways did your small group support you?
What roles did you serve in your small group?
Content Evaluation
How are parabolas, ellipses, and hyperbolas similar? How are they unique? Strive to provide at least 3 similarities and 3 differences that are unique (different from your classmates).
Option: Desmos activity where students work with adjusting conic equations to match a given pattern. https://teacher.desmos.com/activitybuilder/custom/56030ac728462f1706872e72
Exit/entrance ticket where students containing content-relevant questions:
LESSON #1 DESIGNING AND PLANTING A RAISED BED GARDEN
ODE EARLY LEARNING STANDARDS: RELATIONSHIPS: PEER RELATIONSHIPS AND INTERACTIONS: STANDARD STATEMENT
Interact with peers in more complex pretend play including planning, coordination of roles and cooperation.With modeling and support, negotiate to resolve social con icts with peers
INITIATIVE:PLANNING ACTION AND REFLECTION: Develop, initiate and carry out simple plans to obtain a goal.Use prior knowledge and information to assess, inform, and plan for future actions and learning.
CREATIVITY: EXPRESSION OF IDEAS AND FEELINGS THROUGH THE ARTS:Express interest in and show appreciation for the creative work of others.
MATERIALS: 4 X 8 FEET RAISED GARDEN BEDS, SEEDLINGS FROM THE VARIOUS VEGETABLES, FLOWERS AND HERBS PLANTED, MEASURING TOOLS, POSTER BOARD, CRAYONS/MARKERS/COLORED PENCILS, YARN/STRING, PLANTING TOOLS
BEFORE: THE CHILDREN WILL HAVE CONDUCTED RESEARCH AND LEARNING ON SEEDS, PLANTS, PLANT GROWTH AND PLANTED SEEDS TO GROW SEEDLINGS IN THE 6 WEEK UNIT.
STEP 1) IN DISCUSSION WITH CHILDREN, LET THEM KNOW IT IS TIME TO PLANT OUR SEEDLINGS IN A RAISED GARDEN BED. LET THEM KNOW THEY WILL BE DESIGNING THEIR GARDEN BEDS INDIVIDUALLY FIRST AND THEN WORKING WITH A GROUP OF 3 CHILDREN TO COMBINE THEIR IDEAS INTO ONE GARDEN BED DESIGN.
SHOW THEM PICTURES OF RAISED GARDEN BEDS AND VARIOUS GARDEN BED DESIGNS. ASK WHAT THEY SEE, WHAT THEY NOTICE, WHAT THEY HAVE QUESTIONS ABOUT.
4X8 Raised Bed Vegetable Garden Layout – Visual Designs for Raised Bed Vegetable Garden Layout Plans – ekaandoto.com
STEP 2: SHOW THE CHILDREN A SEED PACKET AND READ OFF SOME OF THE INFORMATION FROM THE BACK OF THE SEED PACKET. ASK CHILDREN WHAT THEY THINK IT MEANS AND WHY IT IS IMPORTANT INFORMATION.
STEP 3: GIVE THE CHILDREN A PIECE OF 8 X16 INCH WHITE PAPER AND ASK THEM TO DESIGN A GARDEN, USING THE INFORMATION THEY KNOW AND HAVE ACCESS TO AND USING THE FOLLOWING QUESTIONS TO GUIDE THEM.
GUIDING QUESTIONS: WHAT PLANTS DO I WANT TO PLANT IN MY GARDEN? WHAT DO THE PLANTS LOOK LIKE AS SEEDS AND SEEDLINGS? WHAT DOES THE SEED PACKET SAY REGARDING SPACING OF SEEDLINGS? HOW MUCH SPACING WILL I HAVE BETWEEN MY SEEDLINGS? WILL I HAVE ENOUGH SPACE? OR TOO LITTLE OR TOO MUCH? HOW WILL I MEASURE TO MAKE SURE MY GARDEN HAS THE SPACING IT NEEDS?
STUDENTS CREATE THE GARDEN DESIGN INDIVIDUALLY AND ARE READY TO SHARE.
STEP 4: HAVE THE CHILDREN HANG THEIR GARDEN DESIGNS AROUND THE ROOM. DIVIDE THE CHILDREN INTO GROUPS AND HAVE THEM WALK WITH THEIR GROUPS AND DISCUSS WHAT THEY NOTICE ABOUT THE DIFFERENT DESIGNS. WHEN THE CHILDREN GET TO A DESIGN FROM SOMEONE IN THEIR GROUP, THAT PERSON SHOULD TALK THEIR GROUP THROUGH THEIR THINKING ABOUT THE DESIGN ( THIS SHOULD BE MODELED)
STEP 5: ON A CHART PAPER, AS EACH GROUP TO WRITE DOWN IDEAS THEY HAD NEVER THOUGHT ABOUT IN THEIR OWN WORK THAT THEY NOTICED IN OTHER STUDENT’S WORK, ONES THEY MAY WANT TO ADD.
STEP 6: LET THE CHILDREN KNOW WE ARE GOING TO WORK AS TEAMS TO COMBINE OUR IDEAS AND CREATE A GARDEN DESIGN THAT INCORPORATES IDEAS FROM EACH OF THE THREE PEOPLE IN OUR GROUP.
STEP 7: PASS OUT POSTER PAPER FOR CHILDREN TO SKETCH OUT THEIR IDEAS. CHILDREN SHOULD USE THE SAME GUIDING QUESTIONS TO GUIDE THEIR TEAM PLANS. THE TEACHER ROTATES FROM GROUP TO GROUP GETTING CHILDREN STARTED AND ASKING GUIDING QUESTIONS ALONG THE WAY.
STEP 8: AFTER ALL PLANS ARE COMPLETE, SHOW THE FOLLOWING VIDEO AND DISCUSS WHAT’S NEEDED TO BEGIN PLANTING.
STEP 9: CHILDREN GATHER MATERIALS NEEDED FOR PLANTING AND PLANT THEIR RAISED BED GARDENS.
ASSESSMENT: CLASS DISCUSSIONS, INDIVIDUAL GARDEN DESIGN, OBSERVATIONS DURING GROUP WORK, GROUP GARDEN DESIGN, PLANTED GARDEN
AFTER: CHILDREN WILL WATER OBSERVE GROWING PLANTS DAILY, WATER, WEED AND PROBLEM SOLVE AS NEEDED AS SEEDLINGS GROW INTO PLANTS. PRODUCE WILL BE HARVESTED AND EATEN BY THE CHILDREN.
GROUP JUGGLING: THIS GAME IS INTENDED TO DEMONSTRATE TO CHILDREN THE NEED FOR COMMUNICATION, FOCUS AND CONCENTRATION WHEN A GROUP HAS MANY TASKS ALL HAPPENING AT THE SAME TIME.
MATERIALS: 5 PLASTIC OR FOAM BALLS 5″ IN DIAMETER
STEP 1: INTRODUCE THE RULES OF THE GAME
1) WE ALL SIT IN A CIRCLE.
2) THE TEACHER WILL BEGIN BY CHOOSING SOMEONE IN THE CIRCLE, CALLING THEIR NAME, MAKING EYE CONTACT AND THEN PASSING HIM/HER A BALL.
3) THE PERSON THE TEACHER THREW THE BALL TO WILL THEN DO THE SAME AND THEN THE NEXT PERSON AND NEXT PERSON UNTIL EVERYONE HAS HAD THE BALL THROWN TO HIM/HER AND A PATTERN IS ESTABLISHED, WHICH WILL END IN THE TEACHER RECEIVING THE BALL BACK FROM THE LAST PERSON ON THE FINAL TOSS.
4) THEN THE TEACHER WILL BEGIN THE SAME PATTERN OF PERSON TO PERSON BALL THROWING UNTIL ALL KNOW WHO IS PASSING THE BALL TO THEM AND WHO THEY PASS THE BALL TO.
5) THE TEACHER WILL REPEAT THIS PATTERN SEVERAL TIMES, EACH TIME TRYING TO COMPLETE A LITTLE MORE QUICKLY.
6) THEN THE TEACHER WILL SAY WE ARE GOING TO ADD ANOTHER BALL SO THE GROUP WILL BE JUGGLING TWO BALLS AT ONCE. BEGIN WITH ONE AND THEN ADD THE SECOND.
7) AFTER THE GROUP GETS FLUENT WITH TWO BALLS, THEN ADD ANOTHER AND SEE HOW MANY BALLS THE GROUP CAN JUGGLE AT ONE TIME.
8) THERE WILL BE LOTS OF BALL DROPPING, LAUGHING, REFOCUSING, ETC.
9) AFTERWARDS, ASK CHILDREN WHAT THEY THOUGHT ABOUT THE GAME? WHAT DID THE TEAM NEED TO DO IN ORDER TO BE SUCCESSFUL? WHAT THINGS MADE IT MORE DIFFICULT FOR THE GROUP?
10) THEN RELATE THIS TO THE TEAM WORK THAT WILL HAPPEN IN CLASS THROUGHOUT THE YEAR. PLAY THIS GAME AT VARIOUS TIMES THROUGHOUT THE YEAR RIGHT BEFORE COOPERATIVE LEARNING LESSONS TO REMIND STUDENTS AND GET THEM WORKING TOGETHER.
Set up: For this team building activity, students will be in small groups of 3 – 4 students.
Materials: Each group will receive a set of 3 sticks, 6 colored rings and the following prompt:
Set up: arrange the sticks from left to right. On the leftmost stick, arrange the rings from largest to smallest with the largest ring on the bottom and smallest ring on the top.
Tower of Hanoi: You must move all of the rings from the stick on the left to the stick on the right in the fewest number of moves. The rings should end up in the same order on the right stick as they appear on the left stick now. There are two rules:
You can move only one ring at a time.
You can never place a larger ring on top of a smaller ring.
This team building activity promotes communication and collaborative group work. Students must communicate with one another in order to be successful. Students need to work together to figure out how to get the rings to the third stick in the order they are currently in with the smallest number of moves. Students also need to be creative with their solutions to ensure that they have used the minimum number of moves possible to get all of the rings from the first stick to the last stick.
If you haven’t seen the problem before, check it out here: Tower of Hanoi
Discussion: After teams have completed the activity, the class will participate in a discussion and address the following questions as a group:
What strategies worked?
What strategies didn’t work?
How can you ensure you had the least number of moves?
How did your teammates help you?
What communication methods worked for your group? Are there ways you could have communicated better?
Group activity 2: After participating in the group discussion, each individual group will address the question, “how does this relate to mathematics?”
Extension Questions:
What would the function look like if we graphed it?
How would the game change if we had 4 or more pegs instead of 3?
What is the least number of pegs needed for this game and why?
This will spark great group discussions that also encourage communication to build strong team relationships.
This TED talk on the power of introverts is a great way to introduce how every member of a team can bring unique views to their group. Definitely a great video to show students at the beginning of the school year to set the tone for cooperative learning.
Lesson Plan: Jigsaw II: Representations of Quadratic Functions
Lesson Objective: After completing this lesson, students will have a strong knowledge of how to use all aspects of quadratic functions, including what situations it is most appropriate to graph, find the min/max and solve. Students will also be able to connect their prior knowledge of quadratic functions to scenarios that exist outside of the classroom.
Lesson Outline:
This lesson focuses on students becoming experts in a small aspect of quadratic functions so that they can teach their peers in their area of expertise. Students already have a strong background knowledge of quadratic functions. This lesson acts as an extension of prior knowledge while continuing to build upon prior knowledge (ie: students know how to solve quadratic functions, but not necessarily scenarios to apply their solutions)
Lesson Timing: This lesson is designed to take two 45 minute class periods. The first class period is allotted for students to work on their tasks with their homogenous groups and break into heterogeneous groups to have their group discussion. The second class period begins with a whole class discussion of what each heterogeneous group discussed and feedback from their peers. The rest of the class period is given to students to complete the assessment activity with their heterogenous group.
Set up: Students are divided into groups of three. Each group of three will be given an activity that corresponds to different aspects of quadratic functions: solving, graphic representation, and maximums/minimums. The activities will contain multiple examples of the representation. Students will all be given the same example, but will be asked to represent the activity with respect to their expertise area.
Solving Quadratic Functions (factoring, quad form, etc): This group will receive the following prompt:
You are standing on a deck 10 feet off the ground. From the deck, you use a slingshot to launch a water balloon to your friends below. The water balloon launch can be modeled by the equation f(t)=-16t2+38t+10.
Algebraically determine how long it will take for the rocket to reach the ground.
Graphic Representation: This group will receive the following prompt:
You are standing on a deck 10 feet off the ground. From the deck, you use a slingshot to launch a water balloon to your friends below. The water balloon launch can be modeled by the equation f(t)=-16t2+38t+10.
Graphically represent the water balloon’s launch path and label each part of the graph.
Maximum/Minimum: This group will receive the following prompt:
You are standing on a deck 10 feet off the ground. From the deck, you use a slingshot to launch a water balloon to your friends below. The water balloon launch can be modeled by the equation f(t)=-16t2+38t+10.
What is the maximum height the water balloon will reach? How long will it take to reach that height? Re-write the equation in vertex form.
Jigsaw: Once students have been given time to become experts on their own aspects of quadratic functions, they will get into heterogeneous groups (one graph expert, one solving expert, and one max/min expert) and will be able to teach their groups what they have discovered as experts in their area. As a group, they will discuss the following questions:
What are the benefits of each different aspect of quadratic functions?
When would you need one representation over another? Why would that representation be most helpful?
Describe a scenario in which knowing the maximum or minimum would be most beneficial, a scenario where having a graphic representation is most beneficial and a scenario where solving the quadratic function would be most beneficial (hint: these should be 3 different scenarios)
Share & Discuss: The group will then share their discussion ideas and individual scenarios with the class so that there is a wide variety of examples for all students.
Assessment: The heterogenous group will then complete this activity to ensure that they have understood all aspects properties of quadratic functions.
Materials:
Access to Desmos activity (computers, tablets, mobile devices)
Overview: Students will work in small teams to get to know each other while reviewing prior knowledge about linear and quadratic functions. For this lesson, students will engage in a team-building exercise called If You Build It….(one of the 10 team building games that promote critical thinking)
Size of the teams: 4-5 students per team
Assigning students to teams: Students will be placed into teams based on teacher knowledge of the student and (1) who they have not worked with before, and (2) what teams of students will help to push each other deeper in understanding.
Team building exercise: If You Build It (This allows students to work together and compete against the other teams to create a creative image using both their mathematical understanding and knowledge of Desmos).
For this activity students will use the https://www.desmos.com/ graphing calculator. Students should be working on one screen so that they can all view the “final product” in the making and work as a team to build their image. Students will be given the following task:
If You Build It:
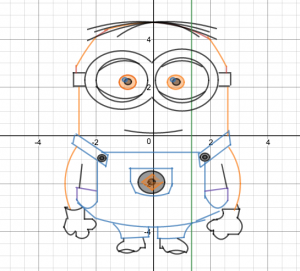
As a team, you have 25 minutes to use Desmos to create an image using only the functions and equations that we have learned about so far (linear and quadratic functions). The goal is for your creation to be the most creative out of all of the other teams in the class. When you present to the class, make sure to address: (1) How did you use linear and quadratic functions? (2) Why were some of the functions easier to use or more appropriate for your image? (3) What difficulties did you face in creating your image, and how did you overcome these difficulties?
Here are some other Desmos images for students to get ideas for their If You Build It creations:
If you have never used Desmos, check out their twitter page @Desmos
One possible variation: have students create team logos on Desmos that represent their team.
Room Arrangement: Students will sit at square tables with their group members (facing each other encourages student discourse and collaboration).
Planning materials to promote interdependence:
Materials interdependence: laptops, internet access for using desmos
Information interdependence: previous notes on linear and quadratic functions
Interdependence with other teams: presentations of student work
CONDUCTING THE ACTIVITY
Assigning roles to ensure interdependence (if necessary two people can hold the same role):
Facilitator: Makes sure students are addressing all parts of the task.
Recorder: Keeps track of the creation process (what were the initial ideas, what questions did the group have, how did members come to an agreement, written solutions to the task questions, etc.)
Manager/Encourager: Tries to make sure every member is heard and gives their input throughout the task.
Time Keeper: reminds the group of the time limit and helps to make sure the task is complete in the given time.
Explaining the academic task: Students will be told that the focus of the activity is to work together as a team to build their image and review linear and quadratic functions, equations, and graphing along the way.
Structuring positive goal interdependence
Produce one desmos product with each person signing their name.
Provide team rewards – students can put their names (or team name) on the “math class superstars board”
Structuring individual accountability
Students will be directed to use their previous notes and tests to aid them in building their desmos creation.
All students will need to be prepared to answer the task questions during the presentation. During work time, the teacher will randomly ask students in a group to explain their thinking and progress.
During presentations, other teams can ask the students questions about the types of functions used in their creation or their process for creating their desmos image
Explaining criteria for success: All students must be an active part of the creation and presentation process. All students should be able to see the connections between the functions and their created images.
Specifying desired behaviors using the T-chart such as…
Ask each team member to explain their thinking throughout the task
Ask each team member to relate what is being created to prior understanding (linear and quadratic functions)
Check to make sure everyone in the team understands the task and agrees with the created product that the team is developing
Encourage everyone to participate
Listen accurately to what all team members are saying.
Encourage each team member to be an active participant in the learning process
Be open to feedback and use constructive feedback to argue and defend ideas and possible solutions
Teacher Role: Monitor students’ behavior by walking around, listening, posing questions, and being available to answer student questions. Acknowledge good group work skills and intervene on a dispute only when necessary.
CLOSURE AND EVALUATION
Providing content closure to the lesson: Have students present their desmos image to the class and present their answers to the task questions. Allow time for the presenting team to answer student questions.
Evaluating the quality of students’ learning: Formative assessment during the creation process, and making sure that each student shares something (has a voice) during student presentations.
Assessing how well the team functioned: Formative assessment during the creation process. Students briefly journal about their experience with their team members and if/how they achieved success in completing the task.
Overview: Students will work in small teams to complete a Jigsaw II Activity. For this lesson students will become “experts” on different exponent rules and then help their other group members also become experts.
Size of the teams: 4-5 students per team
Assigning students to teams: Students will be placed into teams based on teacher knowledge of the student and (1) who they have not worked with before, and (2) what teams of students will help to push each other deeper in understanding. (Same teams as Lesson 1)
Team building exercise: Completed in Lesson 1
Room Arrangement: Students will sit at square tables with their group members (facing each other encourages student discourse and collaboration).
Planning materials to promote interdependence:
Materials interdependence: laptops, internet access for videos
Information interdependence: notes and activities for proving and practicing exponential rules.
Interdependence with other teams: students become experts by working with other students who are also becoming experts on the same exponent rule (these are their expert teams) and then report back and share new information to their learning team.
CONDUCTING THE ACTIVITY
Assigning roles to ensure interdependence
Each student will choose to become an expert on one of the following topics:
Adding/Subtracting with Exponents
Multiplying & Dividing with Exponents
“Power of 0 Property” and “No Negatives”
Power to a Power
Product/Quotient to a Power
Explaining the academic task: Students will be told that the focus of the activity is to work together as a team to build understanding of exponent rules.
Students will each choose one of the expert topics and work within expert teams to complete an expert sheet. This will help students better understand the topic through watching instructional videos (youtube or Khan Academy), working on example problems, discovering proofs, and checking their progress with the instructor. Expert Sheets Linked Here
After students feel confident with their understanding and have checked in with their instructor, each expert will come up with a “mini lesson” to help members of their learning teams understand their exponent rule. Students will be encouraged to use various teaching methods. They can demonstrate a problem using examples, helping students understand the proofs behind the exponent rules, they can use technology, or they can illustrate their ideas with diagrams.
After students have had time to teach their mini-lessons, the teacher will lead a whole-class discussion, answer student questions, and go over some example problems (asking for student participation).
During the whole-class discussion, the teacher may want to show the following youtube video for students to connect their understanding.
Structuring positive goal interdependence
Each person feels confident in their understanding of the content and prepared to share their expertise as well as gain new knowledge from their learning team.
Provide team rewards – students can put their names (or team name) on the “math class superstars board”
Structuring individual accountability
Experts will be directed to build “mini lessons” for their peers to teach their learning team members about their exponent rule.
All students will need to be prepared to answer questions about all of the exponent rules (including the ones where they were not the expert)
Students will complete an individual quiz to assess their understanding of exponent rules and properties.
Explaining criteria for success: All students must be an active part of the learning and teaching process. All students should be able to see the connections repeated multiplication and the exponent rules/properties.
Specifying desired behaviors using the T-chart such as…
Ask each team member to explain their thinking throughout the task
Ask each team member to help make mathematical connections
Check to make sure everyone in the team understands the content
Encourage everyone to participate
Listen accurately to what all team members are saying
Encourage each team member to be an active participant in the learning process
Be open to feedback and use constructive feedback to argue and defend ideas and possible solutions
Teacher Role: Monitor students’ behavior and learning by working with expert teams, listening to student discussions, posing questions, and being available to answer student questions. Acknowledge good group work skills and intervene on a dispute only when necessary.
CLOSURE AND EVALUATION
Providing content closure to the lesson: Have a whole-class discussion where students can ask further questions and check their understanding. Students will then complete a quiz to assess their understanding of exponent rules.
Evaluating the quality of students’ learning:
Formative assessment during the creation process, and making sure that each student shares their expertise during mini-lessons.
Summative assessment in the form of a quiz to assess student understanding of all expertise topics. Quiz Linked Here
Assessing how well the team functioned: Formative assessment during the learning and teaching processes.
Lesson 1: Team Building Activity – Variation of “It’s a Mystery”
Lesson Objective
This goal of this lesson is to help students learn to work together as a team, to learn to communicate, and to learn to problem solve together. These are all integral components to cooperative learning in mathematics.
Lesson Overview
This lesson would take place upon assigning students new cooperative learning groups. First, students will discuss what successful teamwork looks like, and will then complete a team building activity in the form of “It’s a Mystery.” http://www.teachthought.com/critical-thinking/10-team-building-games-that-promote-critical-thinking/ Following the team building task, students will reflect upon working collaboratively.
Room Set-Up
To encourage team work and to provide a space for the tasks, desks will be put into groups of 4. Students will come to the big tables in the back of the room to get the new supplies for each task.
Materials Needed
White board and markers
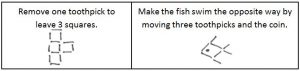
Baggies with small handout, 20 toothpicks, and a coin (Task 1)
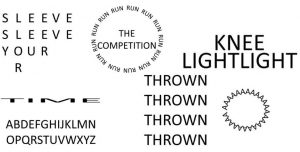
Handouts with pictures representing phrases (Task 2)
About 7 hula hoops (1 per group, Task 4)
Pencil and paper (Students)
Outline
1.Introduction: I will say, “Today you have been placed into teams with students you will be working with for the next few weeks of class.”
I will begin the discussion on collaborative learning with a Chalk Talk, where students come up to the board to write something they think about a statement I put on the board. The statement I will use is “Teamwork is…”
Following the chalk talk, we will discuss what teamwork looks like, and interesting things that come about from the chalk talk.
If certain aspects of collaborative learning do not come up during the chalk talk, I will ask the students follow-up questions. Examples of these are below:
“Why do you think I am choosing to have you work in teams?”
“Do you think the tasks I will be given to you could be done individually?”
“What does it look like to work in teams rather than individually?”
“What does every team member have to contribute to the group as a whole?”
“What have you liked about working with others in the past? What have you not liked?”
Through conversation, students will discuss what successful teamwork looks like: communication, interdependence, listening to others, compromising, working together, valuing the skills each group member brings to the group, respecting each other, choosing the most logical idea (not just majority rules).
2. Team Building Activity: Students will be trying to find a missing object from my classroom. The students will be completing four problem solving tasks as a team to find the missing object. Upon completing each task, students will see me to check if they completed it successfully, and then I will give them a clue. Therefore, altogether, they can receive four clues. *Each task is designed to include problem solving and interdependence. Some tasks require each member to take a specific role. Other tasks are challenging in nature, which encourages students to seek one another for help. *
Task One: Toothpick Puzzles
Students will be given a bag with toothpicks, and a slip of paper including the puzzles shown below. Students will solve the puzzles and then show me their finished work.
Task Two: Picture Phrases
Students will decode the following pictures to determine what phrases they represent.
Task Three: Telephone Pictionary
For this task, students will be asked to be completely silent. I will give one student in the group a word. That student will draw a picture for the second group member to look at. The second group member will guess a word that it represents and show it to the third group member. The third group member will draw a picture to show the fourth group member. The fourth group member will write down the word that is represented, and will show me. If incorrect, I will give them a new word.
Task Four: Hula Hoop Challenge
All group members will stand in a line with hands held to create a “line.” Starting with one end, students will move the hula hoop down the line. Students cannot disconnect their line, or they have to start over. Once they get the hula hoop through their “line,” they have completed the task.
Once students have found all four clues from the activity, they will use the clues to find the missing object.
3. Reflection:
Students will write a reflection of the team building experience answering the following questions:
Overall, how did the team building activity go?
What is one thing your team did really well?
What is one thing your team could improve upon?
What is one thing you learned about yourself from doing this activity?
I will collect student responses to better understand how students felt during the activity. At this point, I will not have students share their experiences with the class, but as cooperative learning continues and students become more comfortable within their groups, I will encourage students to share about group work.
Lesson 2: Collecting and Analyzing Data (Jigsaw 2, revised)
Lesson Objective
Students will understand how to collect, analyze, and compare real world data.
Standards
CCSS.MATH.CONTENT.7.SP.A.1 Understand that statistics can be used to gain information about a population by examining a sample of the population; generalizations about a population from a sample are valid only if the sample is representative of that population. Understand that random sampling tends to produce representative samples and support valid inferences.
CCSS.MATH.CONTENT.7.SP.A.2 Use data from a random sample to draw inferences about a population with an unknown characteristic of interest. Generate multiple samples (or simulated samples) of the same size to gauge the variation in estimates or predictions. For example, estimate the mean word length in a book by randomly sampling words from the book; predict the winner of a school election based on randomly sampled survey data. Gauge how far off the estimate or prediction might be. Draw informal comparative inferences about two populations.
CCSS.MATH.CONTENT.7.SP.B.3 Informally assess the degree of visual overlap of two numerical data distributions with similar variabilities, measuring the difference between the centers by expressing it as a multiple of a measure of variability. For example, the mean height of players on the basketball team is 10 cm greater than the mean height of players on the soccer team, about twice the variability (mean absolute deviation) on either team; on a dot plot, the separation between the two distributions of heights is noticeable.
CCSS.MATH.CONTENT.7.SP.B.4 Use measures of center and measures of variability for numerical data from random samples to draw informal comparative inferences about two populations. For example, decide whether the words in a chapter of a seventh-grade science book are generally longer than the words in a chapter of a fourth-grade science book.
Prior Knowledge
This lesson is intended for a 7th grade advanced math class. Many students in my 7th grade advanced math class are familiar with different displays of data, but do not fully understand how to collect and analyze real world data. This lesson is intended to students better understand data collection, and the ways they can use it in everyday life.
Lesson Overview
In this lesson, each group member will study a specific topic associated with data collection and analysis, and then will teach the lesson to their group. Following their explanations to the group, students will a project with their group collecting data from the rest of the class, and then analyzing their findings.
Note: In the Jigsaw method, students are quizzed following peer-to-peer teaching. However, the project is seen as a summative assessment to test students’ ability to collect and analyze data.
How This Lesson Encouraging Interdependence: Individual students are learning about topics and then teaching them to their groups, which creates accountability. Additionally, students are working together to create a project based off of what they have learned, and each student will put his or her name on the project. Because each student becomes an expert in one category, they can use these strengths while creating the project.
Room Set-Up
To encourage team work and to provide a space for the tasks, desks will be put into groups. While students work with their “Expert Groups,” desks will be in sets of 6. While students work with their regular teams, desks will be in sets of 4.
Materials Needed
Pencil, lined paper, and graphed paper.
Calculators
Individual Chromebooks or computers
Many supplies will vary based on students’ needs for their mini-lessons.
Outline
1. Introduction: I will begin the lesson by letting students know that they will be spending the next several days working with their teams, as well as “Expert Groups” in class. I will remind discuss with them what group work looks like, and the importance of interdependence and respect.
2. Choosing Topics: Students will begin in groups of 5. Each group member will choose one topic in the data and stats unit to become an expert on:
(1) Population and Sample (Includes vocabulary, types of samples, and identifying bias)
(2) Mean, Median, Mode, Range, and Outliers
(3) Box and Whisker Plots
(4) Histograms and Bar Graphs
(5) Comparing Data Using Variability and Measures of Center
3. Learning with Expert Groups: Students will move into “Expert Groups” to learn about their topics and plan lessons. For each topic, students will have videos to watch, practices, and a culminating quiz. All quizzes will be given on Schoology to give students immediate feedback. Some of the resources for these groups can be seen below. However, since the quizzes are on Schoology, they are unable to be linked.
4. Planning Mini-Lessons: Once students have learned about their topic, they will plan an interactive mini-lesson with their expert groups to teach their original groups about the topic.
5. Teaching Mini-Lessons: Students will rejoin their original group to complete mini lessons. The group members will share their lessons in the order seen above.
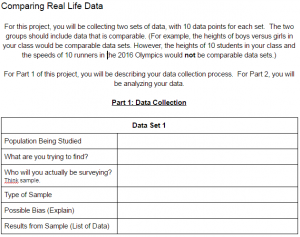
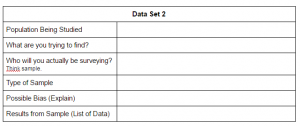
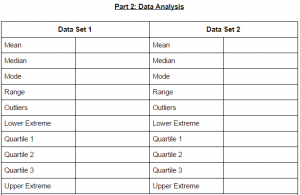
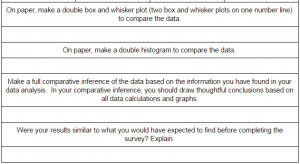
6. Data Collection and Analysis Project: Following the mini-lessons, each group will be completing a data collection and analysis project. In the project, the students will be asked to:
(1) Collect two sets of comparable data from the rest of the class or school on a topic that interests them.
(2) Find measures of center and measures of variability for the data.
(3) Create a double histogram or double bar graph of the data.
(4) Create a double box and whisker plot of the data.
(5) Analyze the data.
An image of the student project page can be seen below.
7. Reflection:
Following the projects, students will reflect upon the experience of working with their teams.
Overall, how did you work as a team in this unit?
What is one thing your team did really well?
What is one thing your team could improve upon?
Were there any issues that you had to resolve as a team?
What is one thing you learned about yourself from doing this activity?
Notes: As students work, I will walk around the room to provide guidance and pose questions to students as needed. I will acknowledge positive teamwork behavior as I walk around to different groups.
Assessment
Formative Assessments:
Check-Ins during “Expert Group” time and while students work on projects
Quizzes during “Expert Group” portion of the lesson
The following reflects an outline for an Algebra unit on factoring that was developed using CBCI philosophies as outlined in Concept-Based Curriculum and Instruction for the Thinking Classroom by Lynn Erickson, Lois Lanning, and Rachel French.
Unit Title: Factoring: aka – Expression Makeovers
Conceptual Lens: Transformations
Time Allocation: Approximately 8 days in a high school Algebra course
Unit Strands:
Identifying and using Greatest Common Factor
Factoring Trinomials
Factoring Difference of Squares
Using Factoring to Solve Equations
Unit Overview: There are many ways to transform an expression into an equivalent expression that looks different. How many ways can you think of to rewrite 10? What about 3(x+2)? Factoring is a common method for rewriting a sum of terms as a product of polynomials, which can be useful in solving quadratic equations.
What we would like students to…
Know: How to identify the greatest common factor (GCF) (where GCF is a number, a variable, or a binomial); the definitions of factor, greatest common factor, perfect square trinomial, and difference of squares; zero factor theorem; standard form a quadratic equation.
Do: Factor out a GCF; factor a trinomial; factor a difference of squares; solve a quadratic equation by factoring.
Understand: Factoring is writing an equivalent expression; factoring is the reverse process of multiplying polynomials; factoring can be used to solve equations.
Generalizations (Students understand that…)
Guiding Questions
1. Factoring is writing an equivalent expression, transforming the expression from a sum of terms to a product of polynomials
Factual Questions:
What is a factor?
What is a greatest common factor (GCF)?
What is factoring by grouping? Conceptual Questions:
How can identifying the GCF help us transform an expression into an equivalent expression?
How are your two equivalent expressions similar? How are they different?
2. Factoring is the reverse process of multiplying polynomials
Factual Questions:
What are the methods for factoring a trinomial?
Conceptual Questions:
How is factoring related to the Distributive Property? To “FOILing”?
3. Transforming an expression on one side of an equation may help in solving the equation
Factual Questions:
What is the standard form of a quadratic equation?
What is the zero product property? Conceptual Questions:
Why is factoring useful in solving quadratic equations?
How does transforming one side of the equation allow us to find potential solutions?
Why are there two solutions to some quadratic equations?
Debatable Unit Questions: Is there one method for factoring trinomials that is best?
Two suggested Learning Experiences:
Lesson 1:
This would be the first day of the unit. This lesson introduces students to greatest common factor, as well as reminds students of previous experiences that involved transformations of expressions, setting the foundation for the transferable macro-concept of transformations.
Objectives:
Students will make connections to previous experiences in writing equivalent expressions.
Students will identify common factors, and the greatest common factor, of expressions and write the factored form of these expressions.
Teacher – White board (or poster paper) and marker
Student – Pencil and paper
Learning Tasks:
Warm-up Discussion: When students enter the room, have the following task on the board/projector, “Write at least two different expressions that are equivalent to 10 but look different.” Students may work individually or with a neighbor. (Potential answers: 2*5, 3+7, 11-1, 3*2+4, etc.) After a minute, ask students to share some of their expressions and record them beside “10” on the board/projector. Repeat the process with 3(x+4), which will likely trigger students to apply the familiar distributive property, giving 3x+12.
Review of key features/terms: Using the lists of equivalent expressions from the warm-up, have students identify expressions that display a sum vs. a product, recall the definition of factor, and identify the factors in the product expressions. Ask students to speculate about (greatest) common factors in variable expressions based off their understanding of (greatest) common factors in numbers.
The Transformation: Now that we have the GCF, let’s actually transform the expression to an equivalent, but different looking, one. This Khan Academy video, https://www.youtube.com/watch?v=FvS7v6KM1ig, has a good explanation of “undistributing” this GCF, starting around the 2.5 minute mark.
Assessment:
Teacher will informally assess prior knowledge and understanding based off discussions. The warm-up for Day 2’s lesson will be a sum of terms where students are asked to identify the GCF and rewrite the expression as a product of the GCF and the remaining factor(s).
Lesson 2:
This will be day 3 of the unit. Students will have discussed factoring by grouping in the context of polynomials that are already set into 4 terms. Today’s lesson will center around rewriting trinomials into 4 terms as a precursor to factoring by grouping.
Objectives:
Students will transform trinomials into expressions with 4 terms using both a “trial and error” method and an area method.
Teacher: Computer with projector, term tiles and practice problems for area activity (see explanation below)
Students: pencil and paper
Learning Tasks:
Warm-up: Review factoring by grouping from an expression with four terms. i.e. – “Use the information on GCF from last class to rewrite this expression as a product of two binomials: xy + 2x + 3y + 6.” (Answer: (x+3)(y+2))
Discussion: Ask students to discuss with a neighbor or two the following question, “How might someone say that FOIL connects the two expressions in the warm-up?” If necessary, guide students toward the idea that the four terms of the initial expression are the F, O, I, and L if you “FOIL” the product.
Rewriting trinomials. Using an example like (x + 7)(x – 4), remind students that in binomials with only one variable, after we “FOIL,” we can collect like terms, giving us a trinomial instead of an expression with 4 terms. Let this discussion lead to the idea of transforming trinomials into expressions with 4 terms, and then attempting factoring by grouping. Students should quickly see that this trial and error method is not always effective and, therefore, not the most efficient.
Use the area activity at http://courses.wccnet.edu/~rwhatcher/VAT/Factorin to demonstrate an alternative to “trial and error.” This activity also serves the purpose of helping students to visualize the connection between product and sum via the concept of area. Note: This app is clunky and not very user friendly. To save time (and avoid the need for a class set of computers), create several sets of terms tiles. Have students work in small groups on problems together, using the same method and process as the app but at their desk with the paper tiles.
Exit ticket: “Summarize a key finding from the area activity just completed. Is there a pattern or process you can summarize that would help a fellow student quickly split a trinomial into a set of four terms that would allow factoring by grouping?”
Assessment:
Teacher will informally assess knowledge and understanding based off discussions, as well as the information students provided on the exit tickets. For the warm-up the next day, project a couple of the exit ticket ideas (or an amalgamation of ideas). Ask students to apply it to a practice problem, and then answer “was the method(s) helpful? Would you like to tweak the process/hint in any way?”
Converting Between Scientific Notation and Standard Form
Operations with Scientific Notation
Real-World Applications with Scientific Notation
Web:
Generalizations:
Exponents can be used to simplify very large or very small numbers.
We can compare small or large numbers more easily when they are written with exponents.
We can perform operations on small or large numbers more easily when they are written with exponents.
Technology uses Scientific Notation to reduce the number of digits displayed.
Guiding Questions:
F = factual questions
C = conceptual questions
D = debatable questions
What are some careers that use Scientific Notation? (F)
Where can we see Scientific Notation in the technology we use? (F)
How can we convert numbers from Scientific Notation to Standard Form and vise versa? (C)
How can we perform operations with numbers written in Scientific Notation? (C)
How can we compare numbers in Scientific Notation? (C)
What kinds of numbers should be written in Scientific Notation? (D)
Critical Content:
Each time the decimal is moved on spot, the number is multiplied or divided by 10.
Scientific Notation must be written with the first factor being greater than 1 but less than 10.
Scientific Notation must be written as a factor multiplied by a power of 10.
When adding two numbers in Scientific Notation, make the exponents the same by moving the decimal, then add the factors.
When subtracting two numbers in Scientific Notation, make the exponents the same by moving the decimal, then subtract the factors.
When multiplying two numbers in Scientific Notation, add the exponents and multiply the factors.
When dividing two numbers in Scientific Notation, subtract the exponents and divide the factors.
Key Skills:
Convert from Scientific Notation to Standard Form and vise versa.
Add, subtract, multiply and divide numbers in Scientific Notation.
Given two numbers in either form, determine which number is larger or smaller.
Assessment with Scoring Guide:
What: Use exponents to simplify, compare, and perform operations with very large and very small numbers.
Why: …in order to make meaning of these numbers that are often found in the real-world.
How: You are a mathematician working at NASA. Your job is to research the distances from Earth to all of the other planets. Then, complete the following:
Write the distances in Scientific Notation
Order the distances from least to greatest
How many times greater is…
The distance from Earth to Saturn than the distance from Earth to Mars?
The distance from Venus to Pluto than the distance from Venus to Earth?
Explore the distance from our galaxy to others. Compare some of the distances you find to the distances in our Solar System. Explain your findings.
Suggested Learning Experiences:
Two are described in detail below.
Unit Overview:
Scientific Notation is a tool that is used by people in many different careers to simplify very large or very small numbers. In this unit, students make connections between Scientific Notation and the Laws of Exponents. Students have just completed the unit on exponents, and are familiar with how to add, subtract, multiply, and divide expressions that contain exponents. After making the connection, students are able to apply their new knowledge to real-world problems. Students come up with generalizations about the kinds of numbers that are being converted into Scientific Notation.
Lesson #1: Converting Numbers in Scientific Notation
Before This Lesson:
This lesson will be the second day of this unit. Before this lesson, students will have seen numbers in Scientific Notation. They will understand that the first factor must be greater than 1 but less than 10, and they will understand that the factor is multiplied by a power of 10.
Standards:
EE.3: Use numbers expressed in the form of a single digit times and integer power of 10 to estimate very large or very small quantities, and to express how many times as much one is than the other.
EE.4: Perform operations with numbers expressed in scientific notation, including problems where both decimal and scientific notation are used. Use scientific notation and choose units of appropriate size for measurements of very large or very small quantities.
Objectives:
Students will be able to convert numbers in Standard Form into Scientific Notation.
Students will be able to convert numbers in Scientific Notation into Standard Form.
Resources and Materials:
Teacher
Cards with numbers in both Standard Form and Scientific Notation
Whiteboard/Marker
Student
Pencil/Paper
Learning Tasks:
Matching Activity: The teacher will give groups of students cards with numbers on them. Half of the cards will have certain numbers in Standard Form, while the other half of the cards will have the same numbers in Scientific Notation. Their task is to match up the Standard Form with the Scientific Notation.
See-Think-Wonder: After students have matched up cards with their group members, explain the ‘See-Think-Wonder’ activity to students. Allow students to explore their thinking with the previous activity. They will be looking at pairs of numbers (one in Standard Form, and one in Scientific Notation). Students will write down their thoughts for each of the 3 ‘stages’ in this routine.
Class Discussion: The teacher will lead a class discussion over the previous activities. The teacher will put ideas and thoughts on the board to make thinking visible for students.
Procedure: The teacher will first ask groups to come up with a ‘procedure’ for going from Scientific to Standard and vise versa. They will once again be focusing on the pairs they formed with the cards in the initial matching activity. Give students plenty of time to come up with this process. At the end of class, share out ideas. End the lesson by solidifying a process for converting these numbers (if one of the groups doesn’t come up with a legitimate process, the teacher will have to show them).
Assessment:
Students will be informally assessed during the matching activity. The teacher will walk around and observe the pairs of numbers students are grouping together.
Students will be more formally assessed during the See-Think-Wonder activity. The teacher will collect the notes that students write down for each ‘stage’ in the routine. The teacher will informally assess as well by listening to students during their discussion.
Lesson #2: Comparing Numbers in Scientific Notation
Before This Lesson:
This lesson would be the 4th or 5th day of the unit. The comparing would take place after students have learned how to convert, but before they have learned how to perform operations with numbers in Scientific Notation.
Standards:
EE.3: Use numbers expressed in the form of a single digit times and integer power of 10 to estimate very large or very small quantities, and to express how many times as much one is than the other.
EE.4: Perform operations with numbers expressed in scientific notation, including problems where both decimal and scientific notation are used. Use scientific notation and choose units of appropriate size for measurements of very large or very small quantities.
Objectives:
Students will be able to determine which number is greater given two numbers in Scientific Notation.
Students will be able to determine which number is greater given one number in Scientific Notation and one number in Standard Form.
Resources and Materials:
Teacher
Computer/Video with Speakers
Worksheets
Student
Pencil/Paper
Laptop
Learning Tasks:
Video: Start by showing students the ‘Powers of 10’ video (Link #2 under Media). This video will give students an idea of how massive some of the numbers are that we are dealing with.
Group Discussion: Have students discuss in groups the following questions after the video:
What stood out to you about the video?
What questions do you have after watching the video?
How is this video related to our current unit on Scientific Notation?
Research: Give students a prompt that requires them to compare the mass of planets. They can collect data on the masses of planets however they’d like by researching online. Students will research in groups of 2 or 3.
Comparisons: Have students come up with 3 significant comparisons that they find interesting. (For example, maybe students discover that Jupiter is 2.5 times more massive than all of the planets in our solar system combined)
Share Out: Students will share out BOTH their findings and their math work. Students will need to show the class how they came up with the comparisons.
Assessment:
Students will turn in their worksheet after they have researched the planet masses. Their work must also show the math behind the comparisons.
***Note: Students have not yet performed operations formally with Scientific Notation. However, some students may figure out the process of adding, subtracting, multiplying and dividing with Scientific Notation during this activity.
Principal: Value can create the illusion of three-dimensional space
Concepts: Light and Dark, Space, Illusion, middle gray, value scale, 2D, 3D
Process: Drawing (Pencil)
Standards:
1PR Integrate observational and technical skills to strengthen artmaking.
4PR Select and use the elements and principles of art and design to communicate understanding of an interdisciplinary concept.
5RE Express what was learned and the challenges that remain when assessing their artworks.
Conceptual Lens: The conceptual lens for this assignment will be the relationship of value to the illusion of three-dimensional space. Allowing students to look at new art work and understand one way it successfully demonstrates space.
Guiding Questions: Students will be shown a black and white photograph.
Black and White Still Life Photo
Why in this photo are you able to see the size and space of the objects?
Is there a light shining on these objects? Where is it located?
Why does that create different values on an object that is one single color?
Next students will attempt to choose the spots they see as the closest to white, black and middle gray (directly between black and white).
Learning Experiences:
Day 1 Lesson
Lesson Outline: Students will be given a 10in x 1in strip of paper and asked to divide it into 9 one inch squares. The first square will be left white and the last square will be filled in black. Students will then need to slowly work their way through the value scale finding the values in between. Using an eraser and pencil students will work to correct areas that are too light or too dark attempting to create a seamless line from white to black.
1 to 9 Value Scale
Timing: This lesson is designed to last 50 minutes. The first 25 minutes of this lesson will be spent working with students on guiding questions and exploring the concept of value and the illusion it uses to create three-dimensional space. The remaining time in this lesson will be used to allow students to create their own value scale and practice working with their materials.
Materials:
Teacher- Whiteboard, Projector, Video links, Black and White Photo, Example for modeling
Student- 10in x 1in paper strips, 4B drawing pencils, pink pearl eraser, kneadable eraser, ruler, art journal
Set up:
Teacher – Teacher: Before the lesson the teacher will find visual aids to assist students in understanding the relationship between value and the illusion of space. In addition she will cut out paper strips to be used in creating value scales.
Student – During the discussion of guiding questions and value, the weeks helper table will pass out supplies and art journals to the class.
Students will be shown a video of an artist drawing a still life. They will be asked to pick out what about the piece makes it appear so life like, identify what the artist works on first in the video and why that might be, then they will record their answers in their art journal.
Lesson Outline: Each table will have a still life of different fruit, bottles, and other objects set up with a direct light source. Students will draw there still life first focusing of the darkest areas, then the lightest and working their way to the middle values. They will be working on middle gray paper to help by giving them a base line for their middle values. It will be as important for them to use their eraser for drawing light spaces as it would be to use their pencil elsewhere.
Still Life, Two Values (white and black only)
Still life, Many Values
Timing: This lesson will last through several class periods with students moving at their own pace. Students will have three days to complete their project, if their project is not completed during this time they will need to complete it at the end of the quarter during catchup week.
Materials:
Teacher- Various Fruit, Bottles and Containers, Flashlights, White Board, Projector, Internet
Students- 9in X 12in Gray Bristol Paper, 2H 2B, 4B Pencils, pink pearl eraser, kneadable eraser, art journal and tissues
Set Up:
Teacher – Teacher: Before the lesson the teacher will prepare still life’s on each table and position a light source on the objects. She will project different examples of black and white still life pencil drawings.
Student – As students arrive to class the weeks helper table will pass out supplies and to the class, making sure to check the supply board for any changes.
Assessment: Students will self-evaluate their work giving themselves a 1 through 4 rating on craftsmanship creativity and clean up. Followed by three short answer questions.
What would you do to create value in your work, if you were photographing a still life in black and white?
What does value do to stop a work from appearing flat?
Where do you see value in your own life?
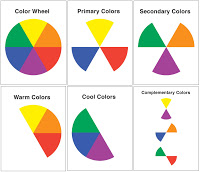
Unit 2 2nd Grade Warm/Cool Color Self Portrait
Principal: Color can show an artist’s emotions or feelings
Concepts: Warm/Cool Colors, Color Families, Self portrait
Process: Drawing (Pastels)
Standards:
1PE Notice and point out details and respond to expressive features in artworks.
5PR Identify, select and use art and design elements and principles to express emotions and produce a variety of visual effects (e.g., nuances of surface, contour, pattern and tone).
4RE Share their personal interpretations of the meanings conveyed in various works of art
5RE Describe how an artist uses the elements and principles of design to create expressive impact in a work of art.
Conceptual Lens: The conceptual lens for this unit will be function, examining how color can be used to communicate the emotions of an artist. This unit will allow students to explore their own feelings and how color can be used to show those emotions in their art work.
Guiding Questions: Students will view different self-portraits painted by Pierre-Auguste Renoir, Frida Kahlo and Picasso done at different times in their lives. Portraits will be placed side by side for comparison of facial expression and color.
What differences do you notice between these two self-portraits?
What emotion do you think they are feeling in each picture?
How do the colors make you feel a different emotion?
What emotion would you choose for your own self-portrait?
What colors would you use?
Learning Experiences:
Day 1Lesson
Lesson Outline: Students will study different self-portraits, with the teacher writing their answers on the board. The teacher will take a black and white photo of the students in their chosen pose and chosen emotion. Student will then choose a color family they feel best matches the emotion they wish to communicate, and practice working with those colors on scrap paper. Students will have the option to bring one prop for their portrait.
Pierre-Auguste Renoir Self-portrait 1875
Pierre-Auguste Renoir, Self-portrait 1910
Frida Kahlo, Self-portrait 1926
Frida Kahlo, Self-portrait 1940
Pablo Picasso, Self Portrait 1901
Pablo Picasso, Self-portrait 1907
Timing: The first 30 minutes of this lesson will be devoted to discussing the function of color and emotion in art and studying various artist self-portraits. The remaining 20 minutes of this lesson will give the students a chance to pick a color family for their portrait and have their picture taken.
Materials:
Teacher-Digital Camera, White board, Projector, Images of Artist Self-portraits, Large Color Wheel
Scrap paper, Color wheels, Chalk pastels, Pencil, Eraser
Set Up:
Teacher – To prepare for this lesson the teacher will need to find a digital camera, collect a verity of artist self-portraits, and print off and laminate color wheels.
Students – The table helpers of the week will need to pass out color pastels, color wheels and other supplies for students. As well as art journals.
Day 2-4Lesson
Lesson Outline: Students will cut out their photo and use chalk pastels to add their color family of choice. They will draw in a background for their portrait and use chalk pastels to add detail. Students will continue to add to their work until they are satisfied and have completed teacher suggestions they are comfortable with.
Color Families
Color Wheel
Timing: This lesson will take several days to complete. Students will have two days to complete their work with partial time the third day before students being the wrap up activity. Any work that is not complete at the end of the lesson will need to be finished during catchup week at the end of the quarter.
Materials:
Teacher- Projector, Images of Self-portrait examples, Example of completed project (model)
Student-Photo copy of student picture, chalk pastel, eraser, scissors, glue, variety 9in x 12in construction paper
Set Up:
Teacher – The teacher will need to print of two copies of each student’s portrait before the lesson can begin. In addition, she will create a model to work on in front of the class. The teacher will also pass back art pieces for students to continue their work.
Student – The assigned table helpers of the week will pass out supplies including color pastels, color wheels, and rubrics.
Assessment: Students will self-evaluate their work giving themselves a 1 through 4 rating on craftsmanship creativity and clean up. Then they will complete two short answer questions.
How does color help artists communicate?
What emotion did you chose for your portrait, and how do your colors help share that emotion?
Lesson Wrap Up Activity: Students will share their work with their table and explain to one another why they made certain color and facial expression choices in their work. They will reflect on their work and if there is anything they would change and provide positive feedback for their peers.