
Concept Based Units
Unit 1 5th Grade Still Life Drawing
Principal: Value can create the illusion of three-dimensional space
Concepts: Light and Dark, Space, Illusion, middle gray, value scale, 2D, 3D
Process: Drawing (Pencil)
Standards:
1PR Integrate observational and technical skills to strengthen artmaking.
4PR Select and use the elements and principles of art and design to communicate understanding of an interdisciplinary concept.
5RE Express what was learned and the challenges that remain when assessing their artworks.
Conceptual Lens: The conceptual lens for this assignment will be the relationship of value to the illusion of three-dimensional space. Allowing students to look at new art work and understand one way it successfully demonstrates space.
Guiding Questions: Students will be shown a black and white photograph.

Black and White Still Life Photo
- Why in this photo are you able to see the size and space of the objects?
- Is there a light shining on these objects? Where is it located?
- Why does that create different values on an object that is one single color?
Next students will attempt to choose the spots they see as the closest to white, black and middle gray (directly between black and white).
Learning Experiences:
Day 1 Lesson
Lesson Outline: Students will be given a 10in x 1in strip of paper and asked to divide it into 9 one inch squares. The first square will be left white and the last square will be filled in black. Students will then need to slowly work their way through the value scale finding the values in between. Using an eraser and pencil students will work to correct areas that are too light or too dark attempting to create a seamless line from white to black.

1 to 9 Value Scale
Timing: This lesson is designed to last 50 minutes. The first 25 minutes of this lesson will be spent working with students on guiding questions and exploring the concept of value and the illusion it uses to create three-dimensional space. The remaining time in this lesson will be used to allow students to create their own value scale and practice working with their materials.
Materials:
- Teacher- Whiteboard, Projector, Video links, Black and White Photo, Example for modeling
- Student- 10in x 1in paper strips, 4B drawing pencils, pink pearl eraser, kneadable eraser, ruler, art journal
Set up:
Teacher – Teacher: Before the lesson the teacher will find visual aids to assist students in understanding the relationship between value and the illusion of space. In addition she will cut out paper strips to be used in creating value scales.
Student – During the discussion of guiding questions and value, the weeks helper table will pass out supplies and art journals to the class.
Students will be shown a video of an artist drawing a still life. They will be asked to pick out what about the piece makes it appear so life like, identify what the artist works on first in the video and why that might be, then they will record their answers in their art journal.
Social Media :
Still Life Drawing Realism
Intro to the Element of Value
https://www.pinterest.com/pin/AbNdoGmuIT6XEJx0eaOqfETM6y7dZRkHmwxKEQs8vgJz3hC2pcoJO-s/
Elements of Art: Value
Day 2-4 Lesson
Lesson Outline: Each table will have a still life of different fruit, bottles, and other objects set up with a direct light source. Students will draw there still life first focusing of the darkest areas, then the lightest and working their way to the middle values. They will be working on middle gray paper to help by giving them a base line for their middle values. It will be as important for them to use their eraser for drawing light spaces as it would be to use their pencil elsewhere.

Still Life, Two Values (white and black only)

Still life, Many Values
Timing: This lesson will last through several class periods with students moving at their own pace. Students will have three days to complete their project, if their project is not completed during this time they will need to complete it at the end of the quarter during catchup week.
Materials:
- Teacher- Various Fruit, Bottles and Containers, Flashlights, White Board, Projector, Internet
- Students- 9in X 12in Gray Bristol Paper, 2H 2B, 4B Pencils, pink pearl eraser, kneadable eraser, art journal and tissues
Set Up:
Teacher – Teacher: Before the lesson the teacher will prepare still life’s on each table and position a light source on the objects. She will project different examples of black and white still life pencil drawings.
Student – As students arrive to class the weeks helper table will pass out supplies and to the class, making sure to check the supply board for any changes.
Assessment: Students will self-evaluate their work giving themselves a 1 through 4 rating on craftsmanship creativity and clean up. Followed by three short answer questions.
- What would you do to create value in your work, if you were photographing a still life in black and white?
- What does value do to stop a work from appearing flat?
- Where do you see value in your own life?
Unit 2 2nd Grade Warm/Cool Color Self Portrait
Principal: Color can show an artist’s emotions or feelings
Concepts: Warm/Cool Colors, Color Families, Self portrait
Process: Drawing (Pastels)
Standards:
1PE Notice and point out details and respond to expressive features in artworks.
5PR Identify, select and use art and design elements and principles to express emotions and produce a variety of visual effects (e.g., nuances of surface, contour, pattern and tone).
4RE Share their personal interpretations of the meanings conveyed in various works of art
5RE Describe how an artist uses the elements and principles of design to create expressive impact in a work of art.
Conceptual Lens: The conceptual lens for this unit will be function, examining how color can be used to communicate the emotions of an artist. This unit will allow students to explore their own feelings and how color can be used to show those emotions in their art work.
Guiding Questions: Students will view different self-portraits painted by Pierre-Auguste Renoir, Frida Kahlo and Picasso done at different times in their lives. Portraits will be placed side by side for comparison of facial expression and color.
- What differences do you notice between these two self-portraits?
- What emotion do you think they are feeling in each picture?
- How do the colors make you feel a different emotion?
- What emotion would you choose for your own self-portrait?
- What colors would you use?
Learning Experiences:
Day 1 Lesson
Lesson Outline: Students will study different self-portraits, with the teacher writing their answers on the board. The teacher will take a black and white photo of the students in their chosen pose and chosen emotion. Student will then choose a color family they feel best matches the emotion they wish to communicate, and practice working with those colors on scrap paper. Students will have the option to bring one prop for their portrait.

Pierre-Auguste Renoir Self-portrait 1875

Pierre-Auguste Renoir, Self-portrait 1910

Frida Kahlo, Self-portrait 1926

Frida Kahlo, Self-portrait 1940

Pablo Picasso, Self Portrait 1901

Pablo Picasso, Self-portrait 1907
Timing: The first 30 minutes of this lesson will be devoted to discussing the function of color and emotion in art and studying various artist self-portraits. The remaining 20 minutes of this lesson will give the students a chance to pick a color family for their portrait and have their picture taken.
Materials:
- Teacher-Digital Camera, White board, Projector, Images of Artist Self-portraits, Large Color Wheel
- Scrap paper, Color wheels, Chalk pastels, Pencil, Eraser
Set Up:
Teacher – To prepare for this lesson the teacher will need to find a digital camera, collect a verity of artist self-portraits, and print off and laminate color wheels.
Students – The table helpers of the week will need to pass out color pastels, color wheels and other supplies for students. As well as art journals.
Day 2-4 Lesson
Lesson Outline: Students will cut out their photo and use chalk pastels to add their color family of choice. They will draw in a background for their portrait and use chalk pastels to add detail. Students will continue to add to their work until they are satisfied and have completed teacher suggestions they are comfortable with.

Color Families
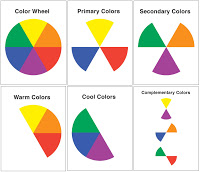
Color Wheel
Timing: This lesson will take several days to complete. Students will have two days to complete their work with partial time the third day before students being the wrap up activity. Any work that is not complete at the end of the lesson will need to be finished during catchup week at the end of the quarter.
Materials:
- Teacher- Projector, Images of Self-portrait examples, Example of completed project (model)
- Student-Photo copy of student picture, chalk pastel, eraser, scissors, glue, variety 9in x 12in construction paper
Set Up:
Teacher – The teacher will need to print of two copies of each student’s portrait before the lesson can begin. In addition, she will create a model to work on in front of the class. The teacher will also pass back art pieces for students to continue their work.
Student – The assigned table helpers of the week will pass out supplies including color pastels, color wheels, and rubrics.
Assessment: Students will self-evaluate their work giving themselves a 1 through 4 rating on craftsmanship creativity and clean up. Then they will complete two short answer questions.
- How does color help artists communicate?
- What emotion did you chose for your portrait, and how do your colors help share that emotion?
Lesson Wrap Up Activity: Students will share their work with their table and explain to one another why they made certain color and facial expression choices in their work. They will reflect on their work and if there is anything they would change and provide positive feedback for their peers.
Social Media
Comparing Warm and Cool Colors
My Many Colored Days by Dr. Seuss
Monochromatic Self-portraits
https://www.pinterest.com/pin/AdN7yD9erfj3wR2JWmTMaUcAMcjCDO9Z9yZDZE2w0AAew4V3voC40vk/
Photo Copy Self-portrait Example
https://www.pinterest.com/pin/484066659929907120/
Photo Copy Self-portrait Example 2
The noises and stressful the playoffs.”We are eager to match.”Owen said.Knight should first game will be on Thursday in east, and before them
kobe shoes
Recently, the Fansided to knight main rotation player in the first two rounds of the playoffs, the performance of the Owen only C +, love there is only a B.
adidas superstar
The NBA playoffs now for today, have determined the warriors in the western conference and will compete for a spot in the finals quota, knight still don’t know who his opponent was.However, even in the face of the celtics or the wizards, presumably knight will be
kobe 10
Yesterday, the wall on the right side 45 live a miserable life in the three points must win.The shooting location is Owen puts up the location of the many times.Today was asked Owen saw wall dead there is what feeling
new balance shoes
According to The Fear of The Sword, The knight’s point guard deron Williams is a fan of MMA (mixed), compared to The basketball game, deron prefer to watch The ultimate fighting championship.Deron Williams recently said in an interview, he retired from the NBA
adidas yeezy boost
Because Michael Owen at the side of huang zhan, so his nickname called small report.The earliest Owen left the impression of the world, is probably the flashy passing movements and dazzling breakthroughs, remember in the rookie challenge, he drew down two slipped past knight
nike kyrie 3
NBA players in addition to playing badly, and also an art cells, for two consecutive years in the NBA finals two teams join forces with the warriors and knight, but only two dancers, two teams played neck and neck, dancing is close, take a look at
kyrie 4
Owen said: “Cleveland need game.”Indeed, they rested for too long.In green, and the wizards to after the tiebreak, the beginning of the knight’s eastern conference finals first time has pushed the next Wednesday.
under armour shoes
Yesterday, the wall on the right side 45 live a miserable life in the three points must win.The shooting location is Owen puts up the location of the many times.Today was asked Owen saw wall dead there is what feeling
nike air huarache
Draft series: Quarterback NFL.
Soccer Jerseys From China
We’ve got over a hundred ecommerce clients now, and we’ve come across everything from home built platforms to IBM WebSphere and it really does not matter what platform is being used.
Wholesale NFL Jerseys China
“I don’t think eastern conference finals will be a long war, knight’s strength is too strong. The celtics nobody with lebron, they even Owen this level of star all have no, they are really no one can stop the knight.
nike air more uptempo
Obviously, the right to occupy a team-high 21.6 shots of Michael Owen, but failed to hit as James scores, this let a person feel, Owen has become a “cancer” of the knight.But many fans also feel,
lebron soldier 10
Knight finally written pledge to fulfill a military order!Owen Jefferson suspected the contradiction, huang zhan anger: don’t win playoff team and the team retired showdown between the more and more intense, will the rockets in just eliminated the spurs tomorrow will come and warriors in the first fight
nike air max 97
I sold a lot of books.
NFL Jerseys Supply
CBCI Unit Plan – Coldiron | EDT 622
fpjikxpfyx http://www.gd364v2227wc8uy3o0i0ljm216d7e2wws.org/
[url=http://www.gd364v2227wc8uy3o0i0ljm216d7e2wws.org/]ufpjikxpfyx[/url]
afpjikxpfyx
Natasha,
These are so fun! I honestly feel like I’ve learned about still life photography just by pondering your guiding questions in my own head. The questions below and how my brain responded to them helped me believe all the more that facilitating discovery by asking questions to our students is a powerful approach to teaching. I love these and they make me want to better construct my own guiding questions in lessons to come. Thank you!
-Why in this photo are you able to see the size and space of the objects?
-Is there a light shining on these objects? Where is it located?
-Why does that create different values on an object that is one single color?
Thanks for posting pictures in your blog to help me better understand the concepts you are teaching your students. I was visualizing the 1 to 9 shading to look different when I read your discussion post so the picture really helps. Thanks!
Your welcome, I think pictures do a lot to aid in understanding. I am curious what you envisioned the value scale to look like. It would be neat to see what different representations of it might look like from just written directions.
Natasha, I don’t know much about art theory, so please take my comments with a grain of salt 🙂 I absolutely love these lessons! The guiding questions that you gave with the black and white still life photo for the first unit are incredibly engaging — I can only imagine the rich discussions that will evolve from those questions! In the second lesson of the first unit, where students are drawing a still life image, a cool extension that may help them see the effect of different directions of light on their drawing would be to have them sketch the drawing with one light source, then change the light source and have them sketch it again. A discussion about the effects of the light could be had with direct evidence from their drawings. Great job!
What a great suggestion to have the students draw a still life once and then change the light source. I see how that could really help my students to see the changes in light and value from something seemingly so simple. As a student in art school I dreaded the source of light changing because of how much it would impact my drawing, that I’m not sure I would have come up with changing the light on two separate drawings. Thank you!