
Area and Perimeter of Quadrilaterals and Triangles
Conceptual Lens: Geometry
Time Allocation: 3-4 Days
Grade: 7th; taught as a review of 6th grade content
Unit Overview: Area and perimeter are used all of the time in real life – from finding the square footage of flooring needed to cover a space, to finding the amount of fencing needed to enclose an area. So how do we find the area and perimeter of shapes other than rectangles? How would we find the area and perimeter of new shapes from the formula for the area of a rectangle?
Unit Strands:Knowing Vocabulary,Understanding Formula for Perimeter, Understanding Formulas for Area, Calculating Perimeter, Calculating Area
Concepts in the Unit:
- Quadrilateral, rectangle, parallelogram, trapezoid, triangle, irregular figure
- Perimeter of polygons and irregular figures
- Area of Rectangles, Triangles, Parallelograms, Trapezoids, and Irregular Figures
- Distance, Length, Width, Base, Height, Right Angle
Critical Content: What I would like students to know
- Know geometric vocabulary: Length, width, base, height, parallelogram, trapezoid, triangle, area, perimeter.
- The height of a figure is not always vertical, but rather intersects the base(s) at a right angle.
Key Skills: What I would like the students to be able to do:
- Identify the base(s) and height of a figure.
- Explain how the area and perimeter of triangles, parallelograms, trapezoids, and irregular figures relate to the area of a rectangle.
- Find the area and perimeter of rectangles, triangles, parallelograms, and trapezoids.
- Find the area and perimeter of irregular figures.
Generalizations: What I would like students to understand:
- The area of a rectangle can be found by multiplying the length and width, or base and height.
- The area of triangles, parallelograms, trapezoids, and irregular figures can be found using the formula for the area of a rectangle.
- The area of a triangle can be found by multiplying the base and height, and dividing by two.
- The area of a parallelogram can be found by multiplying the base and height.
- The area of a trapezoid can be found by averaging the bases and multiplying by the height.
- The formulas for the area and perimeter of quadrilaterals and triangles can be extended to find the area of irregular figures with non-curved sides.
- The formulas for area and perimeter can be used often in real life.
Guiding Questions (F: Factual, C: Conceptual, D: Debatable)
- What do the following words mean? Length, width, base, height, parallelogram, trapezoid, triangle, area, perimeter (F)
- What are the formulas for the area of a rectangle? (F)
- How do we find perimeter of any figure? (F)
- How are parallelograms, triangles, and trapezoids similar to rectangles? How are they different? What measurements do they have in common? (C)
- How does the area of a rectangle relate to the area of parallelograms, triangles, and trapezoids? (C)
- How could we adapt our formula for the area of a rectangle to find the area of parallelograms, triangles, and trapezoids? (C)
- What is the formula for the area of parallelograms, triangles, and trapezoids? (F)
- If we can find the area of parallelograms, triangles, and trapezoids from the area of rectangles, is it still worth knowing their individual formulas? (D)
- How could we use the area of rectangles, parallelograms, triangles, and trapezoids to find the area of irregular figures? (C)
- Should we make up a formula for finding the area of different types of irregular figures? (D)
- How could we use area and perimeter formulas in real life? (C)
Assessment:
- What: Students will investigate area and perimeter of polygons
- Why: In order to understand the relationship between the area of polygons and the area specifically of rectangles, and to find the area and perimeter of various types of figures with straight edges.
- How: The assessment will be composed of the following pieces.
- Identify types of figures and their area formulas.
- Explain how the area of parallelograms, triangles, and trapezoids relate to rectangles.
- Find the area of given rectangles, parallelograms, triangles, and trapezoids.
- Find the area of irregular figures. Explain how they found these areas.
Unit Outline:
Day 1:
Lesson Objectives: The student will be able to recall vocabulary and determine formulas related to the perimeter and area of polygons. This lesson is intended for 7th graders as a review of area and perimeter.
Prior Knowledge: Because this is a review of previous material, students come into class understanding how to find area and perimeter of rectangles, and remembering small pieces of how to find the area of parallelograms, triangles, and trapezoids. However, they often times do not have a conceptual of finding area of triangles and quadrilaterals.
Standards:
- CCSS.MATH.CONTENT.6.G.A.1 Find the area of right triangles, other triangles, special quadrilaterals, and polygons by composing into rectangles or decomposing into triangles and other shapes; apply these techniques in the context of solving real-world and mathematical problems.
- CCSS.MATH.PRACTICE.MP1 Make sense of problems and persevere in solving them.
- CCSS.MATH.PRACTICE.MP2 Reason abstractly and quantitatively.
- CCSS.MATH.PRACTICE.MP3 Construct viable arguments and critique the reasoning of others.
- CCSS.MATH.PRACTICE.MP5 Use appropriate tools strategically.
- CCSS.MATH.PRACTICE.MP7 Look for and make use of structure.
Materials Needed:
- Opening Handout (See step 1 below)
- Grid and Polygons (See step 4 below)
- Projector and/or White Board (Teacher)
- Pencil and Paper (Student)
Lesson Outline:
- Opening Activity/Recall: Students will be given a handout with images of different types of three and four-sided figures. Their job is to (1) name each figure, (2) explain why they know it is that type of figure, (3) label the important vocabulary on the figure (ex: length, width, base, height). An example of this handout is given below:

- Here is an entertaining video talking about types of figures that could be used to reteach types of figures.
- Determining a definition of area and perimeter: I will ask students to answer the following questions on their opening handout. After answering these questions on their own, students will discuss their answers with the class. As students respond, I will record student responses on the board.
- What is area?
- What is perimeter?
- Why are area and perimeter useful?
- Defining area and perimeter for rectangles: I will ask students to answer the following questions on their opening handout. After answering these questions on their own, students will discuss their answers with their group, and then with the class as a whole. As students respond, I will record student responses on the board.
- How do we find the area of a rectangle? Draw a picture showing what is meant by finding area.
- How do we find the perimeter of a rectangle? Draw a picture showing what is meant by finding perimeter.
- Note: Prior to whole-class discussion, I will circulate the room to get an idea of student responses. During whole-group discussion, I will highlight certain student’s work and will ask students questions such as “What do you think about this?” “Why do you think they draw this picture to represent area?”
- Relating area of parallelograms, triangles, and trapezoids to area of rectangles: For the remainder of this lesson, students will be working in a group to determine the areas of parallelograms, triangles and trapezoids. Students will be given handouts to walk through the different parts of the lesson. Students will also be given a large grid, and a rectangle, parallelogram, trapezoid, and triangle that could fit on the grid. All the four figures have the same base and height, although the top base of the trapezoid has a different height. Reduced images of what they will be given are shown below.
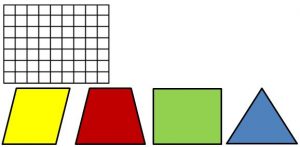
- Examining the parallelogram, trapezoid, and triangle: I will explain to students that their goal is to come up with a rule for how they could find the area of parallelograms, triangles and trapezoids. I will project the following questions for students to think about on their own and then discuss with their group to help them discover the formulas for each figure.
- Place the figure on the grid, and look at how it sits on the grid. What do you notice
- How is the figure similar to a rectangle when it is on the grid? How is it different? What could you do to the rectangle to make it like a rectangle?
- Make an estimate of the area of the figure. How did you do this?
- What does this tell us about finding the area of the figure?
- What could be our formula for finding the area of the figure?
- Class discussion: Once students have time to come up with their “rules” or formulas for finding area of parallelograms, triangles, and trapezoids, we will discuss their findings as a class. During whole group discussion, the class will come to conclusions about the formulas for each of the shapes. They will be asked to then record their formulas.
- Note: Prior to whole-class discussion, I will circulate the room to get an idea of student responses. During whole-group discussion, I will highlight certain student’s work and will ask students questions such as “What did you notice about the space that each figure took up on the grid?” “What do you think about this solution?” “How did you come up with this rule?” “Do you think this formula would work for any triangle [or parallelogram or trapezoid], or just the one you had?”
- Reflection: At the end of the lesson, have students reflect upon their learning by answering the following questions. Once they have their answers written down, have students share their responses with the class. If there is time, discuss the last question as a class.
- What did you learn today about area and perimeter of figures?
- What are you still confused about from today’s lesson?
- If we can find the area of parallelograms, triangles, and trapezoids from the area of rectangles, is it still worth knowing their individual formulas?
- Formative Assessment: The teacher class use classroom observations, discussions, and students’ written reflections from part (6) to gauge student understanding.
- Reteach: If students would like to see how we came up with our formulas again, they can access the following videos:
- Extension/Homework: Ask students to respond to the following problems:
- Look at the perimeter and area of the shapes you used to find your formulas. Are perimeter and area proportional for all of the figures? How do you know?
- If area and perimeter are not proportional, think about what would make a quadrilateral have a bigger area for a set perimeter (that means each shape has the same perimeter, but may have a different area). Draw pictures to come up with a solution.
Day 2: Area and Perimeter Practice: Students will be given the following types of questions: (1) questions relating area of polygons back to the area of a rectangle, (2) basic practice, (3) real life examples, and (3) “problem solving” examples (may include variables to extend student thinking).
Day 3: Irregular Figures
Standards:
- CCSS.MATH.CONTENT.6.G.A.1 Find the area of right triangles, other triangles, special quadrilaterals, and polygons by composing into rectangles or decomposing into triangles and other shapes; apply these techniques in the context of solving real-world and mathematical problems.
- CCSS.MATH.PRACTICE.MP1 Make sense of problems and persevere in solving them.
- CCSS.MATH.PRACTICE.MP2 Reason abstractly and quantitatively.
- CCSS.MATH.PRACTICE.MP3 Construct viable arguments and critique the reasoning of others.
- CCSS.MATH.PRACTICE.MP5 Use appropriate tools strategically.
- CCSS.MATH.PRACTICE.MP6 Attend to precision.
- CCSS.MATH.PRACTICE.MP7 Look for and make use of structure.
Materials Needed:
- Irregular Figures (See step 2 below)
- Projector and/or White Board (Teacher)
- Pencil and Paper (Student)
- Scissors and Rulers (Students)
Lesson Outline:
- Introduction: I will introduce the lesson by saying, “So far, we have seen how we find the area of parallelograms, rectangles, triangles, and trapezoids. But shapes in real life aren’t always so nice. Look at our classroom, for example. The floor is not a perfect rectangle. If I was replacing the tile in class, I wouldn’t be able to just multiply the length and width. Today, we are going to explore how we find the area and perimeter of figures that don’t look as nice as what we’ve seen so far.”
- I will give students several cut-out irregular figures, as seen below.
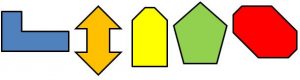
- Students will be completing “See, Think, Wonder.” I will write the following questions on the board.
- See: What do you see looking at these figures? (I will have students record their responses on paper, and then share with a partner.)
- Think: What do you think is true about these figures? (I will have students record their responses on paper, and then share with a partner.)
- Wonder: What do you wonder about find the area and perimeter of these figures? (I will have students record their responses on paper, and then share with a partner.)
- Discussion: Discuss as a class what the students noticed during “See, Think, Wonder.” Record what they wrote on the board, and then come to a conclusion together about how they might find the area and perimeter of irregular figures.
- Practice: Have students work with a partner to break the irregular figures into smaller shapes, and then find the combined areas. Students are welcome to use scissors to cut shapes, and should use rulers to measure their figures in centimeters.
- Share: Once students have completed the task, have pairs of students share their responses with the class. Pairs of students can then compare their findings with other pairs. (If a document camera is available, students can project their work for the class to see. Otherwise, students can draw their images on the board.)There are many different ways to break up irregular figures, so this will give students a chance to understand that there are multiple approaches to solving problems.
- Wrapping Up: Have students record answers to the following questions. Once they have finished, discuss the second question as a class.
- How did you use the area of rectangles, parallelograms, triangles, and trapezoids to find the area of irregular figures?
- Should we make up unique formulas for finding the area of different types of irregular figures? Why or why not?
- Formative assessment: The teacher class use classroom observations, discussions, and students’ written reflections from part (6) to gauge student understanding.
- Reteach: If students would like additional help, they can watch this video.
Day 4: Summative Assessment (See section titled “Assessment” above.)
magnificent points altogether, you just gained a new reader. What would you recommend in regards to your post that you made some days ago? Any positive?
Hiya, I am really glad I’ve found this info. Today bloggers publish just about gossips and net and this is actually irritating. A good site with interesting content, that is what I need. Thank you for keeping this website, I will be visiting it. Do you do newsletters? Can’t find it.
Carey – Owen about injury of varese, said it happened out how knight players want to play games.”I was about to enter a 5 on 5 game, but after three seconds, varese is injured
mizuno shoes
Layup is a very basic basketball skills maybe everyone layup but there is a way of layup is not everyone that is wrong step layup.
adidas ultra boost
Draft of the same year on the bottom rookie will be what?In general the draft should be able to blow the other party, who would have thought them took Owen on the 60th pick small Thomas in the same year, he turned out to be in the position of the challenger?
adidas boost
Obviously, the right to occupy a team-high 21.6 shots of Michael Owen, but failed to hit as James scores, this let a person feel, Owen has become a “cancer” of the knight.But many fans also feel,
curry 3 shoes
NBA players in addition to playing badly, and also an art cells, for two consecutive years in the NBA finals two teams join forces with the warriors and knight, but only two dancers, two teams played neck and neck, dancing is close, take a look at
kyrie 1
With three points to beat John wall, the day before yesterday the wizards will competition into the tiebreak wars, 8:00 tomorrow the wizards will be tie-break at Celtic and rival.
adidas pure boost
I do not even know the way I stopped up here, but I believed this post was good. I do not know who you are however certainly you’re going to a famous blogger should you aren’t already 😉 Cheers!
The noises and stressful the playoffs.”We are eager to match.”Owen said.Knight should first game will be on Thursday in east, and before them
adidas superstar
Bradford – CBCI Lesson Plan | EDT 622
[url=http://www.g6u56mscijx38d8w0i4o7f1l976l570ps.org/]ucvdqinqsej[/url]
acvdqinqsej
cvdqinqsej http://www.g6u56mscijx38d8w0i4o7f1l976l570ps.org/
I really like your lessons and I think your students will benefit from how you have organized your discussions and learning materials. If you wanted to incorporate technology into your first lesson the following Geogebra link has some great tools for seeing connections between polygons and their area: https://www.geogebra.org/search/perform/search/areas%20of%20polygons
I also found Geogebra resources for perimeter: https://www.geogebra.org/search/perform/search/perimeters%20of%20polygons
Sometimes my students gain more from learning with geometry sketches and dynamic software because they can see how changing size impacts specific measurements.
Audrey, thank you for those resources. Geogebra would be such a great resource to help kids make connections between area and perimeter. I love that it allows you to manipulate figures so much easier than you could with pencil and paper.
Lesson looks really great! I could use this with Geometry students as well.
In lesson #1 when you ask…What is area? What is perimeter? Why are area and perimeter useful?
It could be interesting to try it as a station chalk talk like we discussed today in class. Then post the notes to lead the discussion.
Here also here is a video to relate the two for that discussion, very unique
https://www.flocabulary.com/unit/area-and-perimeter/
Hi Cory, thanks for the feedback. I really like your idea of asking the questions “What is area?” “What is perimeter?”and “What are these useful?” in a chalk talk. That could be so helpful to get students thinking about the concepts that are going to be discussed over the next few days.