
What Causes Hydraulic Pump Failures in Dump Trucks?
Hydraulic pump failures in dump trucks can arise from different sources, each of which affects performance and may lead to breakdowns. Some of them are:- Fluid Contamination: Dirt, debris, or moisture in hydraulic fluid can cause substantial damage to the pump’s components, causing them to fail.
- Worn Parts: Continuous use causes wear on seals, gears, and bearings, which, over time, become less efficient and allow leaks.
- Neglecting Proper Maintenance: Skipping routine activities like changing oils or filters quickens deterioration, resulting in a faulty hydraulic pump.
- Excessive Heating: High temperatures alter fluids’ properties, making seals vulnerable to thermal expansion, which can also result in internal breakdowns.
- Overloading: Subjecting an already stressed hydraulic system beyond its operational capacity leads to premature wear and tear on pumps or even catastrophic failure.
- Air Leaks: Ingress air into a hydraulic system can lead cavitation which reduces pumps’ performance while causing damages
- Pump Misalignment: Strain on the pump caused by misalignment during installation could result mechanical failures over time
- Using Wrong Fluid Types: Pump operation is adversely affected when wrong type of hydraulic fluid is used
- External Factors: The functionality of a hydraulic system can be influenced by harsh working conditions such as extreme temperatures coupled with environmental contaminants
- Insufficient Operator Training/Experience Lack thereof among workers using dump trucks equipped with hydraulics may result improper loading/usage leading towards malfunctioning pumps
Common Signs of Hydraulic Pump Problems
It’s critical to catch hydraulic pump problems in their infancy, because this can help you avert more serious damage and expensive repairs. Here are a few signs that might indicate a problem with your hydraulic pump:- Unusual Sounds: Loud banging, whining or grinding noises could mean internal wear or damage due to cavitation or misalignment.
- Decreased Performance: A failing pump typically manifests itself through a noticeable drop in the effectiveness of the hydraulic system—for instance, when attached equipment starts moving slower.
- Fluid Leaks: If you see any visible fluid around the pump, it may indicate worn-out seals or connections that need immediate attention.
- Increased Temperature: Insufficient lubrication, overloads, or failed components within the pump will result in higher-than-normal operating temperatures.
- Vibration: The motor or pump may be misaligned, which causes excess vibration, which can lead to more mechanical failure later on.
- Erratic Pressure Gauges: Blockages, pump wear, and issues with hydraulic control systems can all cause pressure gauges to fluctuate wildly.
- Fluid Contamination: Pump malfunctions often occur because particle discoloration foaming is present in hydraulic fluids, indicating some degree of internal wear has taken place.
How to Identify Hydraulic Pump Issues?
Diagnosing problems with hydraulic pumps requires careful observation and analysis of performance metrics and a clear understanding of specific technical requirements. Here are the key steps to diagnosing related issues based on insights from leading industry sources:- Listen for Unusual Noises: Monitor your pump regularly for sounds such as grinding or whining. If you hear any of these noises, check for cavitation or misalignment which can cause excessive wear.
- Monitor Performance Levels: Track how well the hydraulic system is performing. A gradual decrease in performance may indicate that the pump is failing. Look out for flow rate readings that do not match manufacturer specifications.
- Look Out For Leaks: Regularly examine the pump area for signs of fluid leakage. Fluid leaks often indicate seal or connection problems, so they should be torqued according to the specifications in equipment manuals.
- Check Operating Temperature: It’s important to check the pump’s temperature because operating above normal limits could mean inadequate lubrication or overloading. When identifying possible issues, refer to the standard temperature ranges manufacturers give.
- Assess Vibration Levels: You need to determine if there are high levels vibrations present through conducting vibration analysis since this may imply imbalances that must be corrected so as not cause further damage. Compare readings using vibration measurement tools against acceptable thresholds.
- Evaluate Pressure Readings: Watch out for fluctuations in pressure gauge readings that might suggest blockages or wear while ensuring that pressure stays within specified limits, which is ideal for system efficiency.
- Examine Fluid Quality: Check hydraulic fluid regularly for signs of contamination, such as discoloration and particulates. Testing viscosity and moisture content will provide better information about pump internal conditions.
- Review Historical Data: Maintain an operational data log over time, including performance metrics and maintenance history. Historical trends and anomalies may help locate when things went wrong.
- Conduct Regular Maintenance: To prevent issues, follow the maintenance schedule recommended by the manufacturer. This can include routine checks and replacement of worn-out components.
- Consult Technical Documentation: Always refer to hydraulic pump technical documentation maximum flow rates, pressure ratings, and fluid compatibility once problems arise to ensure compliance during repairs
Understanding Hydraulic Pump Wear and Breakage
Hydraulic pumps wear out and break for different reasons. These include working conditions, maintenance practices and material quality. Here are some of the most important things to know: 1. Wear Types: The three primary types of wear are abrasive, adhesive and fatigue. Hard particles entering a pump cause abrasive wear while metal-to-metal contact leads to adhesive wear. Repeated cycles can lead to fatigue. 2. Operating Conditions Impact: Temperature, pressure, and fluid viscosity significantly impact how long a pump lasts. High temperatures degrade the quality of fluids used in pumps, whereas high pressure causes mechanical failure. Proper lubrication ensures optimum viscosity for cooling functions. 3. Signs Of Wear And Tear: Unusual noises from the pumps may indicate that it is worn out or about to fail as well as vibrations generated by its movement or leakage from within them may also be warning signs you should look out for to take preventive measures against total breakdowns due to prolonged usage without servicing regularly 4. Technical Parameters:- Flow Rate Maximum: Operators using hydraulic systems must not exceed rated flow rates. Excessive flow rates can cause cavitation, which irreparably damages pumps.
- Pressure Ratings: Understanding maximum continuous operating pressure ratings helps prevent mechanical breakdown under excessive loads applied onto them
- Fluid Compatibility: Chemicals used must be compatible with materials making up these devices so as not corrode them .
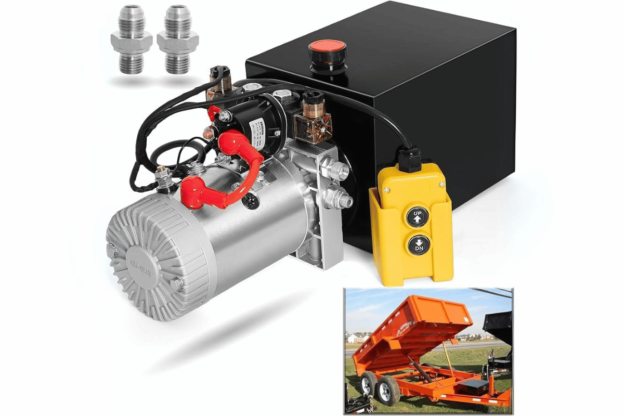
What are the Steps for Replacing a Hydraulic Pump in a Dump Truck?
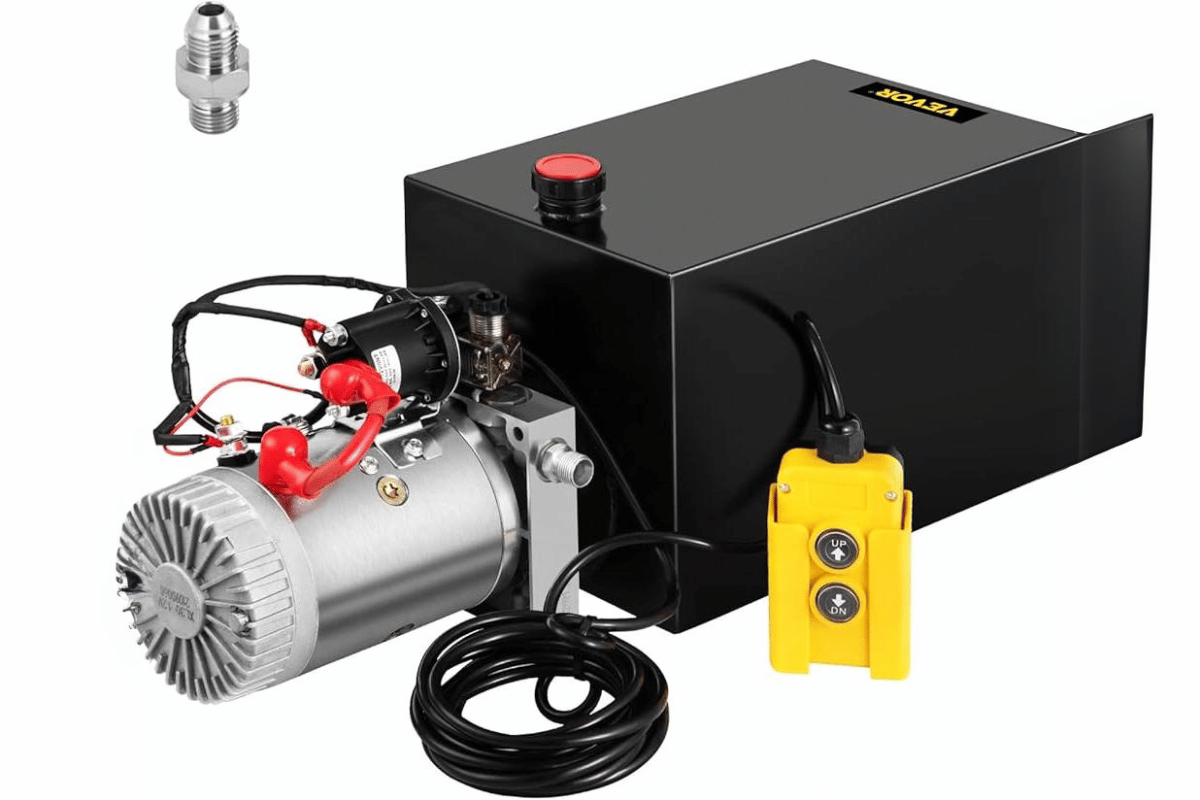
dump truck hydraulic pump repair
- Preparation: Gather all necessary tools and equipment before you start the process. This may include wrenches, screwdrivers, hydraulic jacks, safety gear and any other items that are needed for the job. It is also important to make sure your workspace is clean and safe.
- Disconnect the Battery: To prevent electrical shorts or hazards during pump replacement, disconnect the truck battery.
- Drain the Hydraulic Fluid: Collect hydraulic fluid from system using drain pans as this helps avoid spills thereby ensuring cleaner work environment.
- Remove Old Pump: Disconnect hydraulic lines from the existing pump, but take care since residual fluid might still be present. Remove the mounting bolts, then remove the old pump.
- Inspect System Components: Look at hydraulic lines and associated components and check for damages or signs of wear. Change defective parts so as not to encounter future problems with these systems.
- Install New Pump: Install new hydraulic pumps using suitable mounting bolts before securing them. Tighten reconnected lines, ensuring they do not leak after being attached back together again where possible.
- Refill Hydraulics Fluids: Add the appropriate type/quantity of fluids into hydraulics systems according to the manufacturer’s specifications.
- Bleed Systems: Cycle-through pumps to remove air pockets within lines following manufacturers directions for optimal performance levels. After doing so
- Reconnect Battery: After ensuring all components have been secured properly reconnect the truck’s battery
- Test The System: Start the engine up while checking if everything works correctly regarding hydraulic systems, including looking out for leaks around newly fitted machines’ areas. These should operate smoothly without any issues arising during tests conducted by testers who know what they are doing best when it comes to testing things like this one here today!
Necessary Tools and Equipment for Hydraulic Pump Replacement
Here are the essential tools and equipment for replacing a hydraulic pump, including their specifications: 1. Wrench Set: A complete set of adjustable wrenches and sockets to remove the mounting bolts and hydraulic line fittings.- Specifications: Metric and SAE sizes should be included to accommodate different fastener standards.
- Specifications: Ensure that the length and width corresponds with what is used in your specific vehicle.
- Specifications: Should be at least 5 gallons capacity so it can handle all fluid materials safely.
- Specifications: Should consist of absorbent materials capable of effectively wiping down greasy wet parts.
- Specifications: Needle nose pliers should be used for different tasks than regular ones.
- Specifications: Adjustable torque range (usually 0-150 ft lbs) suitable for many sizes of bolts.
- Specification: Viscosity ratings such as ISO 32 or ISO 46 need checking along with fluid type which could either be mineral-based biodegradable etc
- Specification – Goggles should have anti fog feature while gloves need resistance against hydraulic fluids
- Specification – Correct size matching up with those found on fittings connected to hydraulic lines is needed here too
- Specification: A jack having lifting capacities exceeding vehicle weights i.e., normally three tons would suffice light duty trucks most times .
A Step-by-Step Guide to Hydraulic Pump Replacement
Although replacing a hydraulic pump is difficult, these steps can simplify the process. This guide was compiled from the best online resources, and technical parameters were included. 1. Preparation- Make sure to have all necessary tools and equipment listed above.
- To avoid electrical shorts, disconnect the vehicle’s battery.
- Find the hydraulic reservoir and drain its contents into an appropriate container. This prevents spills and keeps your workspace clean.
- Be careful not to spill any fluid when disconnecting hydraulic lines using a line wrench.
- Using a torque wrench, remove bolts or brackets that hold the pump in place while adhering to specified torque ratings.
- Look at hoses and fittings for wear on related components. Replace them if they are damaged.
- Put new pump into position and secure it with bolts tightened according to manufacturer’s torque specifications.
- Use adjustable torque wrench to make sure all fasteners are properly tightened.
- Attach hydraulic lines again, ensuring proper fit and no leaks. If recommended by the manufacturer, use thread sealant for extra safety.
- Fill the reservoir with the correct type of hydraulic fluid following the viscosity rating given (for example, ISO 32 or ISO 46 as suitable).
- Start the engine and let it run through a hydraulic system, which will help bleed air out of it; check for leaks during this time.
- When the system is running, do a final inspection, ensuring everything is tight and working right.
- Take the car for a test drive, paying attention to whether anything sounds strange or does not work like a new one should have been done after replacing the old one .
Common Mistakes to Avoid When Replacing a Hydraulic Pump
How to Rebuild a Hydraulic Pump for a Dump Truck?
dump truck hydraulic pump repair
- Start by disassembling the pump: The first step involves removing the pump from where it was fixed. Care should be taken when detaching any hydraulic lines so as not to spill any remaining fluid, which should then be collected and disposed of appropriately. As you disassemble the pump’s components, arrange them in an orderly manner on a clean workbench.
- Check all parts: Thoroughly inspect all internal parts, such as bearings, gears, and seals, looking out for wear, tear, or damage signs such as corrosion. If faulty pieces are present, replace them with high-quality ones that meet the manufacturer’s specifications.
- Clean every part: Appropriate solvents or cleaners must be used to remove grease, dirt particles, or old hydraulic fluids from various components. All parts must dry completely before they can be reassembled.
- Replace gaskets and seals: New gaskets and seals should be fitted to stop leakages happening here, including O-rings which are critical sealing components necessary for proper functioning of pumps
- Reassemble The Pump: In reverse order, rebuild your pump, disassembling it carefully, ensuring all parts fit well together and align properly. Torque bolt fasteners according manufacturer’s specification, prevent problems during operation
- Reinstall The Pump: Place rebuilt dump truck back onto its original position. Reconnect all hydraulic lines tightly, else leakage will occur
- Refill And Bleed: Fill appropriate hydraulic fluid into the system, then follow the manufacturer’s procedure to bleed air outta the system
- Test Rebuilt Pump: Start engine test monitor and listen to unusual noises indicating problem presence during performance evaluation optimality checking for any leakages
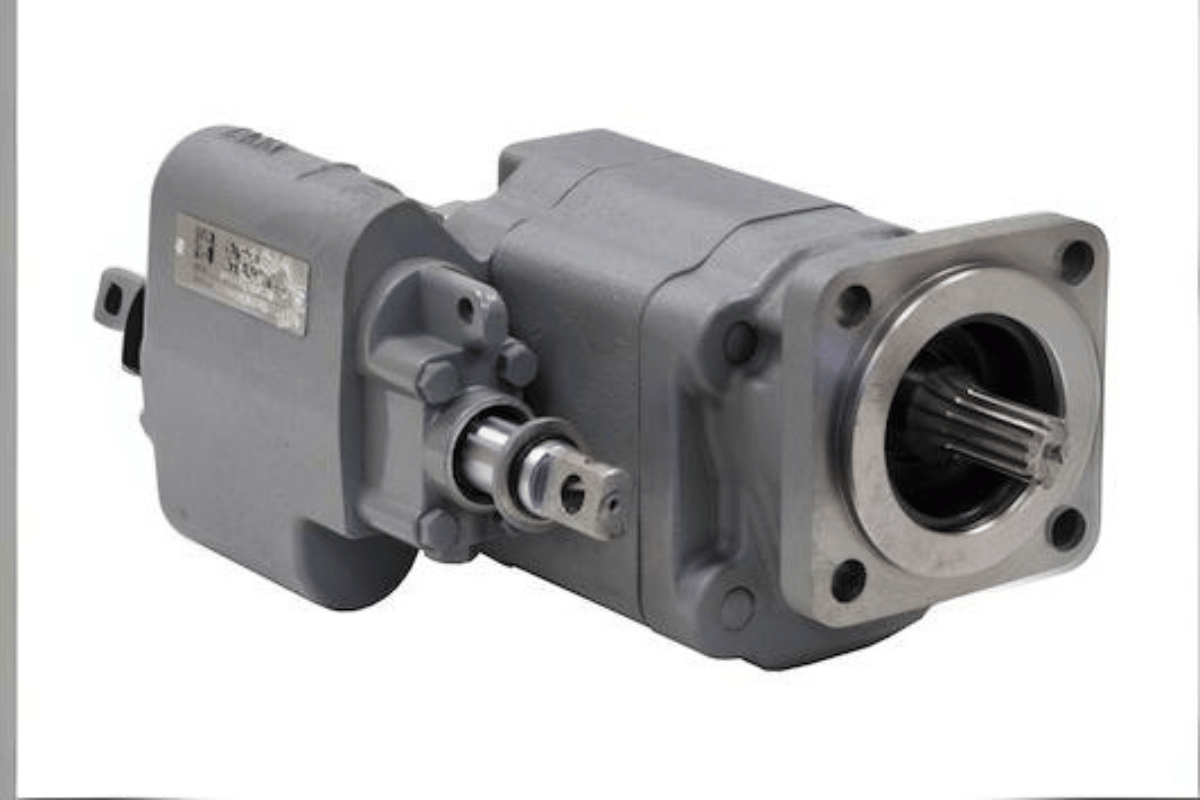
Understanding the Components of a Hydraulic Pump
Hydraulic pumps play a vital role in hydraulic systems, transforming mechanical energy into hydraulic energy. Here are the key parts of a hydraulic pump and what each part does:- Pump Housing: The outer casing that protects and contains the inner workings. Its design may impact efficiency and ease of maintenance.
- Drive Shaft: This part transmits mechanical power from the engine or motor to the pump. It is crucial for converting rotational energy into hydraulic energy.
- Gearset: In gear pumps, two gears push fluid through the system, creating flow. The size and speed of these gears dictate output pressure and flow rate.
- Cylinders and Pistons: These are found in piston pumps, where pistons move back and forth within cylinders, displacing fluid. The number and diameter of the pistons affect the output pressure/displacement.
- Seals & Gaskets: These components ensure no leaks occur while maintaining pressure inside the pump so that fluid flows only in the intended direction.
- Intake & Outlet Ports: Entry/exit points for hydraulic fluids critical for establishing an efficient flow path during operation.
- Check Valves: Preventing backflow ensures hydraulic fluids move one way, maintaining system integrity/performance
- Relief Valves: Protecting against overloading pressures can be set at specified levels to open, ensuring safe operations.
- Filtration System: Essential filtering contaminants from hydraulic fluids prevents wear/damage on internal components.
- Pressure Gauges: Monitoring system pressure is essential for operational efficiency/safety allowing operators adjust based on real-time data
Tips for Disassembling and Reassembling a Hydraulic Pump
- Preparation: Before starting the disassembly process, completely depressurize the hydraulic system to prevent accidental fluid discharge. Then gather your tools such as pliers, torque wrenches and other necessary items.
- Documentation: Record what you do or take photographs while disassembling something so it goes back together correctly later. This is especially helpful for complicated assemblies where parts need to be labeled.
- Cleaning: When taking apart the hydraulic pump, clean each piece well to get rid of dirt or contaminants that could hurt them when they are put together again and affect how well the system works overall.
- Inspect Components: Check seals, gaskets and other critical components for wear and tear Look out for signs like rusting, corrosion or damage that might impact performance by making things not work properly anymore
- Follow Manufacturer Guidelines: Always consult with a manufacturer’s service manual if you want specifications about disassembly/assembly including torque values used on bolts, clearances needed between moving parts, etcetera
- Reassembly Order: Put everything back in reverse order from which it was taken off ensuring proper placement at every step otherwise, malfunction will occur due to misalignment
- Replace Worn Parts: If any component looks worn out replace it before reassembling; otherwise optimal functioning cannot be ensured
- Torque Specifications: To avoid over-tightening, make sure you use a torque wrench according to manufacturer recommendations when tightening bolts
- Testing: After reassembling, conduct a pressure test check for leaks, ensure the hydraulic pump functions properly, and then return to service
- Regular Maintenance: Plan regular maintenance schedule inspect cleanliness, among other things, and regularly ensure efficient operation of hydraulic pumps plus their parts all times
Testing the Rebuilt Hydraulic Pump for Proper Operation
Testing a rebuilt hydraulic pump is essential to ensure it works efficiently and effectively. Below are the steps that should be followed for an all-encompassing testing process alongside important technical specifications:- Visual Inspection: Conduct a thorough visual inspection of the pump assembly before carrying out operational tests. Look for leaks, cracks or misalignment.
- Check Fluid Levels: Confirm that the hydraulic fluid is at recommended levels and of the right type as indicated by its manufacturer.
- Preliminary Pressure Test: Using a pressure gauge, perform a preliminary static pressure test to ascertain whether the pump can generate the maximum pressure specified by its manufacturer, which typically ranges from 1,500 – 3,000 psi, depending on the type of pump.
- Flow Rate Measurement: The output of any given pump can be measured using a flow meter. Depending on the model used, this measurement will usually be expressed in gallons per minute (GPM) or liters per minute (LPM), but it should match the minimum specification provided by the manufacturer.
- Temperature Monitoring: During operation, it’s advisable to check the hydraulic fluid’s temperature to ensure it does not exceed the range suggested by the manufacturer (usually between 90°F and 180°F). This helps prevent overheating, thus ensuring optimal performance.
- Vibration Analysis: Use vibration analysis tools to detect abnormal vibrations that may suggest bearing problems or misalignment. Vibration levels should not surpass the threshold set by manufacturers.
- Load Testing: If applicable, run the pump under load so as to simulate working conditions where constant pressure must be maintained without fluctuation throughout its usage period.
- Shut-down Procedure: Follow proper shut-down procedures after testing and monitor any sudden drop in flow/pressure indicating internal failure.
How to Maintain Your Dump Truck’s Hydraulic Pump?
dump truck hydraulic pump repair
- Regular Fluid Checks: Regularly inspect the level of hydraulic fluid and top off as needed, using recommended type only. Look out for signs of contamination or degradation in this fluid.
- Inspect for Leaks: Check hydraulic lines, seals, and gaskets regularly for leaks. Address any issues immediately to prevent further damage or loss.
- Clean the Components: Ensure dirt does not accumulate around the hydraulic pump area. Clean debris that may collect on top of pumps, especially where they connect with other parts like hoses.
- Monitor Performance: When operating a pump, listen carefully to unusual sounds, such as grinding noise, which may be caused by a lack of oiling of moving parts within the mechanism itself. Notice changes, too, because unexplained differences may mean something wrong has occurred elsewhere inside the machine, requiring more attention.
- Lubricate Moving Parts: Properly lubricate moving parts always to reduce frictional wear. This also helps keep workers efficient.
- Schedule Professional Inspections: The entire hydraulic system should be inspected regularly by an expert who can detect potential problems early enough before they develop into major ones.
- Replace worn components: As part of routine maintenance, take proactive measures to replace seals gaskets, and out components to prevent breakdowns, maintain integrity
Regular Maintenance Tips for Hydraulic Pumps
- Check Operating Temperature: The hydraulic fluid temperature should always be kept within the limits specified by the manufacturer, usually between 120°F and 180°F (49°C to 82°C). When it gets too hot, the fluid can break down and pump parts may get damaged.
- Fluid Quality Testing: Conduct routine fluid tests for impurities like dirt, water, or metal particles. Cleanliness levels differ, but generally, aim for ISO ratings between 14/12 and 16/14.
- Filter Replacement: Change hydraulic filters regularly based on manufacturers’ recommendations, about every five hundred – one thousand hours worked. A blocked filter restricts fluids from flowing through thus causing pumps to fail.
- System Pressure Monitoring: Periodically check hydraulic system pressure. Ensure that it corresponds with what is indicated on the pump; a sudden drop indicates blockages or leaks in these systems.
- Environmental Considerations: Make sure your hydraulic pump works in a clean environment. Dust and other unwanted materials can get into this system, leading to wear out. If need be, provide protective housing around it.
- Vibration Analysis: To determine whether your pump is working properly, you should perform a vibration analysis. Misalignment or worn bearings might cause excessive shaking, requiring urgent fixing.
- Seal Integrity Checks: Every now and then inspect seals and O-rings for damages such as wearing out so they can be replaced when necessary because this helps prevent leaks while maintaining pressure within the system
- System Bleeding: Change fluid or service the pump by bleeding the hydraulic system to eliminate trapped air because air can seriously affect the performance of systems
- Pump Alignment: Alignment tools should use lasers during the evaluation stage so misplaced power sources don’t increase strain on pumps due to misalignment.
- Operational Training: All operators must receive training concerning proper operation procedures related to hydraulic systems; otherwise, misuse may lead to premature wear/damage.
Signs Your Hydraulic Pump Needs Immediate Attention
- Uncommon Noises: Any grinding, whining or knocking sounds could indicate that something inside the pump is wearing out or broken and should be investigated immediately.
- Lower Output: A noticeable drop in output pressure or volume can indicate leaks, clogs, and failing pumps. Standard operating ranges should be closely monitored.
- Overheating: If the hydraulic system temperature exceeds manufacturer recommended limits (usually between 100°F to 180°F depending on fluid type), it can cause fluid breakdown and component damage.
- Fluid Leaks: Any visible leaks from the pump or hydraulic lines are a warning sign of seal failure. They compromise system pressure and require immediate sealing or part replacement.
- Increased Vibration: High vibration levels may indicate misalignment, unbalanced components, or internal wear. Vibration levels should be compared against specifications typically indicated in manufacturer documentation.
- Excessive Dust/Contaminants: There are indications that filtration problems exist when there is contamination present within hydraulic fluids necessitating a change-out and filter replacement job done as well
- Fluctuating Pressure Readings on Gauges: Erratic gauge readings can lead to unpredictable performance by suggesting pump cavitation, among other issues like malfunctioning pressure relief valves
- Erratic System Response Time/Slow Response Times – If your hydraulic system works sporadically with delayed response times then this could mean air trapped within it’s systems along with component failure elsewhere too
- Frequent Changes Required For Hydraulic Fluids – Frequent changes required due contamination/degradation might signal deeper lying problems needing attention elsewhere around here now please
- Warning Lights Shouldn’t Be Ignored—Any warning indicators on control panels shouldn’t go unnoticed because they often suggest operational concerns that require urgent expert investigation!
Long-Term Care Strategies for Hydraulic Pumps
To ensure that hydraulic pumps last for a long time and work reliably, they should be routinely cared for and checked according to industry best practices. Here are some strategies for long-term care:- Frequent Fluid Analysis: Regular monitoring of the quality of hydraulic fluids through sample testing can help identify levels of contamination and degradation in the fluid. To guarantee optimal performance, it is necessary to check viscosity, particle count, and water content against manufacturer specifications regularly.
- Scheduled Maintenance: A preventive maintenance plan which includes routine inspection and servicing of pumps, filters, hoses etc., should be implemented. This must be customized based on usage intensity levels in different environments while observing the manufacturer’s recommended intervals.
- Temperature Control: Hydraulic systems must be kept within their specified operating temperature range (usually between 30°C and 60°C). Excessive heat may cause fluid breakdown or wear-out seals. Thermal sensors can effectively monitor this parameter.
- Contamination Control: A robust filtration system coupled with clean storage facilities for hydraulic fluids must be established to prevent contamination. Filters ought to be changed according to manufacturers’ guidelines, usually every three months but not exceeding six months or as suggested by fluid analysis results.
- Regular Component Inspection: Key components like seals, cylinders, and hoses should be frequently inspected, looking at them for any signs indicating wear and tear . Measuring tolerances periodically using OEM specifications will help detect possible failures before they become serious problems.
- Vibration Monitoring: Vibration analysis tools are used to monitor pump health status . The frequency of vibrations should not exceed what is specified by the manufacturer (typically below four mm/s for most hydraulic pumps) which prevents misalignment strains due undue balance
- Use Of Proper Lubricants: Ensure that the bearing lubricants used are the right ones as manufacturers indicate. Different applications require specific types oils greases that meet operational demands
Frequently Asked Questions (FAQs)

dump truck hydraulic pump repair