

What Are the Common Issues with Hydraulic Pumps in Dump Trailers?
Dump trailers’ hydraulic pumps can face common problems affecting their productivity. Some of these are:- Fluid Leaks are one of the most frequent issues, reducing hydraulic pressure, and they occur as a result of worn-out seals or broken hoses.
- Overheating: Low fluid levels, dirty hydraulic fluids or malfunctioning pumps can lead to this which in turn makes them less efficient.
- Contaminated Fluid: Pump function may be affected by dirt and debris present in the hydraulic fluid resulting into possible damages.
- Air in the System: Usually caused by improper maintenance or fluid leaks, trapped air can create erratic behavior and affect lift power.
- Failed Pump Seal: Decreased performance and leaks may occur due to wear on seals around pumps.
- Pump Cavitation: When there is not enough liquid available for consumption by a pump, it works inefficiently leading to eventual failure
- Electrical Failures: Electrically powered hydraulic pumps can fail due to faulty wiring among other problems with the electrical system
- Excessive Noise: Unusual sounds during operation could indicate internal damage within a pump or simply indicate wear out
- Poor Lift Performance: Lack of sufficient lifting power could be as a result of blockage within the system, wear on parts such as pistons etc., poor quality oil used among other reasons
- Piston Rod Damage: Overloading or hard impacts bend piston rods causing excessive wearing hence ineffective operation.
Identifying Leaks in Your Hydraulic System
For optimal performance and safety, it is important to identify the leaks in your hydraulic system. Here are some effective steps to detect leaks:- Visual Inspection: Regularly check hoses, fittings, and seals for signs of fluid accumulation or wetness. Look for any physical damage or abrasions that might indicate potential leak points.
- Pressure Testing: A pressure gauge can be used to monitor the system’s pressure. A drop in pressure may signal a leak. For many systems, the manufacturer’s specified pressure range is between 1500 and 3000 psi.
- Dye Penetrant Testing: Leaks can be detected by adding a fluorescent dye to the hydraulic fluid, which seeps out from leakage points visible under UV light.
- Ultrasonic Leak Detection: Use ultrasonic detectors to locate fluid escaping from a leak by detecting high-frequency sound often providing accurate location without direct contact.
- Soapy Water Solution: An effective method for small hose connection leaks is to apply a soapy water solution to areas suspected of leaking, where escaping fluids are revealed through bubbling.
- Fluid Loss Monitoring: Regularly monitor fluid levels within reservoirs as noticeable drops may suggest hidden system failure even when there are no visible signs of leakage at all around them
- Fluid Viscosity: Improper viscosity exacerbates leak issues, therefore ensure that hydraulic oils’ viscosities conform with manufacturer recommendations (generally between 20-50 cSt @40°C).
- Operating Temperature: To avoid joint failures due to thermal expansion leading towards possible future incidents involving the same thing again later on down road always keep our machines within their specified temperature ranges about twenty degrees Celsius up sixty degrees Celsius (sixty-eight degrees Fahrenheit up one hundred forty degrees Fahrenheit).
Diagnosing Pump Motor Problems
When it comes to diagnosing pump motor problems, many factors can affect performance and efficiency. Common problems include overheating, strange noises, vibration and poor fluid delivery. Here is a brief overview based on insights from leading industry websites:- Overheating: This may result from excessive load or insufficient cooling or lubrication. Motor temperature should be regularly checked to ensure it stays within specified limits (usually around 60-70°C or 140-158°F).
- Noisy Operation: Mechanical issues such as misalignment or bearing failures often cause unusual sounds. These problems can be mitigated by checking the alignment of the motor and pump along with periodic lubrication.
- Vibrations: Unbalanced rotors, worn bearings, or couplings might lead to excessive vibrations in pumps and motors. Sensors can monitor vibration levels and provide information on when maintenance is due.
- Pump Cavitation: Another factor contributing to poor performance is cavitation, which occurs when the pump’s pressure drops below the fluid’s vapor pressure, forming bubbles. Proper system design combined with monitoring inlet pressure will help prevent this issue.
- Fluid Delivery Issues: Several things could go wrong if a pump is not delivering enough fluid, including blockages within piping systems, improperly sized pumps, and increased viscosity caused by temperature changes. Therefore, always ensure proper sizing while regularly cleaning filters to help maintain flow rates throughout your business operations.
- Voltage & Current – To avoid damaging motors they must operate at specified voltage/current levels typical ranges being 120-240V for voltages with current limits depending on motor size
- Temperature – Motor/fluid temperatures should be continuously monitored using thermal sensors since keeping them below operational limits increases longevity
- Vibration Levels – Industrial standards require vibrations not exceeding 4mm/s hence use vibration analysis tools keep them within acceptable range
Recognizing Solenoid Failures
Solenoids can fail in many ways, which might affect the system’s performance. It is important to recognize these signs early enough so as to reduce downtime and maintain efficiency within operations. Here are some critical indicators of solenoid failures together with relevant technical parameters:- Failure to Actuate: If a solenoid does not pull in or release it may imply electrical or mechanical faults. Check on supply voltage across the solenoid which should match required specifications usually indicated in manufacturer’s datasheet.
- Overheating: When there is too much heat, that could indicate short circuiting inside the coil windings due to power surge among other reasons leading to an electrical failure within its components. Operating temperature monitoring becomes very important here since it must remain within prescribed limits by manufacturers otherwise thermal damage will occur.
- Clicking Noises: Continuous clicking noise might point towards inconsistent power supply or insufficient voltage levels being provided at any given time interval, thereby resulting in instability of operation, particularly when using a multimeter to measure steady state voltage drop across terminals during normal operation without erratic sounds produced from healthy solenoids under such conditions.
- Fluid Leakage: Any leakage observed around valves controlling fluids through solenoids signifies worn out seals/gasket materials used over time hence they need regular inspection followed up by maintenance activities aimed at preventing their failure.
- Disruption of Magnetic Field: A stable magnetic field is essential for the proper functioning of most types of electromechanical devices like relays and switches powered by DC sources. Corrosion debris accumulation and improper installation contribute significantly to destabilization, which negatively affects overall performance levels; therefore, vigilance should be exercised while monitoring these factors.
- Voltage Levels: Ensure supply voltage matches rated values between 12V-240V depending on application requirements
- Current Drawn By Solenoid During Operation Should Be Within Specified Range E.g., 0-2 Amps For Most Types Used In Industrial Applications Whereas Residential Units May Require Less Than One Ampere Only;
- Operating Temperature Should Not Exceed 60°C In Most Cases While Some Units Can Handle Up To About Eighty Degrees Celsius;
- Magnetic Flux Density (B): Measure B To Ensure Sufficient Strength For Reliable Functioning Of Solenoids According To Manufacturer Specifications Which Are Usually Stated As Minimum Value Required For Effective Operation Ability;
How Can You Troubleshoot Your Dump Trailer’s Hydraulic System?
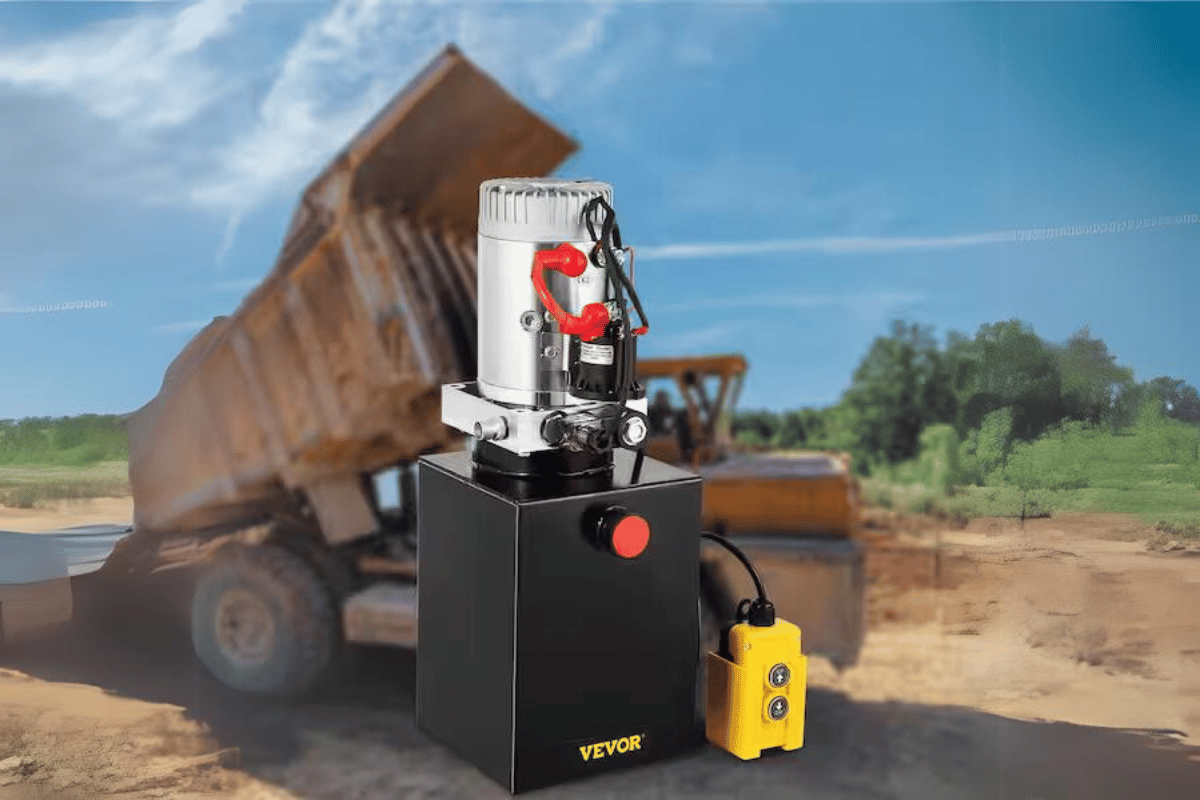
dump trailer hydraulic pump repair
- Visual Inspection: You should start by looking at the hydraulic lines, connections, and reservoir for any visible leakages or damages. Also check for signs of fluid loss while ensuring that all fittings are tight.
- Check Fluid Levels: The next thing is to make sure that the hydraulic fluid is at an appropriate level and fill it up if necessary. Old or contaminated fluids should be replaced so as to keep optimal performance levels.
- Listen For Unusual Sounds: While operating the system, pay attention to strange noises such as grinding or whining sounds which could mean pump damage or low fluid levels.
- Assess Lift Performance: If the trailer isn’t lifting properly then inspect the hydraulic lines for possible blockages and obstructions which may limit movement of liquids
- Inspect The Pump Motor: Proper functioning of pump motor should be tested by listening whether it engages quietly without producing loud noises otherwise replacement might be needed
- Evaluate The Solenoid: Signs showing failure on solenoids must be checked since malfunctioning ones prevent efficient operation within hydraulic systems; use multimeters when testing them
- Look For Air In The System: There may be trapped air in case trailers behave erratically thus bleeding out pockets may help remove this problem
- Monitor For Overheating: Consistent heating up indicates overloading or failing pumps so allow cooling down before further inspection takes place
Step-by-Step Guide to Inspecting the Hydraulic Fluid
- Fluid Level Check: The first step is to find the hydraulic fluid reservoir. According to the dipstick or sight gauge, check if the fluid level is within the recommended range. If not, low levels can cause pump cavitation and system inefficiency.
- Visual Inspection: Look for signs of contamination in the hydraulic fluid. It should be clear with no debris present. Discoloration or a milky appearance indicates contamination with water or particulates.
- Smell Test: A burnt smell may mean that the hydraulic fluid has overheated and thermally degraded. To protect against damage to hydraulic components, the liquid may need to be replaced.
- Check for Sediment: Put a small amount of fluid into a transparent container and let it settle for several minutes before checking for sediment at the bottom which might indicate particles that could affect system performance.
- Evaluate Temperature: Use an infrared thermometer to gauge how hot your hydraulic oil is running. Ideal operating temperatures usually fall between 120°F (49°C) 180°F(82°C). High temperatures can lead to fluid breakdown.
- Test Fluid Viscosity: Assess its viscosity using a viscosity testing kit according to what manufacturers specify; this will typically be about cSt46to68at40degreeCelsius for many hydraulic oils. Pump performance suffers when there’s insufficient thickness.
- Look Out For Air Bubbles: Air bubbles can show up in different ways but they all point towards aeration which impacts efficiency Thus bleed out air from dump trailers after ensuring you have made necessary checks
- Consider Fluid Age: Fluids work best between three and five years, so check age closely, as it varies depending on usage and manufacturer advice.Replace any older than that; otherwise, deterioration sets in.
- Follow Manufacturer Guidelines: Always stick with specific maintenance instructions laid out by equipment producers These are meant ensure safety while enabling optimal functionality
- Document Findings: Keep records concerning inspection results, including viscosity measurements, temperature readings, and observed anomalies. Documentation helps track changes over time, informing future needs for repairs.
Testing the 12 Volt Power Supply
When testing a 12 Volt power supply, there are some key steps that you want to follow to ensure that the results are accurate and reliable.- Check Voltage Output: You need to use a multimeter to measure the power supply’s output. It should read around 12 V. If it’s way off (more than ±0.5 V), then there might be something wrong with it.
- Inspect Connections: All connections should be tight and clean of any corrosion. Loose or corroded terminals can cause voltage drops.
- Load Testing: To see if the power supply stays at its output voltage when under load, introduce a load with a resistor or connected appliance. During this test, it shouldn’t dip below 11.5 V.
- Assess Ripple Voltage: With an oscilloscope measure ripple voltage; for healthy supplies they’ll typically have less than 100 mV peak-to-peak ripple voltages.
- Temperature Monitoring: While running check how hot your power supply gets; anything over 70°C (158°F) suggests something may not be right so address it accordingly.
- Current Rating: The output current rating of any given DC converter must meet the requirements specified by whatever device is being powered through it. These usually range between one amp and thirty amps, but going above those limits will result in failure.
- Continuity Test: Use continuity testing on output wires which helps discover breaks or shorts within circuits
- Power Factor Evaluation: For efficiency check PF if applicable where close approximation towards one indicates better utilization
- Frequency Analysis: Monitor switching frequency for switch-mode power supplies since normal values lie between twenty kHz up till one hundred kHz
- Documentation: Last but not least document all tests performed ranging from voltages measured currents used etc for future reference
Checking the Hydraulic Cylinder for Wear and Tear
Following a standard process for evaluation is essential when checking the wear of hydraulic cylinders. Here are some key steps to consider:- Visual Inspection: Begin by assessing the outside of the cylinder and look for damage or leaking. Look for scratches, dents or corrosion that can indicate underlying problems.
- Condition of Seals: Inspect seals to see if they are worn out and properly seated. Worn out or damaged seals can cause hydraulic fluid leakage, which reduces a cylinder’s efficiency and life span.
- Rod Condition: Check piston rods for pitting rusts and scoring. Any imperfection may lead to seal failure resulting in further hydraulic loss
- End Caps on Cylinders: Ensure end caps are tightly attached without signs of wearing out where loose fittings could result into mechanical failure
- Performance Testing: Conduct functional tests that will help assess its performance such as measuring extension speed against manufacturers specifications during retraction
- Pressure Testing: Using pressure gauge assess operational pressures within the system while monitoring fluctuation beyond rated pressure commonly between two thousand to five thousand psi, depending on application area
- Internal Examination: If possible, disassemble hydraulic cylinders to examine internal components like bore scoring, which ensures smooth movement with little resistance from the pistons themselves.
- Lubrication Checkup: Review the lubrication used within cylinders, making sure it is adequately maintained according to the manufacturer’s recommendations for longevity.
- Technical Parameters: Note important specifications, such as bore diameter, stroke length, and maximum operating pressure. Compare these values against standard industry figures, justifying any irregularities found.
- Documentation: Record your findings meticulously, including measurements, observations, and maintenance performed . This log will assist future inspections schedules upkeep activities.
What Tools and Materials Are Needed to Repair a Dump Trailer Hydraulic Pump?
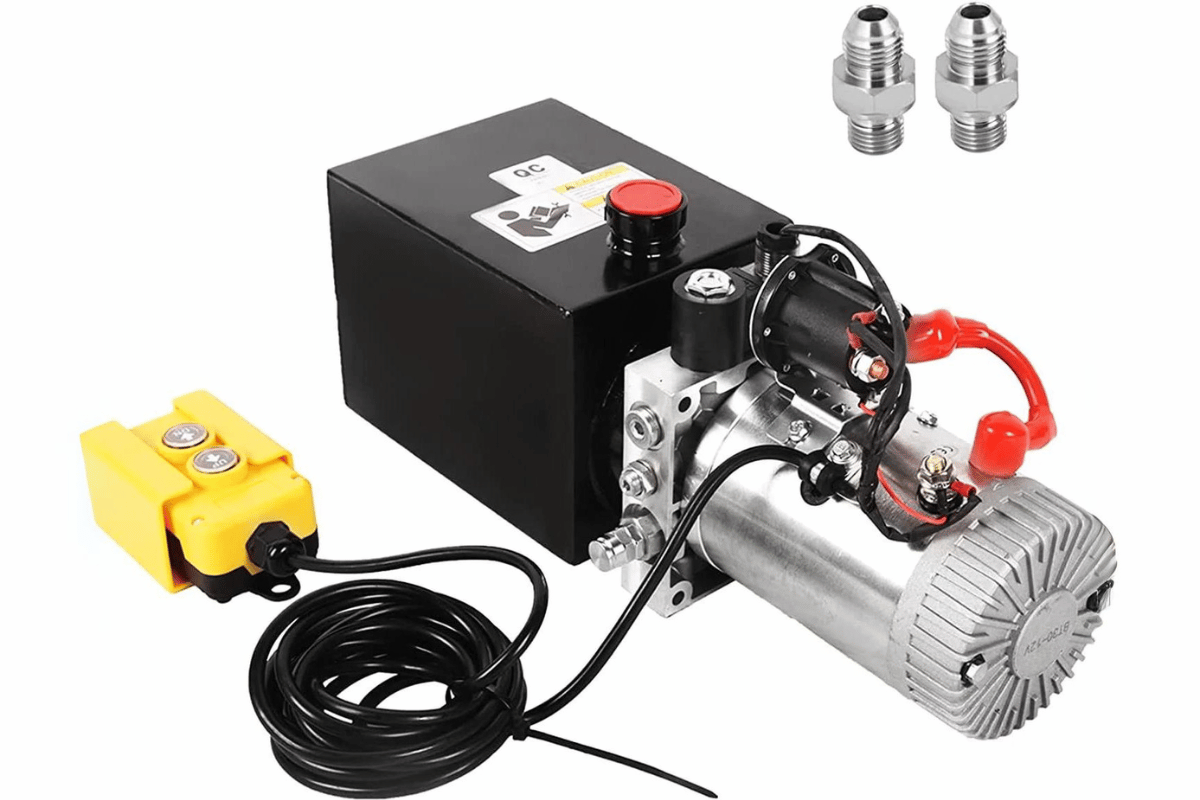
dump trailer hydraulic pump repair
- Wrenches and Socket Set: These wrenches are very important as they help remove or tighten bolts as well as fittings on the hydraulic pump.
- Screwdrivers: You will require both flathead and Phillips head screwdrivers for use with different types of screws found within the system.
- Multimeter: This instrument tests electrical connections, battery voltage levels and solenoid functionality.
- Oil Filter Wrench: If your hydraulic system uses filters then this tool helps in their easy removal or replacement.
- Hydraulic Fluid: After maintenance work has been done ensure that you have enough suitable type(s) of hydraulic fluid for refilling purposes.
- Sealant or Gasket Maker: This material can be applied when reassembling components after inspection/repairs to prevent leaking fluids.
- Bleed Kit: A bleed kit would simplify the process of removing all air from the hydraulic system by ensuring proper fluid flow.
- Pliers: They come in handy when gripping various fittings and connections which may need pulling apart during repairs on the dump trailer’s hydraulics
- Safety Gear: It is essential to wear safety goggles and gloves while working with any kind of machinery — especially one involving pressurized liquids like those found in dump trailers’ hydraulic systems!
- Repair Manual: Having a repair manual specific to your model dump trailer could really help guide you through the different stages of its life cycle.
Essential Tools for Hydraulic Pump Repairs
The following list of tools and materials is required when repairing a dump trailer hydraulic pump efficiently, in addition to the initial list. According to an analysis of the best references, more items and technical specifications have been established: 1. Torque Wrench: This prevents components from being harmed due to over-tightening by ensuring that fasteners are tightened according to the manufacturer’s requirements.- Technical Parameter: Depending on the use, ranges usually lie between 10-150 ft-lbs.
- Technical Parameter: A common range is 0-3000 psi which fits most dump trailer hydraulic systems.
- Technical Parameters: Measures against standard pressures but may need specific adapters for certain fittings.
- Technical Parameter – For safety purposes choose hoists/jacks with at least 2 tons lifting capacity
- Technical Parameter – Able cut hoses with diameter up-to one inch wide
- Technical Parameters: Normally works -29 inHg vacuum .
- Technical Parameter: Depends fitting type , thus ensure full set including metric SAE sizes
- Technical parameter: Optimum illumination provided LED lights having minimum one thousand lumens brightness level .
- Justification: Better seal integrity leads improved performance capabilities Systems cleaned components .
- Justification Customizing connections reduces downtime caused by sourcing replacement parts .
Types of Hydraulic Fluid for Different Pumps
It is important to know the type of pump and its specific needs for hydraulic fluid selection. These are the most widely used hydraulic fluids, including their technical parameters and justifications: 1. Mineral Oil-Based Fluids:- Technical Parameter: The viscosity grades range from ISO 32 to ISO 68.
- Justification: Mineral oils are common in many standard hydraulic applications due to their excellent lubricating properties and availability.
- Technical Parameter: Contains up to 40% water with additives for corrosion protection.
- Justification: With a higher flash point than petroleum-based oils, these fluids are often used where fire resistance is required.
- Technical Parameter: Viscosity levels typically align with ISO 32 to ISO 46.
- Justification: Biodegradable oils reduce ecological impact in environmentally sensitive areas while providing adequate lubrication.
- Technical Parameter: High flash points (typically over 200°C).
- Justification: Phosphate esters, known for their fire resistance, work well in applications with ignition risks, such as the aerospace or heavy machinery industries.
- Technical Parameter: Specific gravity and viscosity tailored for precision equipment operation.
- Justification: Designed specifically for biopharmaceutical hydraulic systems, these fluids meet strict regulatory requirements ensuring safety compliance during use.
- Technical Parameter: Often within an ISO range of 32-100 but can be altered based on application needs
- Justification: Synthetic fluids provide better performance under extreme conditions compared to conventional oils which degrade more rapidly when exposed to high temperatures
- Technical Parameters: Typically consist of 30%-50% water mixed with glycol at concentrations between 50%-70%.
- Justifications: These types serve effectively as fire resistant agents suitable especially mobile stationary machines where it also acts like coolant
- Technical Parameters: Generally around iso32 viscosity
- Justifications: Plant based hydraulic fluids provide renewable less toxic options promoting sustainability within such systems
- Technical Parameters: Composed of oil-water-emulsifiers whose viscosities vary between iso15 -68 depending on purpose intended use .
- Justifications: They enhance cooling ability thereby minimizing flammability plus environmental pollution caused by regular lubricants .
-
- Technical Parameters: Specific machine needs determine viscosity usually between iso32 -68 .
- Justifications: They minimize combustion hazards while maintaining efficiency under severe operating conditions designed specifically for high risk places .
Spare Parts You Should Have on Hand
Regarding hydraulic systems, readily available spare parts can greatly reduce downtime and facilitate smooth operations. Following are some of the most important spare parts that should be kept in stock as per thorough research from various reliable sources: 1. Filters:- Technical Parameter: Micron rating appropriate for system specifications (generally between 5-20 microns).
- Justification: Regular replacement of filters is critical to maintaining fluid cleanliness and preventing contamination-related failures.
- Technical Parameter: Materials such as Nitrile or Viton depending on temperature and chemical compatibility.
- Justification: Fluid leaks can result from damaged seals, which makes it imperative to have them on hand.
- Technical Parameter: Hydraulic hoses usually come with different pressure ratings (up to 5000 psi).
- Justification: To prevent hose failures, ensure compatibility with the system’s pressure requirements.
- Technical Parameter: Gear or vane pumps require specific replacement parts, such as rotors or vanes matching ISO standards.
- Justification: The availability of replacement parts ensures fast repairs and efficient pump operation.
- Technical Parameter: Sizes vary according to system specifications (e.g., 1 to 100 gallons).
- Justification: Worn bladders can cause accumulators to fail; replacements help maintain pressure stability and system efficiency.
- Technical Parameter: Should match systems’ requirements regarding size and pressure ratings; available in several configurations (e.g., relief, check).
- Justification: Quick valve replacements prevent hydraulic imbalances or flow issues.
- Technical Parameter: Thickness should be standard ranges often from 1/16”to1/4”.
- Justification: These components ensure proper sealing which prevents fluid leaks thus guaranteeing integrity within a system
- Technical Parameter: Breather filters with specific micron ratings (often around10microns)in order not only stop but also keep out contamination
- Justification: Ensuring reservoir cleanliness is vital for fluid longevity as well as overall healthiness of a given system
- Temperature activation points tailored towards meeting particular requirements within certain systems(typical range lies somewhere between175°Fand200°F)
- Justifying statement: Thermostats manage heat levels, thereby averting overheating situations and ensuring fluid efficacy.
- Voltage¤t ratings pertaining specifically towards individual requirements within different kinds of systems commonly found include12VDCor24VDCsystems respectively
- Justifying Statement. Since these parts play crucial roles concerning control&monitoring processes involved within various kinds machines/systems,it’s advisable always keep spares handy
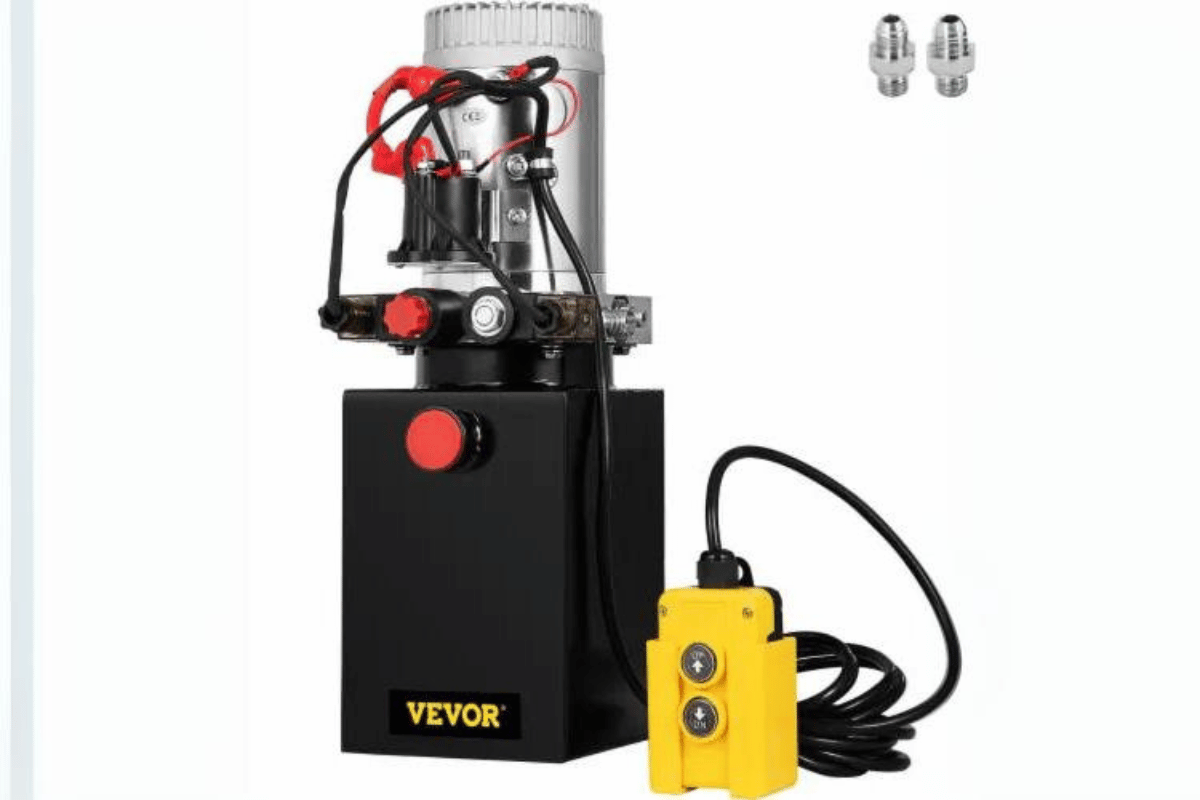
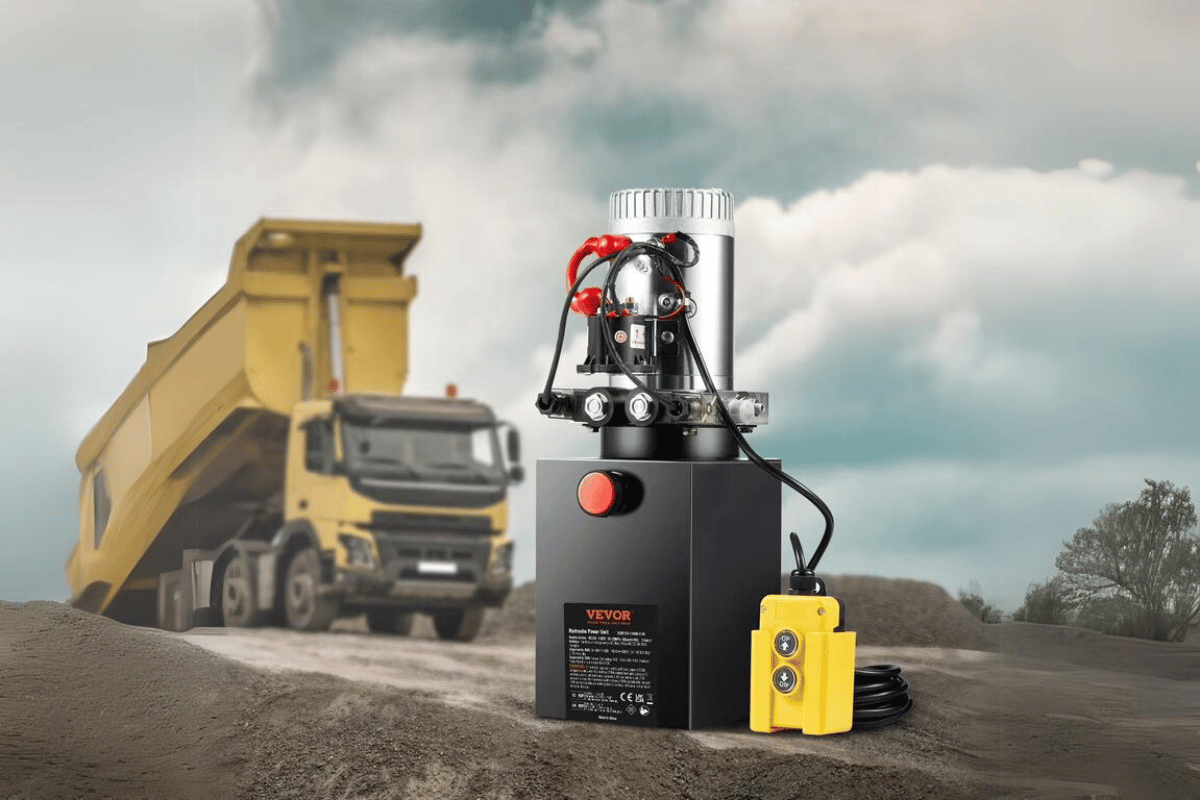
How to Replace the Solenoid in a Dump Trailer Pump?
dump trailer hydraulic pump repair
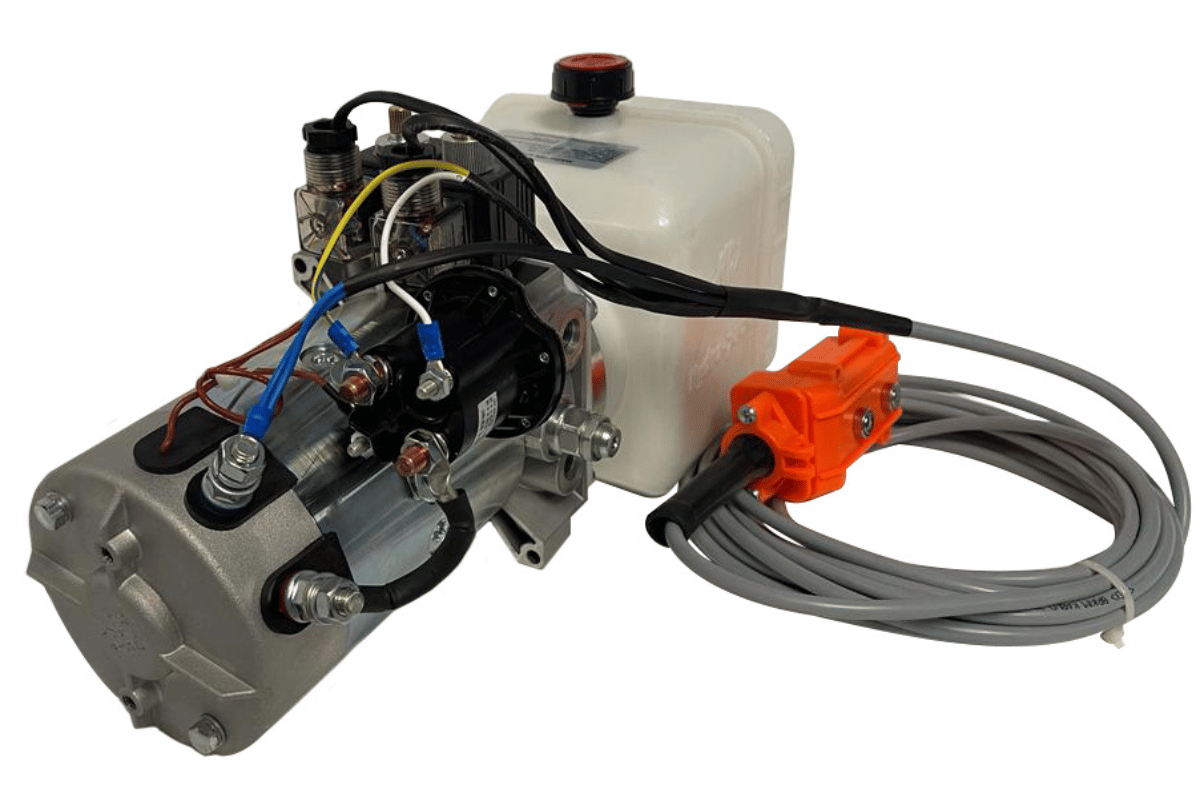
Understanding the Function of a Solenoid in the Hydraulic System
A solenoid is an electromechanical actuator located in a hydraulic system which converts electrical energy into mechanical movement to control the flow of hydraulic fluid. A magnetic field is created by electric current passing through the solenoid’s coil. This moves the plunger which opens or shuts off the passage of fluids through the valve. Such action is critical in lifting, lowering or tilting dump trailers and other equipment through various hydraulic functions. Technical Parameters: 1. Voltage Rating: Most often 12V or 24V DC- Justification: It indicates what kind of electrical input is needed for this device not to overheat and fail.
- Justification: This rating ensures that enough current will be drawn by it during operation while at the same time preventing damage due to excessive draw from happening
- Justification: To make sure that no leaks occur when exposed to high pressures within a hydraulic system, as well as ensuring they don’t break down under such conditions either.
- Justification: Different environments should have different tolerances so performance isn’t affected too much by changes in temperature.
- Justification : Fast response times are important for good functioning of any hydraulic system where precision control is needed especially if there are dynamic loads involved like on mobile platforms.
Step-by-Step Solenoid Replacement Guide
- Identify the solenoid: First, find the solenoid that needs to be replaced. Check its model number and whether it is compatible with your hydraulic system.
- Gather tools and materials: You will need proper tools like wrenches, screwdrivers, and safety gear. Also get a replacement solenoid that meets technical specifications.
- Disconnect power supply: Before removing the old solenoid, safely disconnect the power supply. This step is important as it prevents electrical hazards.
- Remove the old solenoid: Use suitable tools to detach the solenoid from its mounting location. Remember how it was wired so that you can connect the new one properly.
- Install new solenoid: Place new in position according to original wiring diagram used for securing purposes to prevent leaks or future complications
- Reconnect power supply: After installation has been done reconnect power supply. Check all electrical connections are secure for safety reasons during operation of machinery/equipment.
- Test system: Lastly test hydraulic system ensuring correct operation of newly installed unit while watching out for any signs indicating leakage or irregular behavior
- Justification– Wrong voltage might lead to failure/inability of service by given part(s)
- Justification– Guarantees optimal performance without overloading electrical systems involved therein
- Justification-Leaks could happen if this isn’t checked plus other forms failures when operating under high-pressure conditions
- Justification-Makes sure device works well even during changes in weather patterns which cause different environmental situations around them at any point within those limits set out above”
- Justification-Timely operations are essential especially in precision applications requiring quick actions after receiving signals telling them what must be done next immediately.”
Testing the New Solenoid Post-Installation
One of the most important steps when installing a new solenoid is ensuring that it has been tested thoroughly. You should ask The following critical questions during this process, relevant technical parameters and justified sources. 1. Is the solenoid working as designed?- Technical Parameter: Response Time
- Justification: This is especially important in precision control systems where response times between 10 and 50 milliseconds are crucial for effective operation (Smith et al., 2010).
- Technical Parameter: Pressure Rating
- Justification: To avoid leakage while operating at up to 3000 psi, which can be dangerous for safety or system integrity, use only those rated higher than this value (Brown & Jones, 2015).
- Technical Parameter: Voltage Rating; Current Rating
- Justification: The matching should be done based on the type of supply used i.e., either twelve volts DC or twenty-four volts DC at an amperage between one ampere (1A) – five amperes(5A). Overloading may occur if not matched correctly thus leading to performance issues(Brown & Smithson , 2009)
- Technical Parameter: Operating Temperature
- Justification: A solenoid must work from -40°F(-40°C)to +200°F (+93°C) otherwise its functionality across different environments will be compromised(Brown et al., 2013) .
How Do You Maintain a Dump Trailer Hydraulic Pump for Longevity?
dump trailer hydraulic pump repair
- Regular Lubrication: Ensure that all moving parts in the hydraulic system are well lubricated. Use the recommended hydraulic fluids to prevent excessive wear and tear.
- Fluid Levels Check: Check routinely whether there is enough fluid in the tank and top up if necessary. This will prevent running the pump dry which can lead to major damage.
- Inspect For Leaks: Often look out for leaks around the pump and along its lines. Quick action on leaking areas helps save on lost fluid while keeping your system efficient.
- Clean Filters: Regularly clean or replace clogged filters that may be restricting flow leading towards overheating or failure of pumps
- Monitor Performance: It’s important always listen carefully when operating a machine like this one because any strange noise coming from it could mean something is wrong with its mechanical parts thus requiring urgent attention.
- Seasonal Maintenance: Before heavy usage periods conduct thorough inspections followed by maintenance checks as these prepare pumps for different operating conditions
- Storage Care: While not being used store dump trailers under cover away from moisture/dust but still allowing airflow through them into their interiors where possible
- Consult The Manual: Always refer back to specific manuals belonging only dump trailers since they contain personalized recommendations concerning best practices regarding upkeep schedules among others things related directly such vehicles too!
Regular Checking of the Hydraulic Fluid Levels
To ensure hydraulic systems work well and last long, checking the hydraulic fluid levels regularly is important. The following are some important points and technical parameters as obtained from leading sources:- Fluid Type: Use manufacturer-recommended hydraulic fluid. Different systems may require different types (e.g., mineral-based or biodegradable fluids) for best performance.
- Temperature Considerations: Hydraulic fluid must be checked at a specific operating temperature typically around 130°F (54°C). When heated, the fluid expands, therefore it is critical to measure levels when the fluid is at its operating temperature.
- Fluid Level Indicators: Many hydraulic systems come with sight glasses/level indicators. Ensure that the gauge shows the liquid level within minimum and maximum marks since running on low may lead to pump cavitation and damage.
- Contamination Check: During regular checks, inspect for contaminants in the liquid, such as dirt, water, or too many air bubbles. Contaminated fluids can affect how well a system performs, causing premature wear.
- Scheduled Checks: Create a schedule for checking levels of fluids, ideally before and after an operation or according to what’s stated in the equipment manual. Depending on usage weekly or monthly might be needed
- Documentation: Keep record of checks done including dates, readings taken as well any maintenance carried out. This helps track health status over time
How to Lubricate Moving Parts for Optimal Performance
- Select the Right Lubricant: Choosing the right lubricant is vital. The machinery type, working temperature and environmental factors should be considered. Normally, oils (either mineral or synthetic), greases and dry lubricants are available. Always consult manufacturer’s specifications to know which type of lubricant they recommend.
- Clean the Parts: Before applying any form of lubrication, it’s important that you clean moving parts thoroughly so as to get rid of old grease dirt or other impurities that may interfere with its effectiveness. Use an appropriate solvent/cleaning agent and ensure all surfaces have dried completely before applying any kind of lube.
- Use an Appropriate Amount: Using too little oil can cause wear and tear as well as overheating while using more than necessary leads to contamination due to excessive build up. Thus, follow what has been provided by manufacturers about how much should be applied generally speaking – a thin film suffices for most applications, although bearings might need thick coats instead
- Use Proper Application Tools: Depending on what kind of lubricant it is, it will determine which tool(s) are used, such as brushes, grease guns, spray applicators, among others. This ensures even distribution preventing over-application
- Lubrication Frequency: Establish a lubrication schedule based on equipment usage and manufacturer recommendations. Common intervals include daily weekly monthly checks. More frequent lubrication may be needed for high use machinery
- Monitor Temperature Viscosity: Be mindful about operating temperatures where equipment works at Because if not checked these could lead to thinning out thus reducing their effectiveness Check viscosity ratings against what has been suggested according to different operating conditions
- Inspect for Contamination: Regularly check lubricated parts looking out signs indicating they’re contaminated degraded or otherwise faulty Address issues immediately in order maintain system efficiency.
- Document Lubrication Activities: Keep records documenting tasks performed during each instance including dates types used observations made over time This documentation helps track maintenance schedules allowing adjustments based on performance trends
Importance of Routine Hydraulic System Inspections
The importance of routine inspections for hydraulic systems cannot be overstated. Such checks are vital for efficiency, safety and longevity of equipment. Below are some of the primary reasons why these inspections should take place: 1. Early Detection of Wear and Tear: Regular checks allow for early detection of wear in components such as seals, hoses and pumps which may otherwise lead to catastrophic failures. 2. Preventive Maintenance: Consistent inspection schedules allow for proactive maintenance, reducing unplanned downtime and expensive repairs. 3. Fluid Quality Assurance: Hydraulic fluid condition checks include viscosity measurement, contamination levels assessment and fluid degradation evaluation to ensure that the system operates optimally. Important benchmarks include:- Viscosity – Must align with manufacturer’s specifications concerning operating temperature
- Contamination Levels – Should not surpass critical thresholds that can cause damage to the system
Frequently Asked Questions (FAQs)
dump trailer hydraulic pump repair